SmartSign
Send PDFs out for signature from any Monday.com item. Signers get a secure emailed link, verify who they are, and sign — and the finished document comes straight back to your board.
Before You Start
Two board columns do the work. Create them ahead of time, or let SmartSign create them for you from the + Create new column… option in any of its dropdowns.
| Column | Required | What it is for |
|---|---|---|
| File | Yes | Where the signed PDFs are delivered |
| Recommended | Read a signer’s address off the item instead of typing it each time | |
| Status | Optional | Tracks the request automatically: Sent → Viewed → Signed → Completed / Declined |
The status labels are written with create labels if missing, so you do not need to set them up by hand — and they are stable enough to build board automations on.
SmartSign lives on the item view, not the board view. Add it once from Add view → Apps → SmartSign and it is available on every item of that board.
The Two Tabs
| Tab | What it holds |
|---|---|
| New request | The three-step builder for the request you are about to send |
| Track signatures | Every request already sent from this item, with live signer status and the signed files |
One request per item at a time. While a request is out, the first tab shows “A request is out for signature” with a Track it button instead of the builder. Start the next one once this is signed or cancelled.
Building a Signing Request
The builder is a three-step wizard. Everything autosaves as you go, so you can leave and come back — the draft is waiting.
| Step | What you do |
|---|---|
| 1 · Documents | Add the PDFs, in the order signers work through them |
| 2 · Map fields | Place the boxes — item data that fills itself, and boxes each signer completes |
| 3 · Signers & sending | Say who signs, what the email says, and where the signed file goes |
Step 3 does not unlock until step 2 is clean. A pill beside the footer button always tells you what is holding you up — for example “Step 2: Please add Client signature field”.
Step 1 — Documents
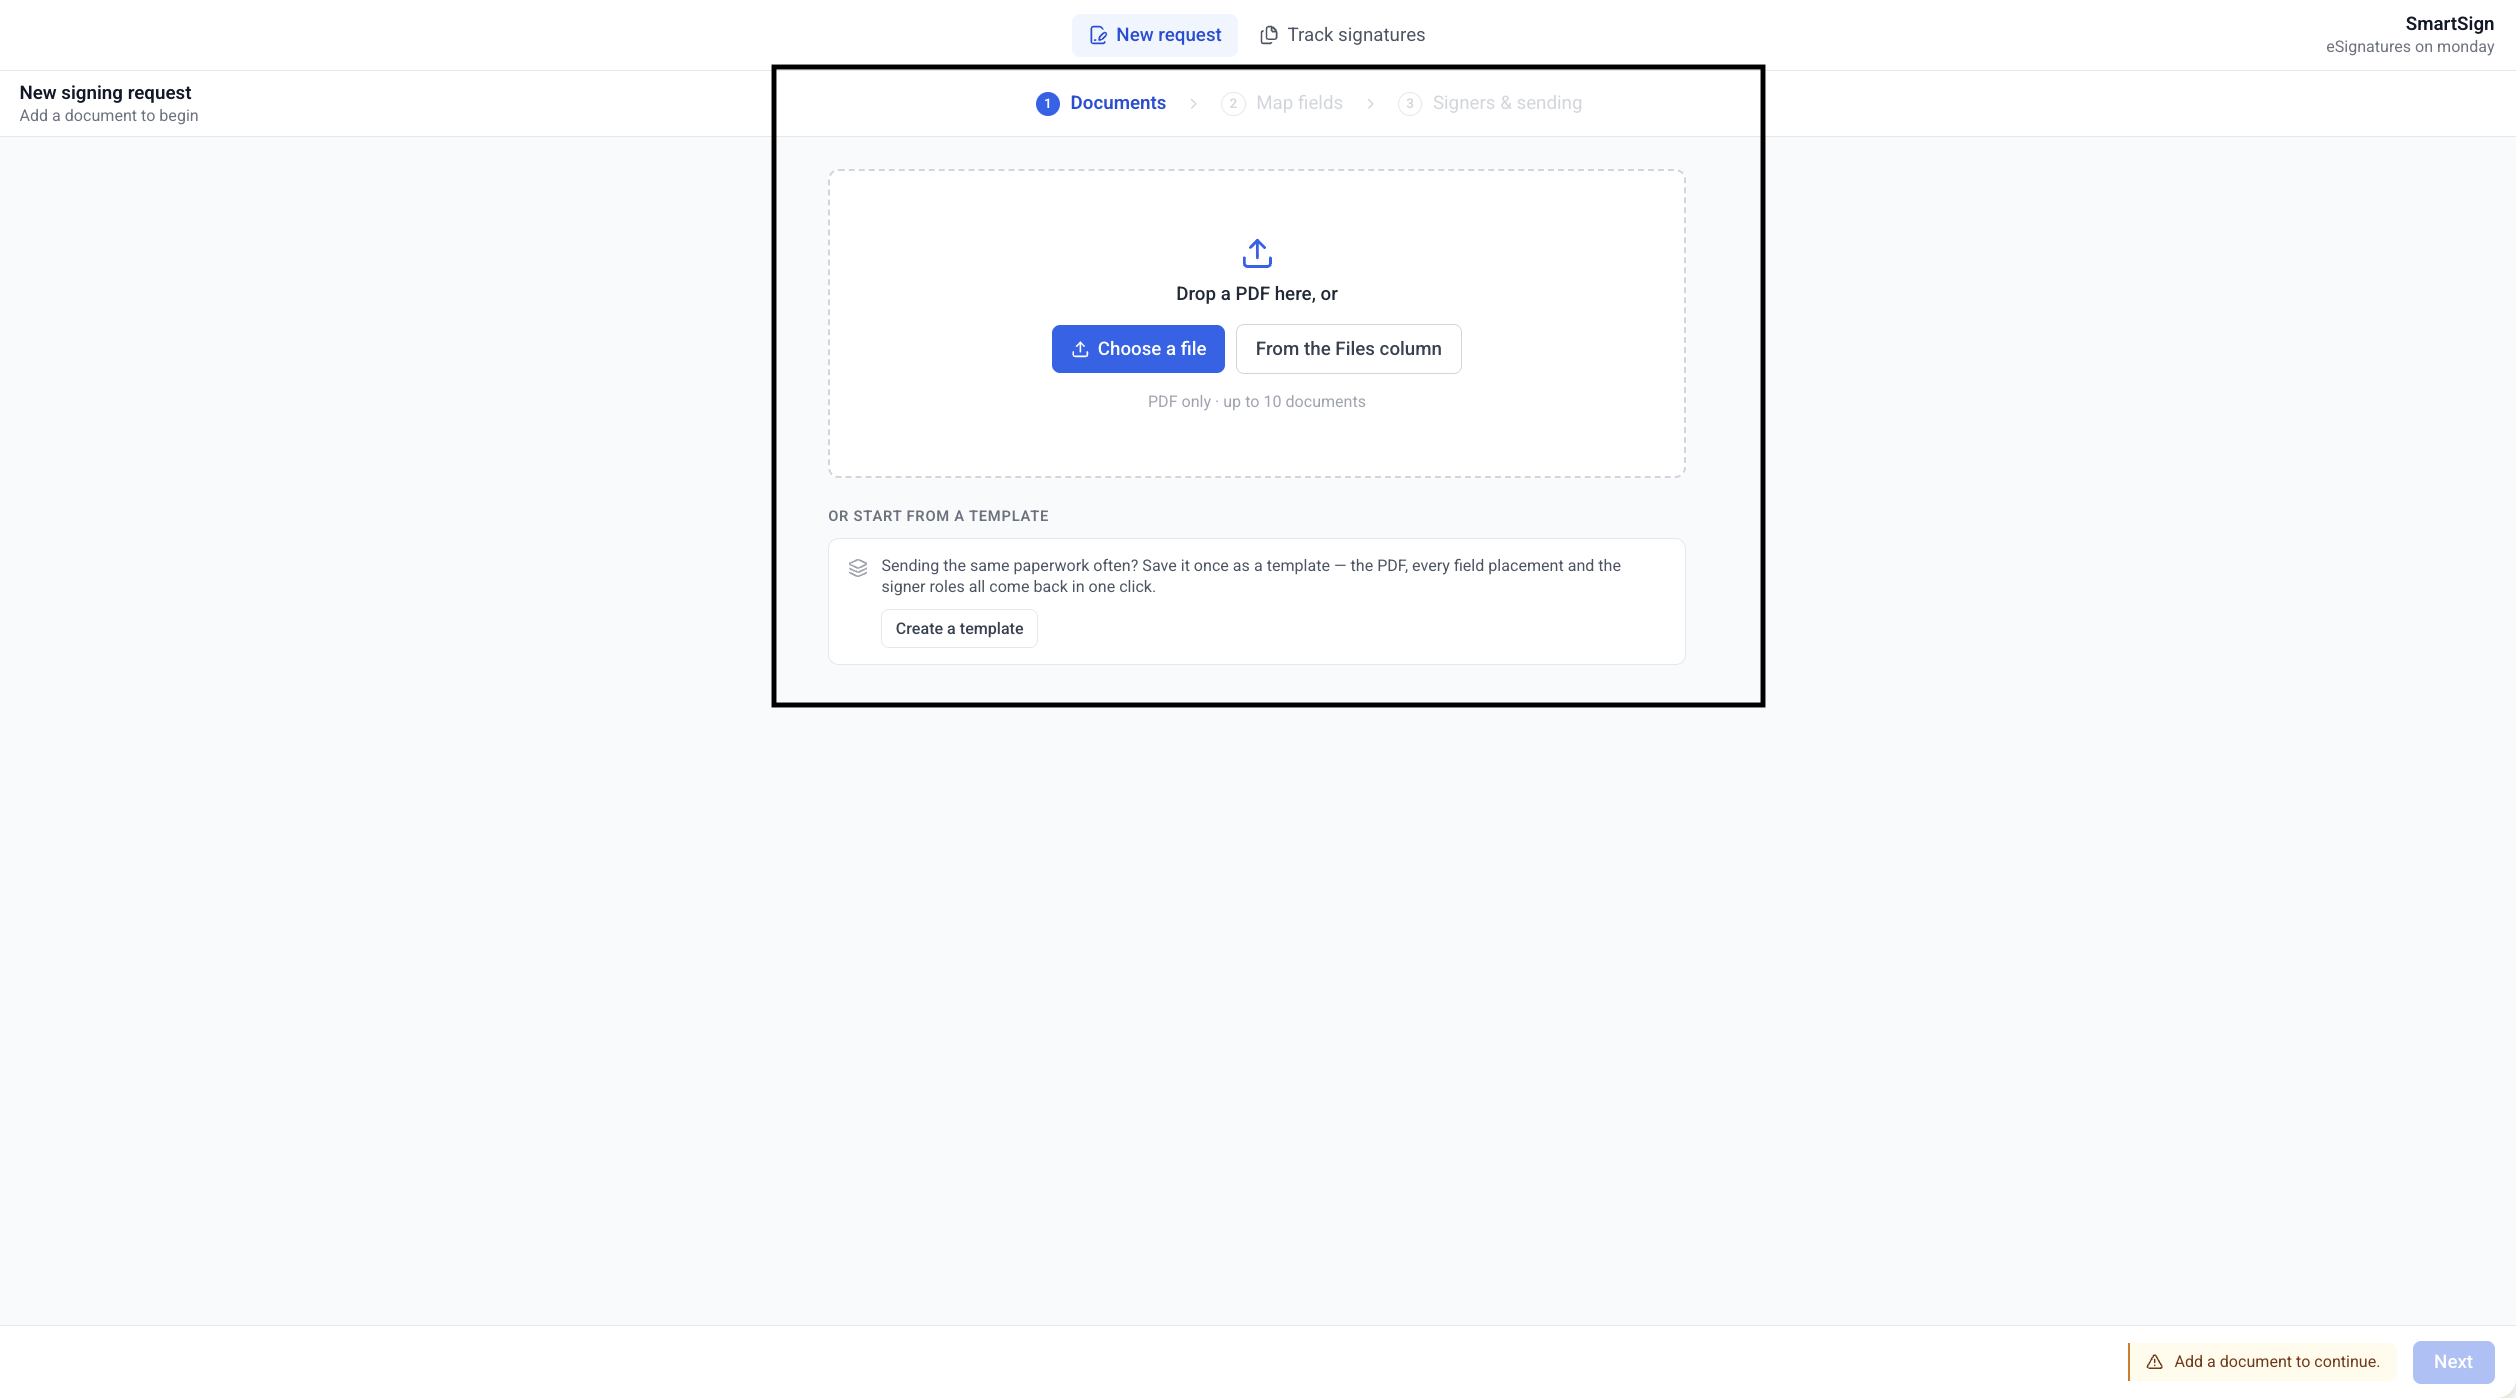
Add Your PDFs
Drop files onto the dropzone, click Choose a file, or pull a PDF that is already on the item with From the Files column. You can also start from a saved template — see Templates below.
Name Them
Each row has an editable name. This is the name signers see, and the name the finished file is saved under.
Put Them in Order
Drag the handle on the right of a row to reorder. The number down the left is the order signers walk through the documents.
Once you have at least one document, the dropzone is replaced by an Add document menu:
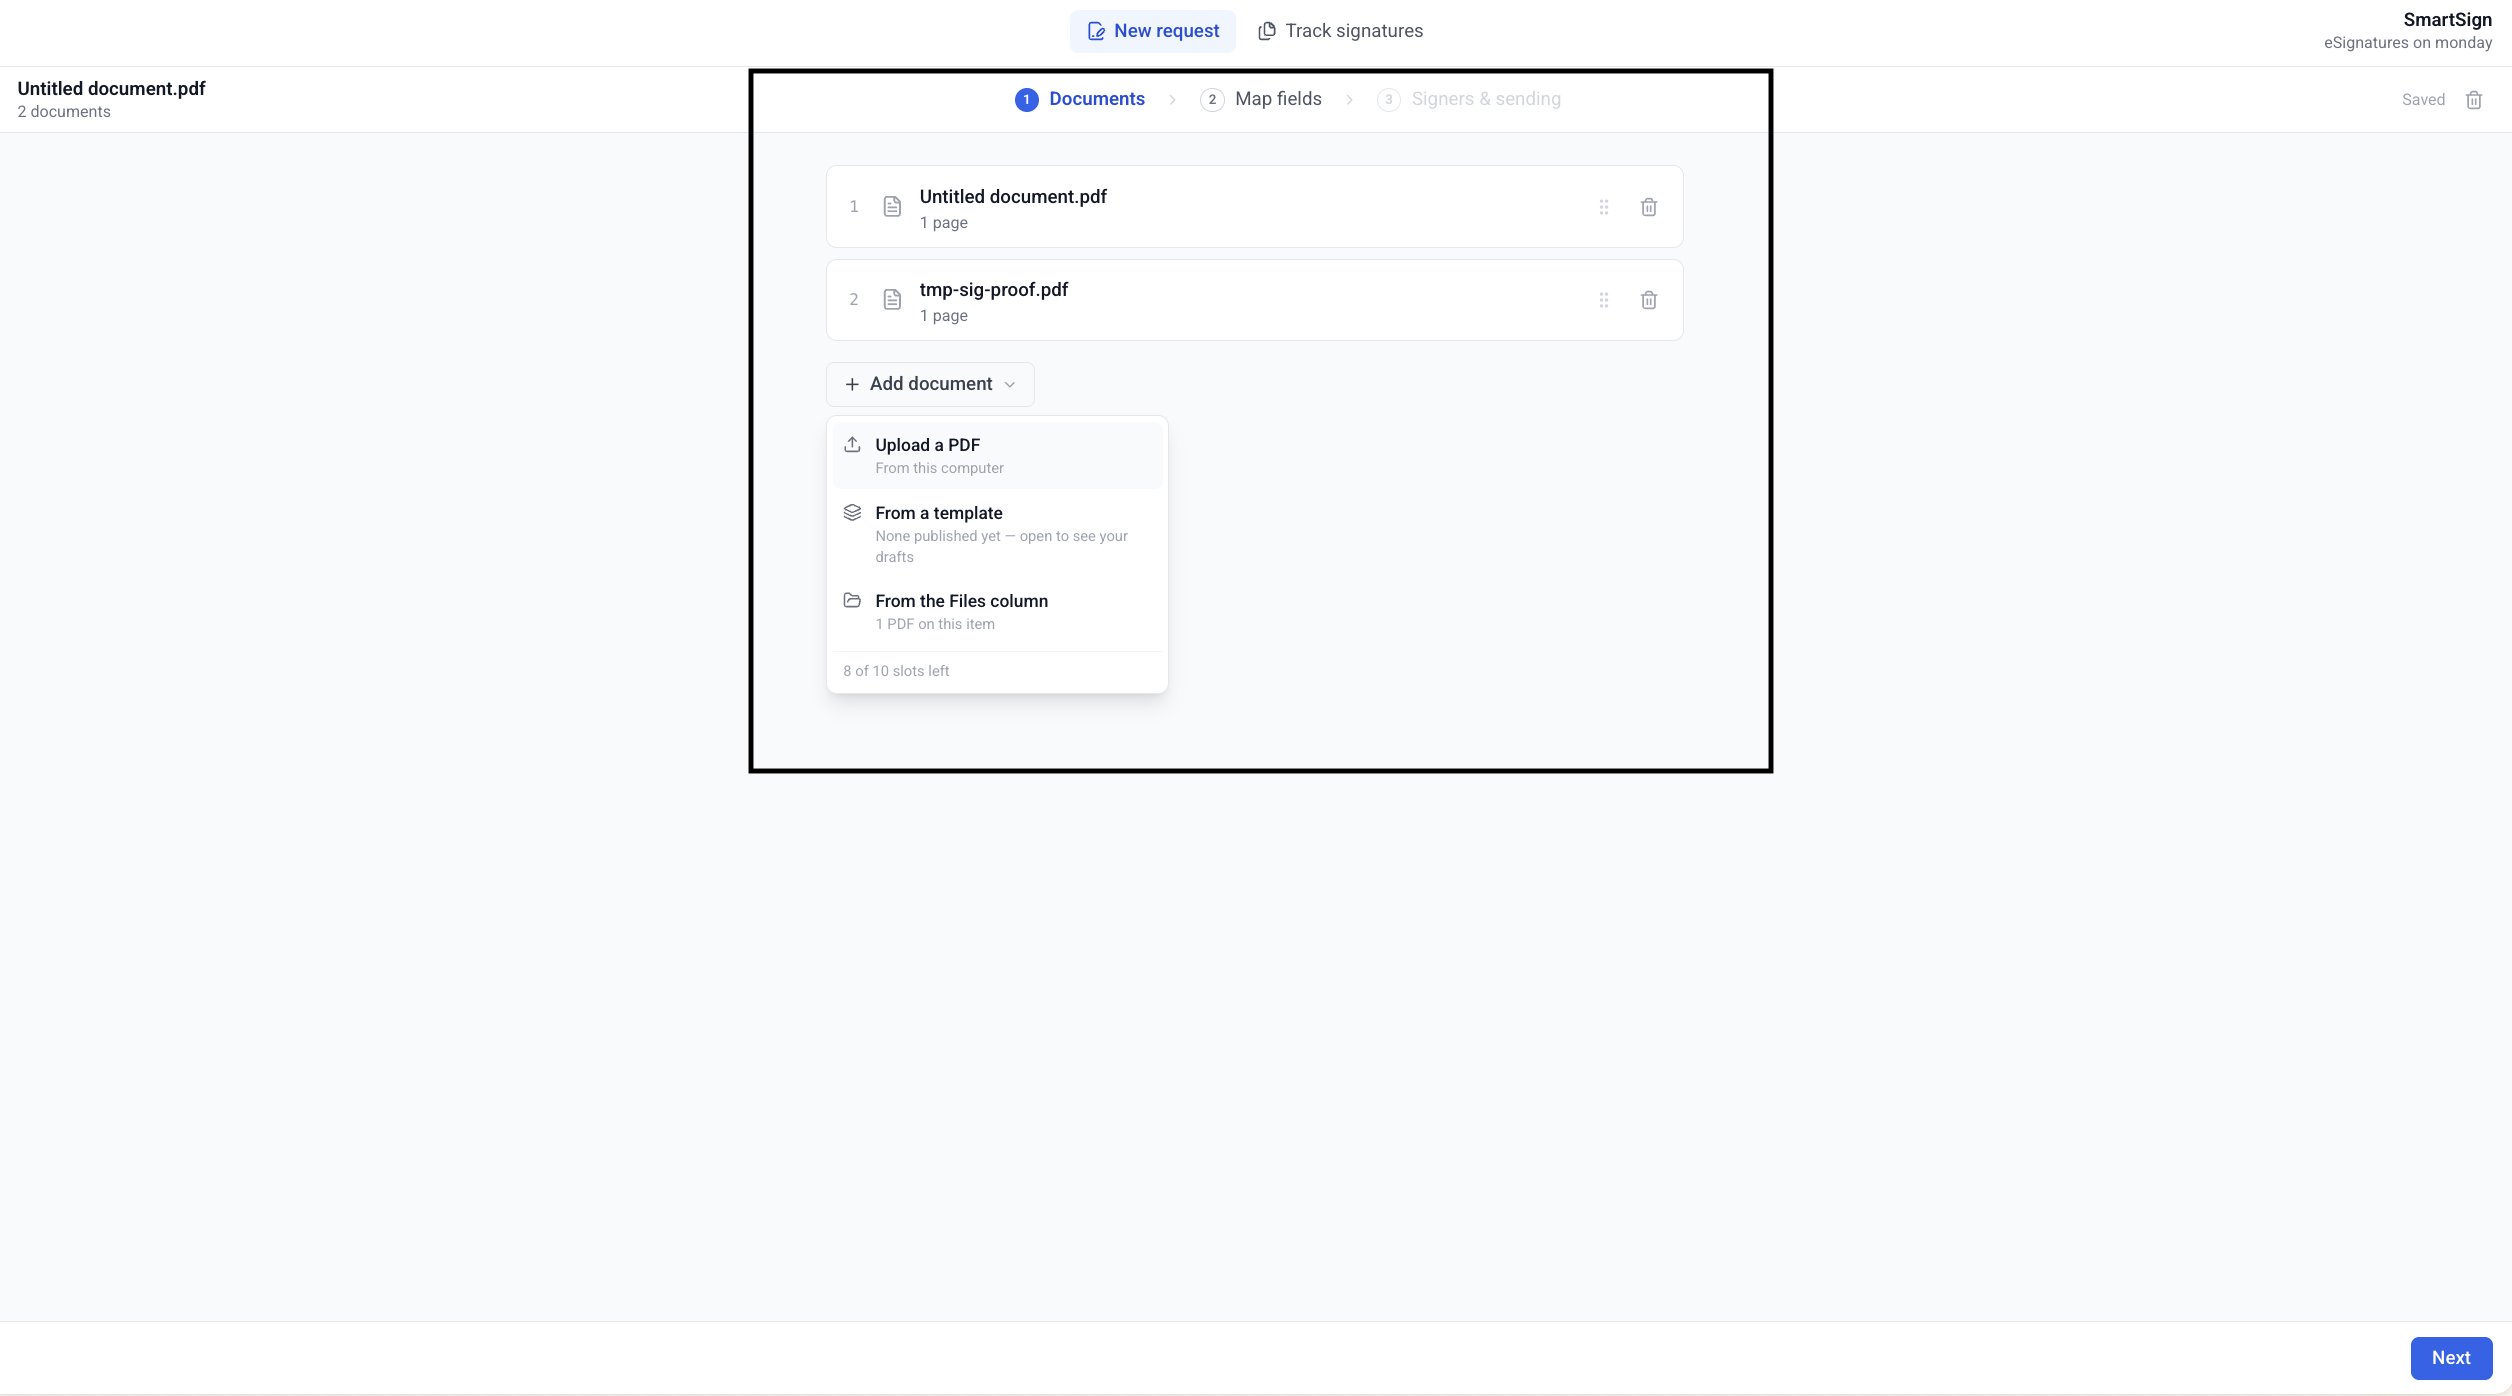
| Menu option | Where the PDF comes from |
|---|---|
| Upload a PDF | Your computer |
| From a template | A published template on this board — copies its documents, field placements and roles |
| From the Files column | A PDF already attached to this item. Copied once; later changes to the board file do not follow |
PDF only, 10 MB per document, up to 10 documents. Password-protected PDFs are rejected at upload.
Step 2 — Map Fields
This is where you decide what goes where on the page. The screen has four panes.
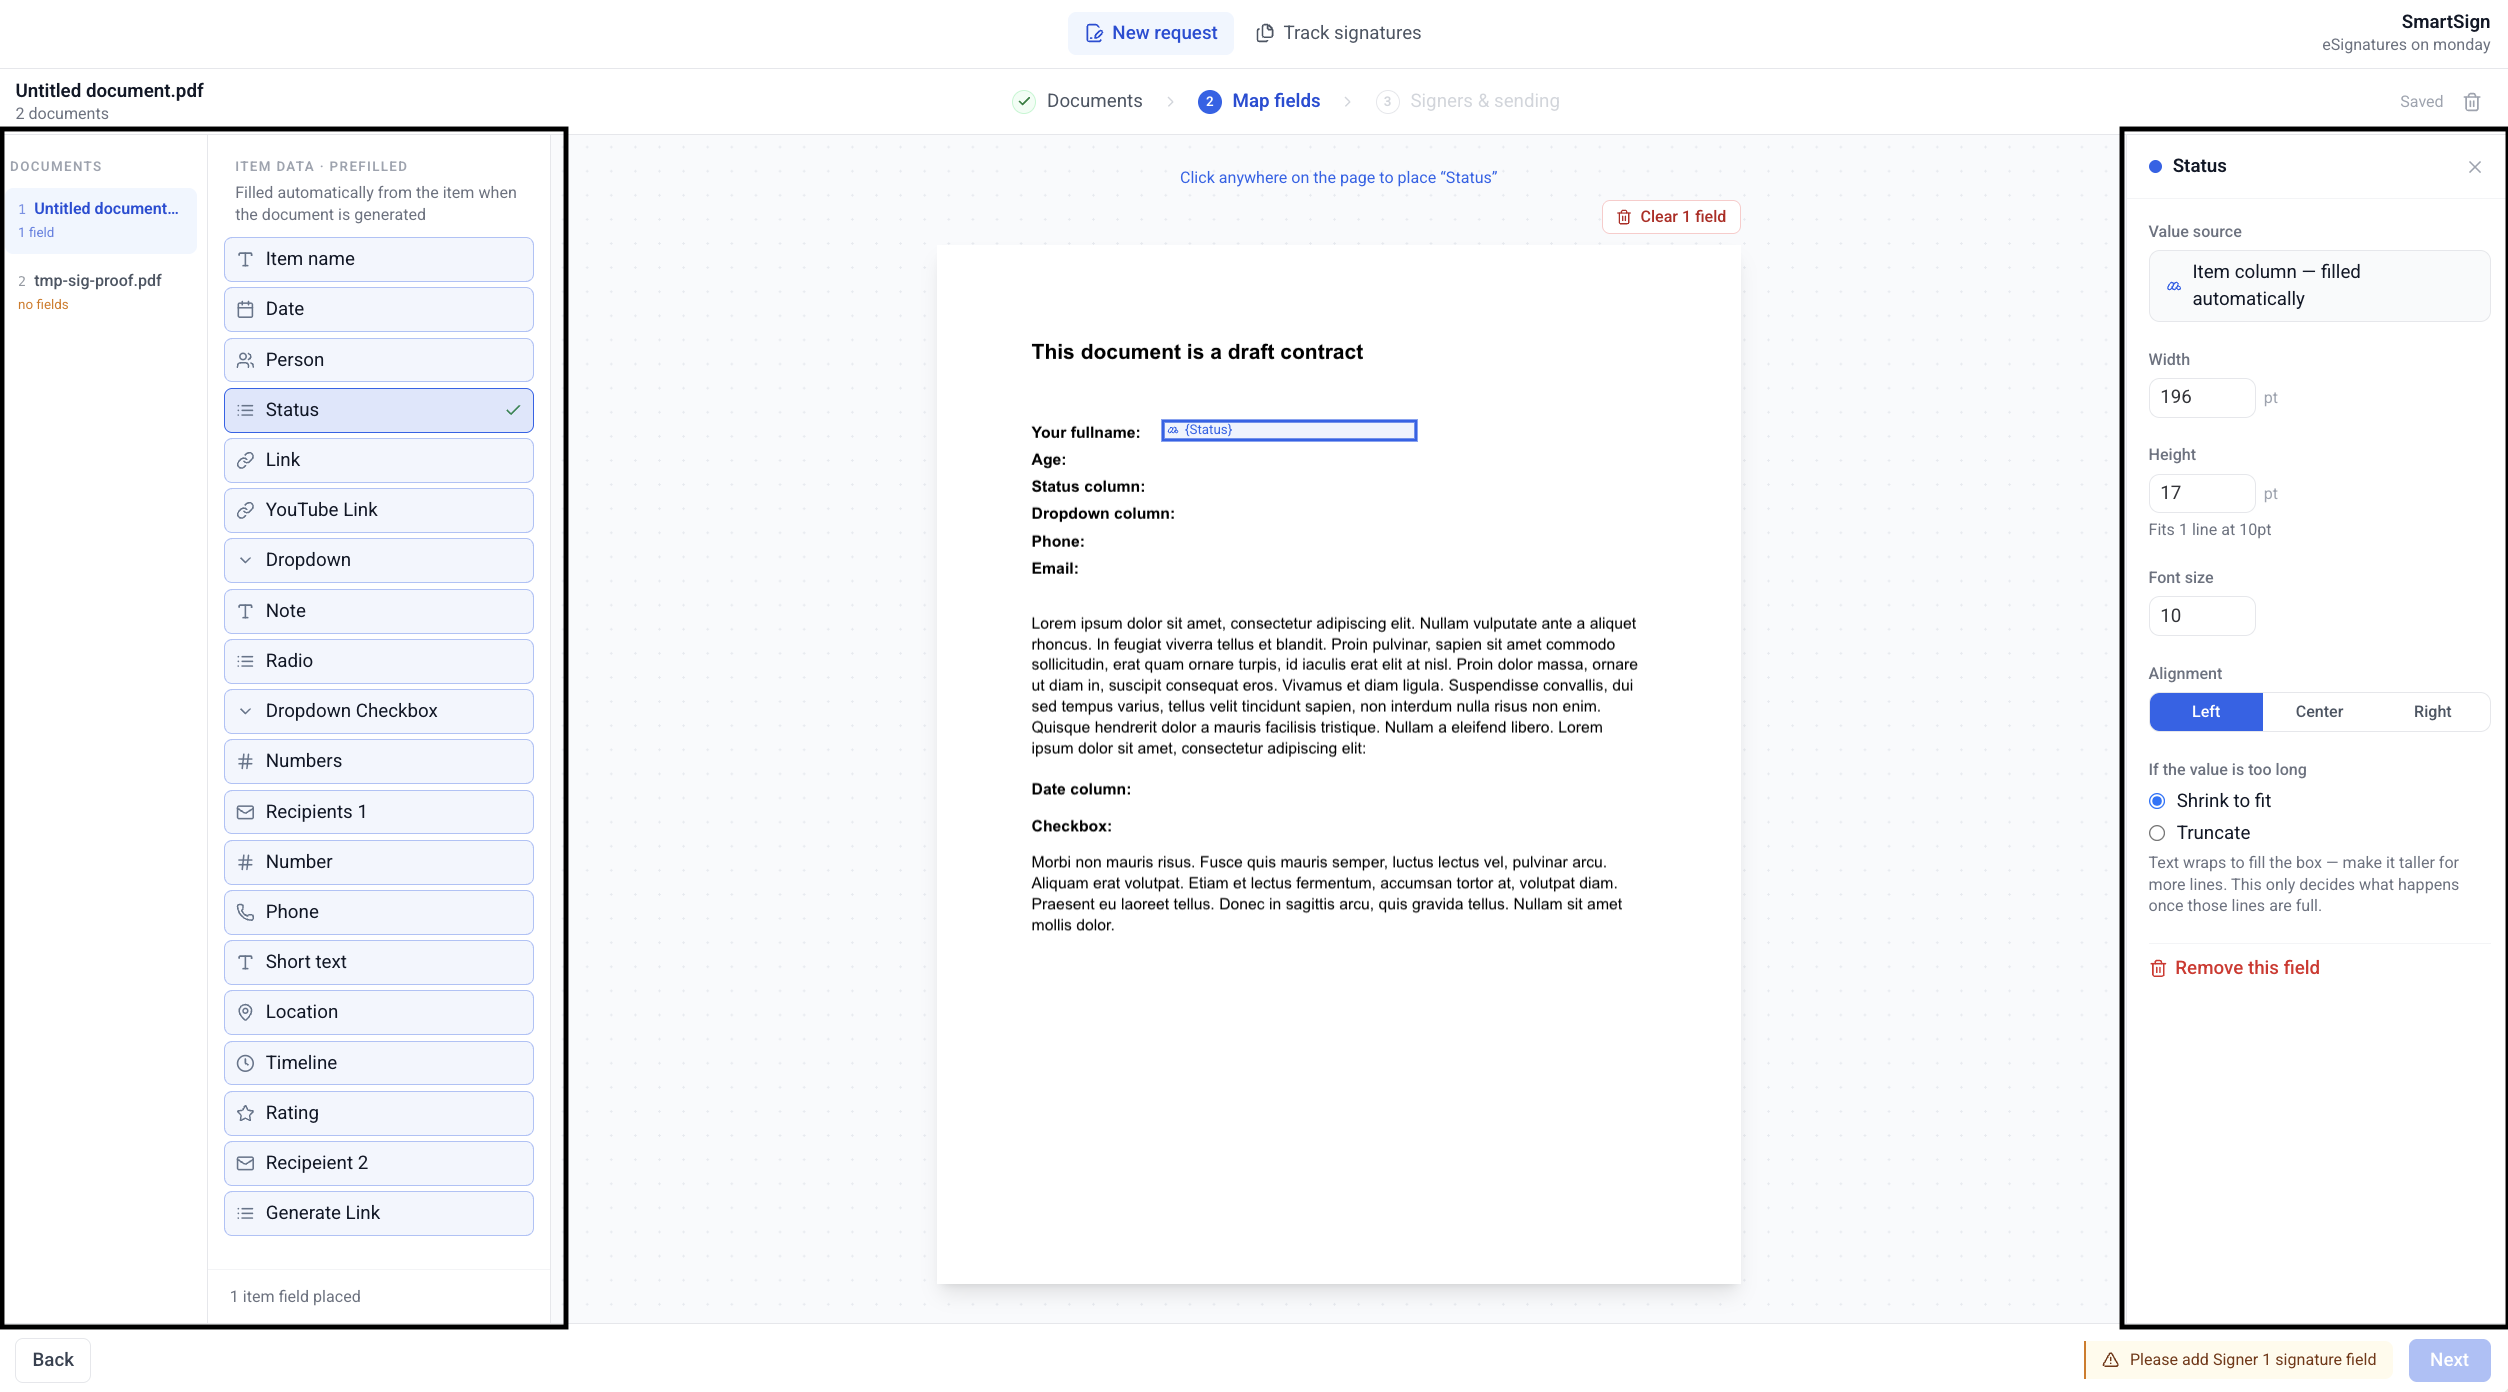
| Pane | Purpose |
|---|---|
| Documents rail | Switch between the PDFs. A row reading no fields in amber has nothing placed on it yet |
| Field palette | The boxes you can place, in two groups |
| Canvas | The page itself. Drag boxes to move, drag the corner handle to resize |
| Properties panel | Settings for whichever box is selected |
Two Kinds of Field
The group you drag from decides where the value comes from — and how the box looks on the page.
| Palette group | Value source | Look on the page |
|---|---|---|
| Item data · prefilled | The item’s value on the board, stamped in when the request is sent | Blue, solid border |
| Signer fields · filled at signing | Empty when sent — the signer completes it | Dashed, one colour per signer |
Signer colours run teal, purple, amber, pink, green — the same colour appears on the palette chip, the signer’s row, the drag ghost and the placed box, so you can always see at a glance who fills what.
Placing a Field
Pick the Signer First
Click a signer in the roster so they are the active one. Every signer box you place next belongs to them.
Drag, or Click Twice
Drag a chip onto the page — or click the chip, then click the spot. A blue banner confirms the armed field: “Click anywhere on the page to place “Signature””.
Nudge It Into Place
Drag the box to move it. Drag the small handle at its bottom-right corner to resize — resizing snaps to a 1% grid. Fine-tune the exact size in points in the right panel.
Move Between Pages
Use the Page 2 of 5 control below the page. One board column can be placed on as many pages and documents as you like.
The Signer Fields
| Chip | What the signer does | Notes |
|---|---|---|
| Signature | Draws or types their signature | Always required. Height follows width so the pad keeps its proportions |
| Date signed (auto) | Nothing — it stamps itself | The date that signer finishes, as YYYY-MM-DD |
| Date | Picks a date | |
| Text field | Types free text, up to 500 characters | Give it a Label shown to the signer, e.g. Job title |
| Checkbox | Ticks a box | Stays square on the page |
The Signer Roster
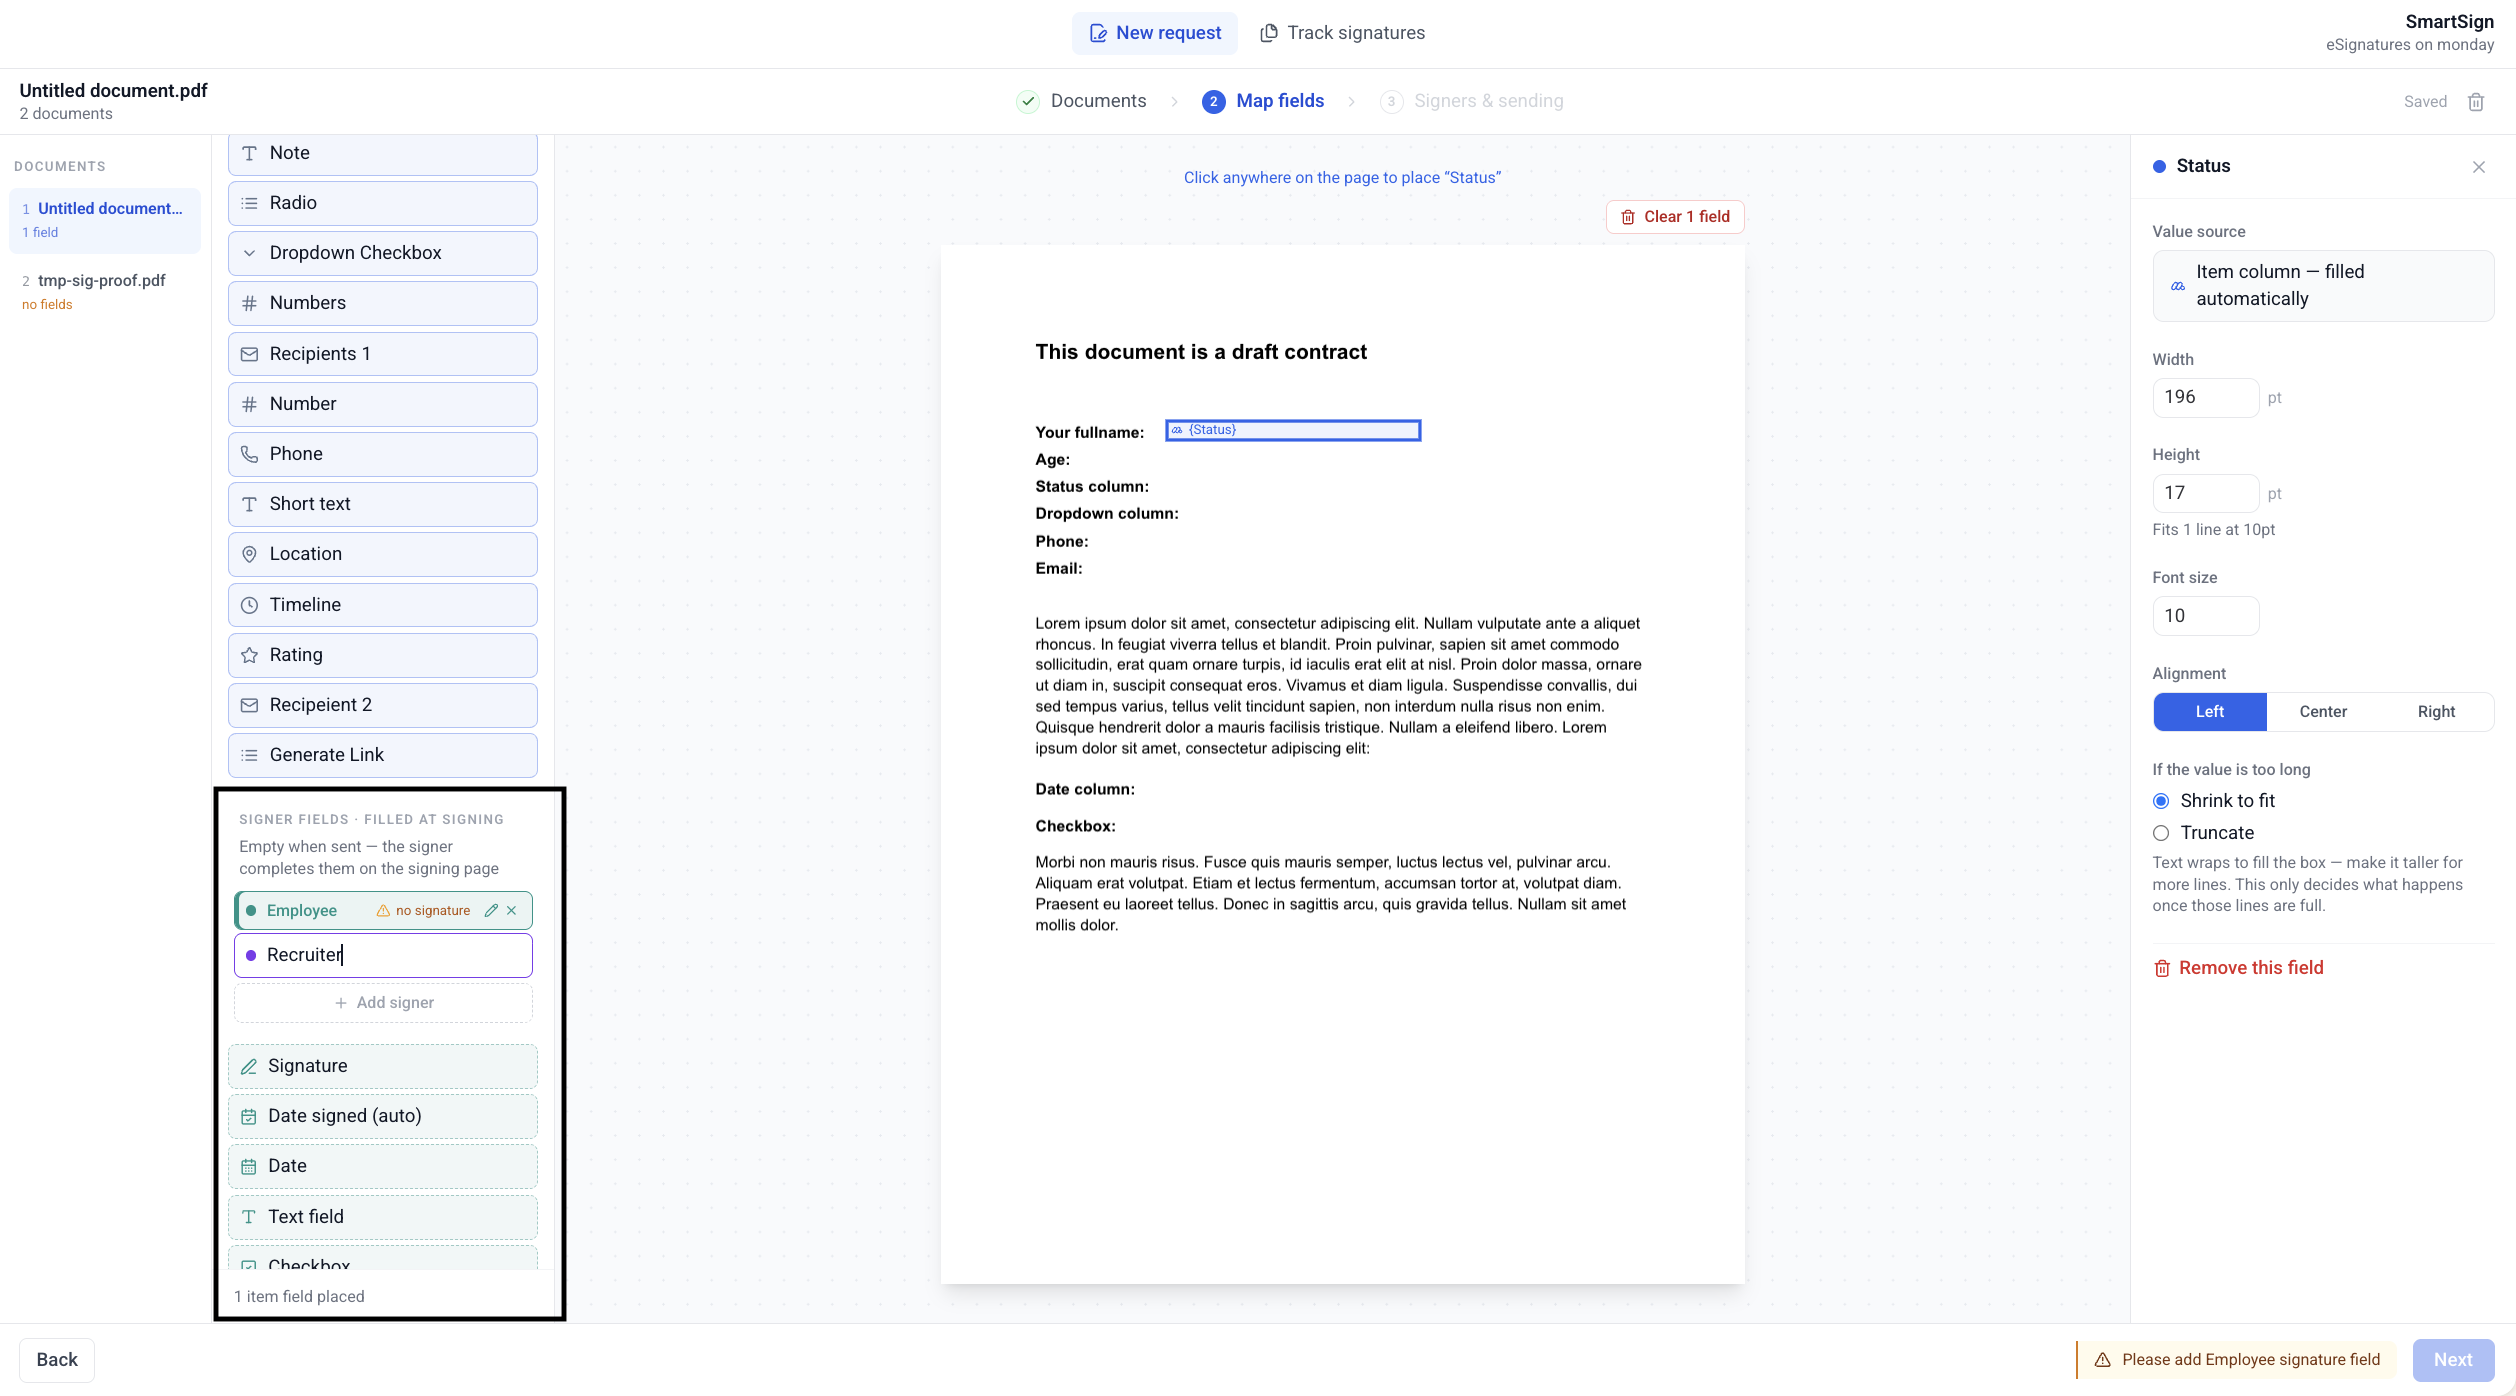
| Action | How |
|---|---|
| Add a signer | Click Add signer. New signers are named Signer 1, Signer 2, … Up to 5 |
| Rename | Click the pencil, or click the label of the row you are already on. Enter saves, Escape cancels |
| Remove | Click the ×. If they have fields placed, you are asked first |
| Switch active signer | Click their row |
A signer with no signature field anywhere shows an amber no signature marker and blocks sending. Field count is useful; a missing signature is the only one of the two that stops you.
Field Settings
Click any placed box to open its settings on the right.
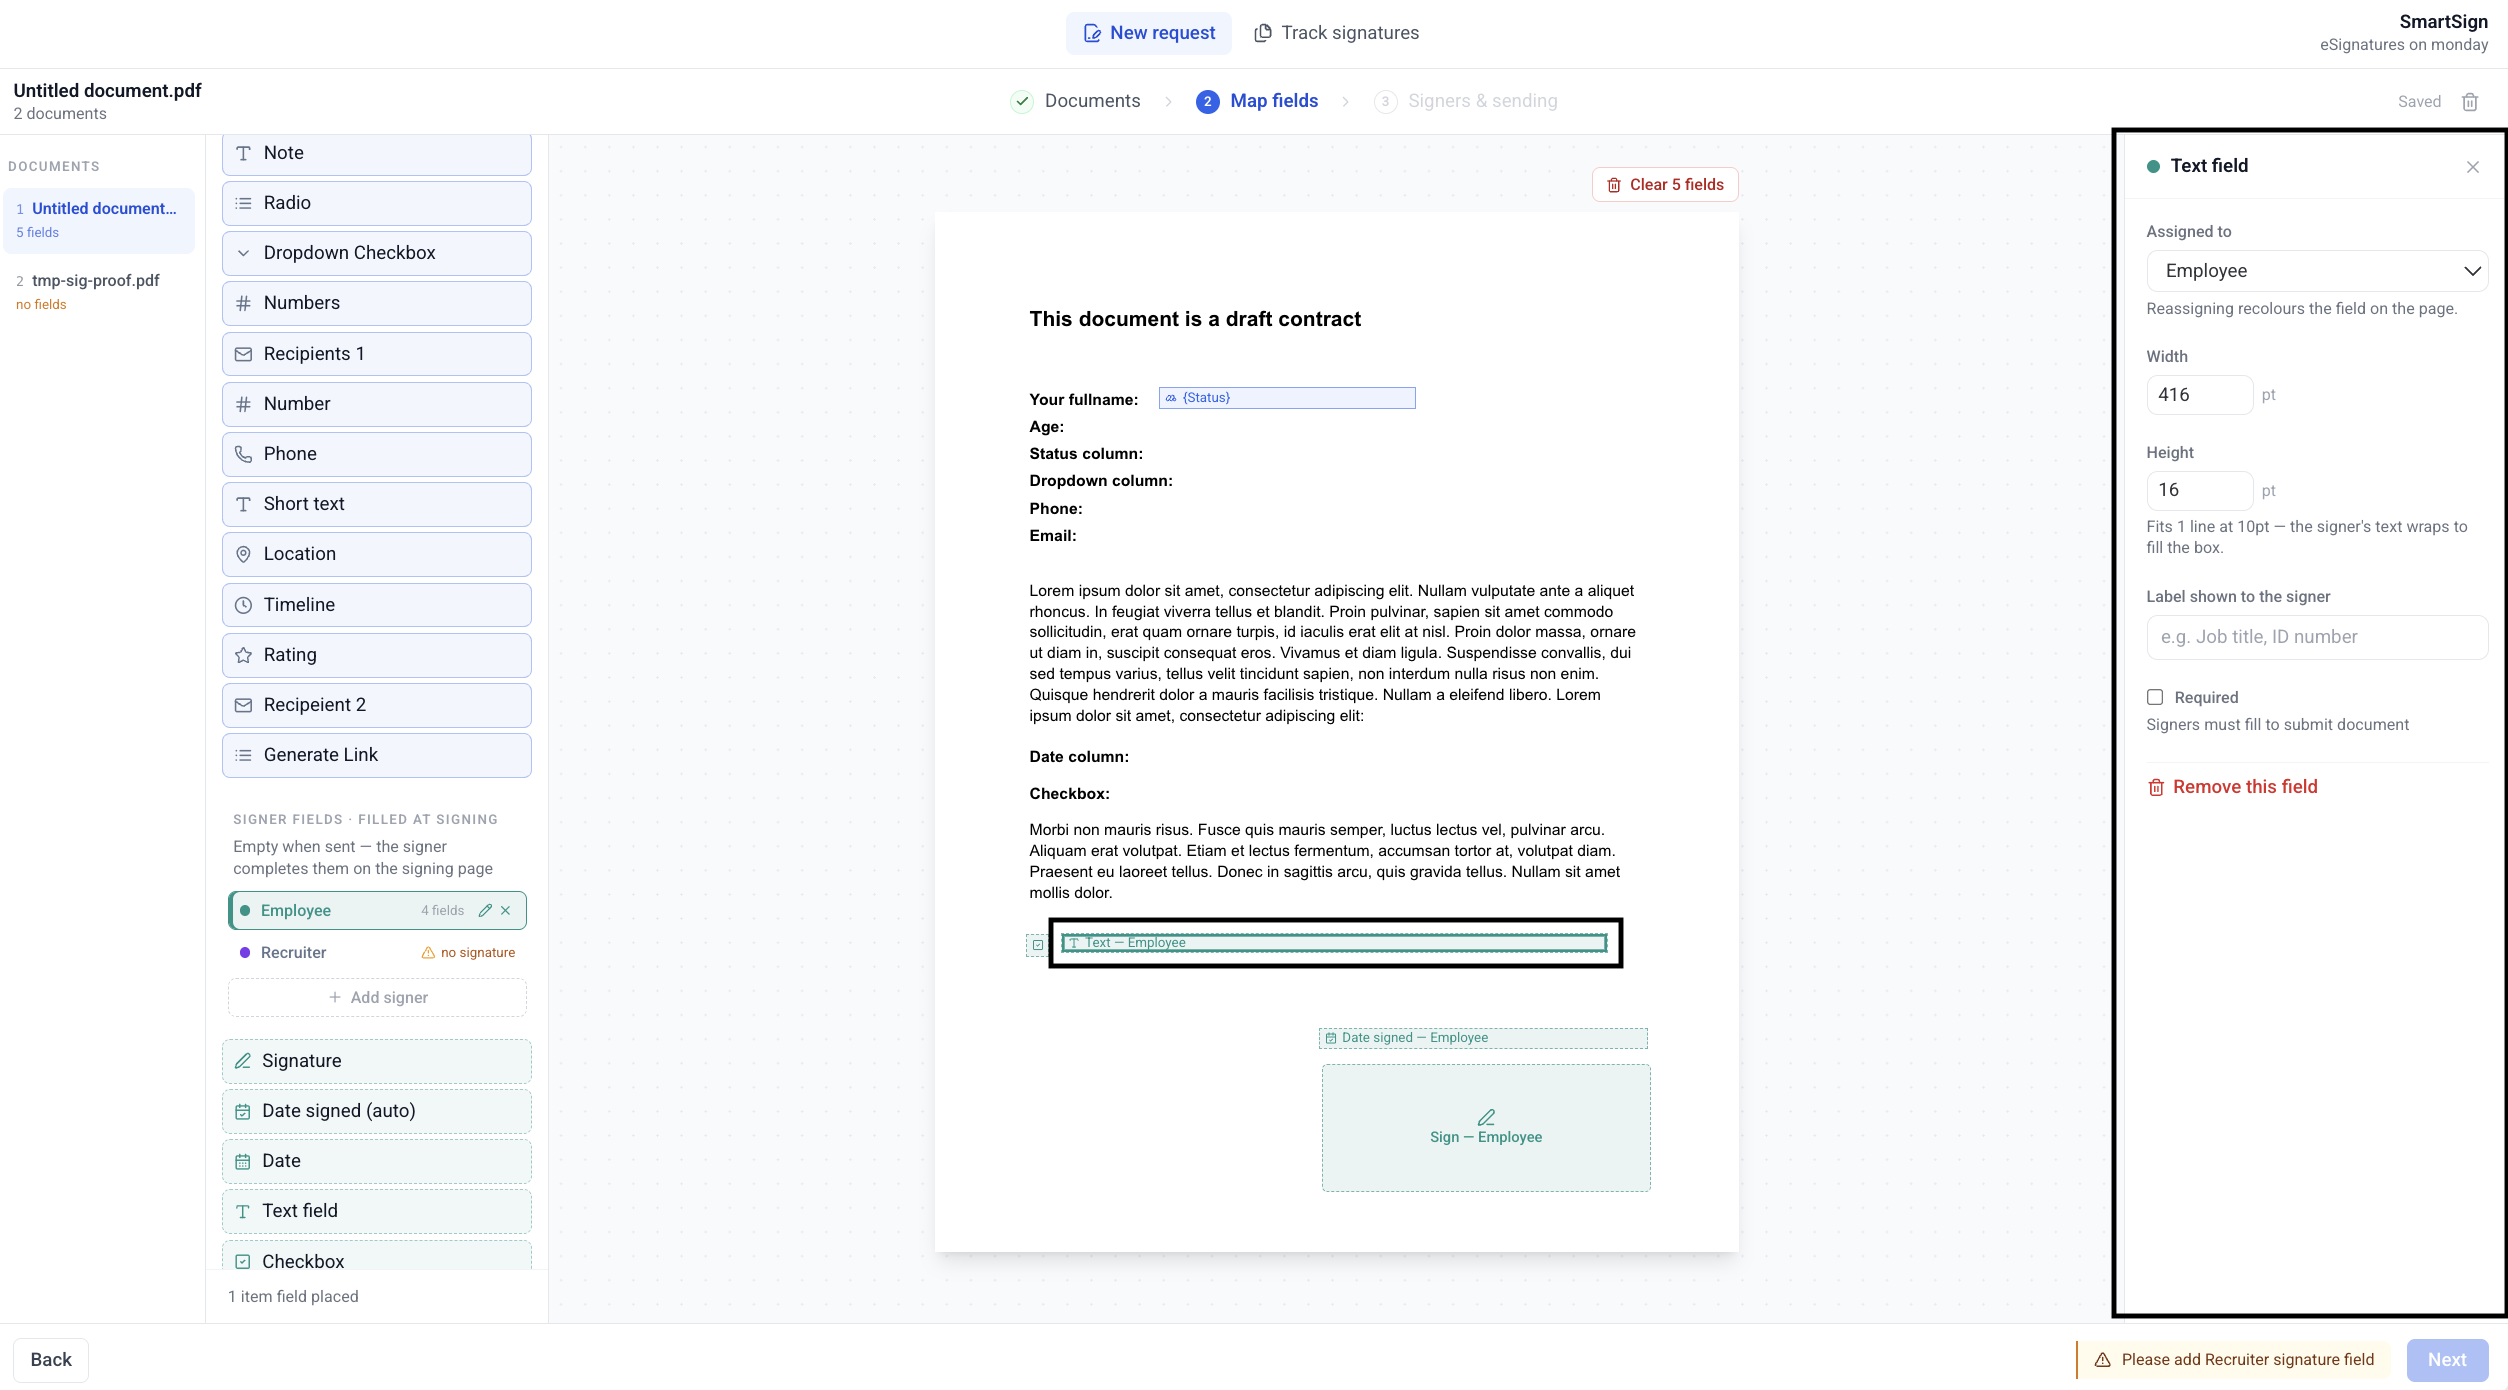
| Setting | Applies to | Description |
|---|---|---|
| Value source | Item data | Read-only — decided by the palette group you dragged from |
| Assigned to | Signer fields | Move the field to another signer. It recolours on the page |
| Width / Height | All | In PDF points. The hint tells you how many lines fit, e.g. Fits 3 lines at 10pt. Height is locked for Signature and Checkbox, which keep their shape |
| Font size | Item data | Between 4 and 72 pt |
| Alignment | Item data | Left, Center or Right |
| If the value is too long | Item data | Shrink to fit or Truncate. Text always wraps first — this only decides what happens once the lines are full |
| Label shown to the signer | Text field | Up to 80 characters, e.g. Job title, ID number |
| Required | Signer fields | On by default. Locked on for Signature; hidden for Date signed |
Clear N fields above the page removes every box on the document you are looking at — both signer and item boxes, across all its pages. It never touches your other documents.
If a board column is deleted after you placed it, its boxes turn red and a banner appears: “2 placements reference a board column that was deleted (page 1, 3). Nothing will be filled in there — remove them before activating.” This blocks sending until you remove them.
Step 3 — Signers & Sending
Five cards, top to bottom.
Signers
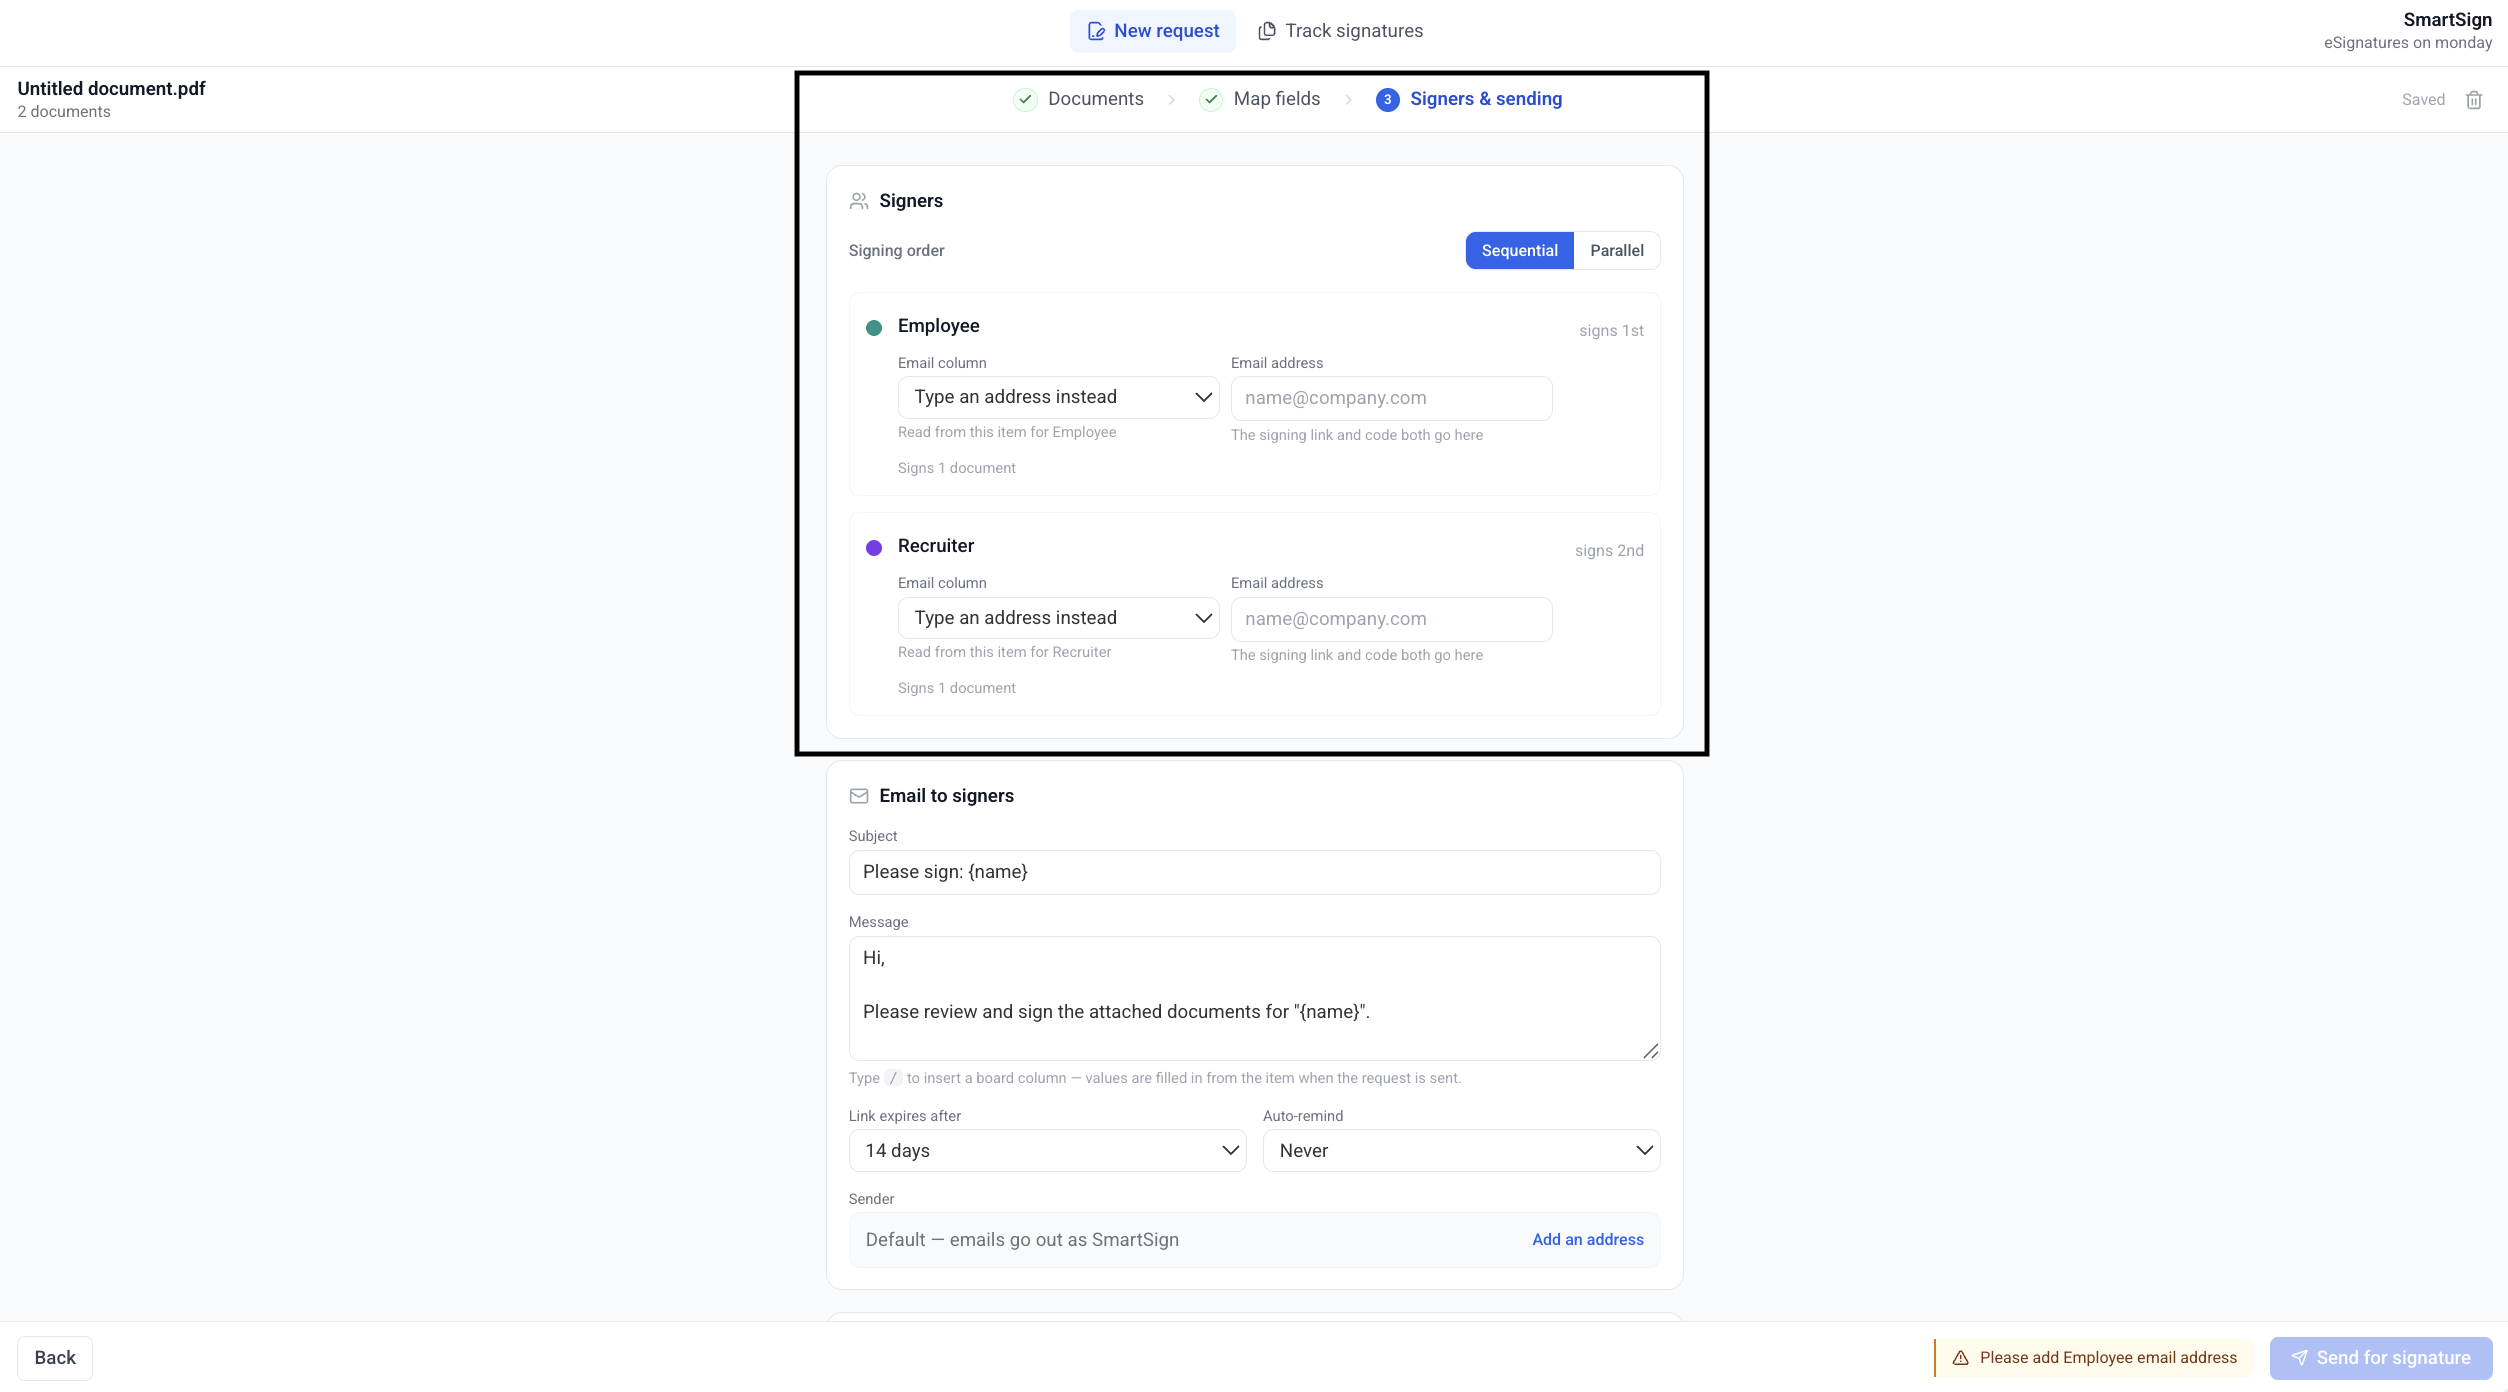
| Setting | Description |
|---|---|
| Signing order | Sequential (default) — one at a time, in order; each signer is invited when the one before them finishes. Parallel — everyone invited at once |
| Email column | Read the address off this item. Pick Type an address instead to enter one by hand |
| Email address | Where the signing link and the one-time code both go |
In Sequential mode each signer row carries a signs 1st, signs 2nd badge. In Parallel mode the badges disappear — that is the whole difference.
Choosing an email column resolves a real address off the current item straight away, so you can see what will actually be used. If the column is empty on this item you get a nudge: “That column is empty on this item — type the address instead.” The address stays editable either way.
Email to Signers
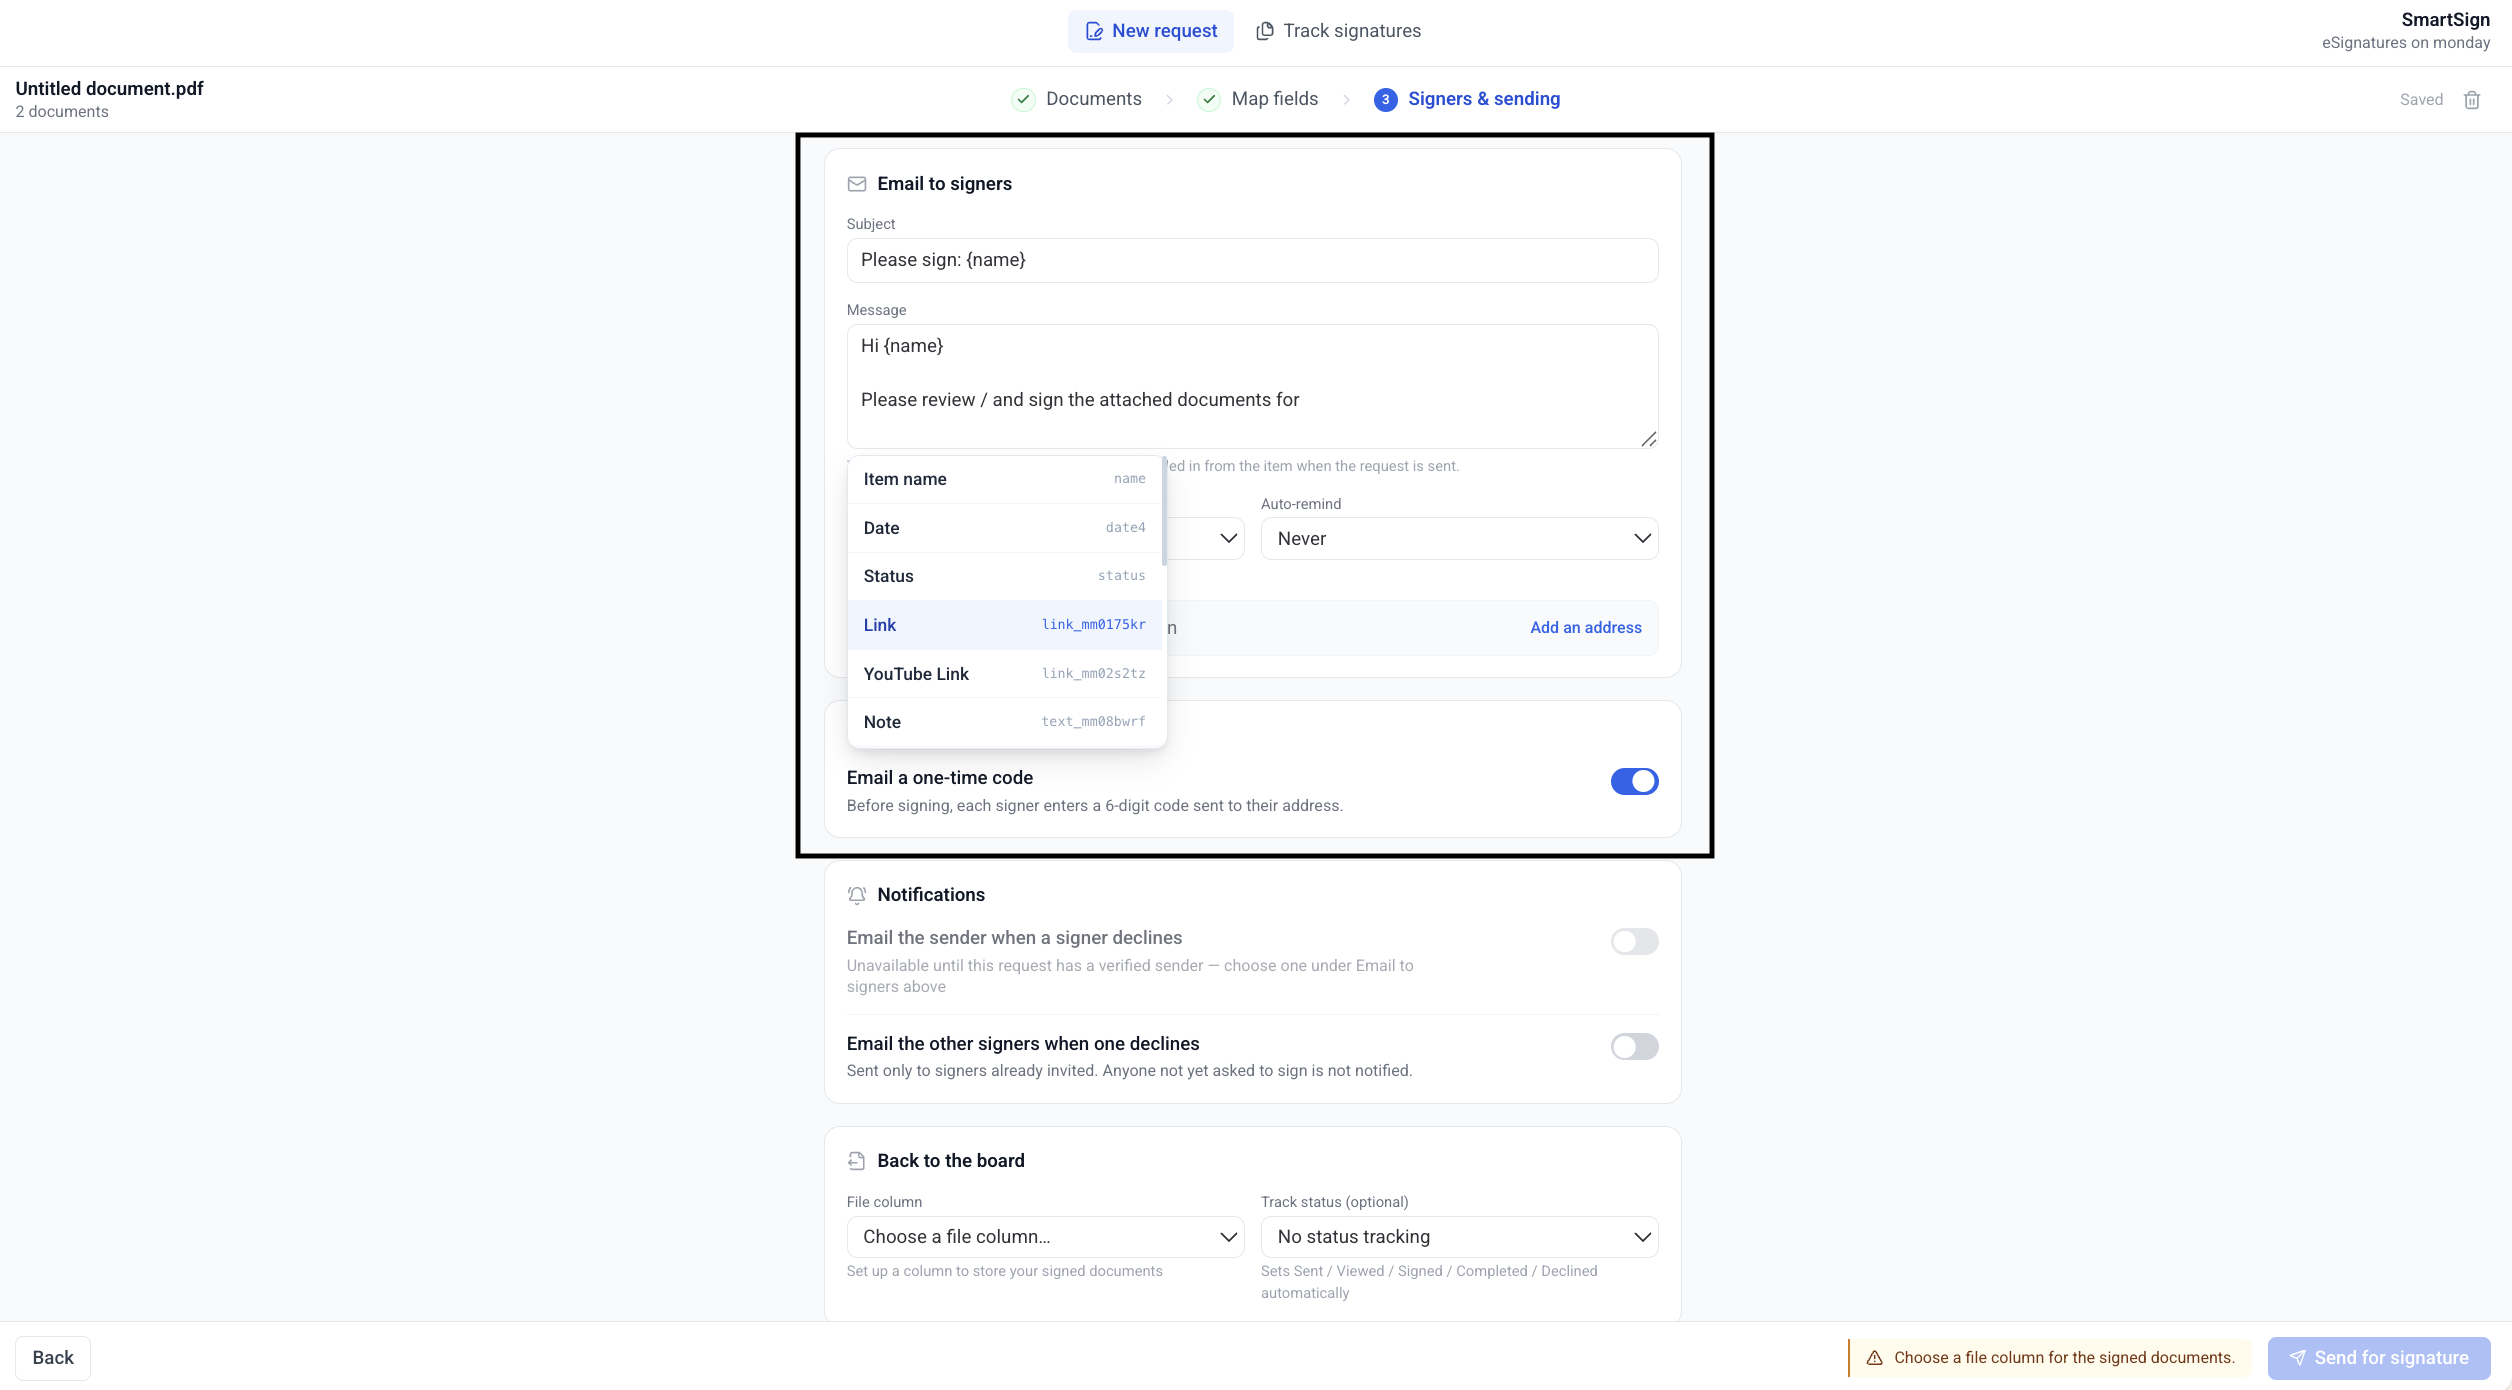
| Field | Description |
|---|---|
| Subject | The subject line signers see. Up to 200 characters |
| Message | The body of the invitation. Up to 5,000 characters |
| Link expires after | 7 days, 14 days (default) or 30 days |
| Auto-remind | Never (default), Every 3 days or Every 7 days |
| Sender | Which address the email appears to come from |
Type / in Subject or Message to insert a board column. The token is replaced with the item’s value when the request is sent — and frozen there, so a later board edit never rewrites an email that already went out.
A reminder is the original invitation sent again, word for word. The cadence is copied onto the request when you send it, so it cannot be changed out from under a request already in flight.
Sending From Your Own Address
By default emails go out as SmartSign. Add and verify your own address to have them appear to come from you instead.
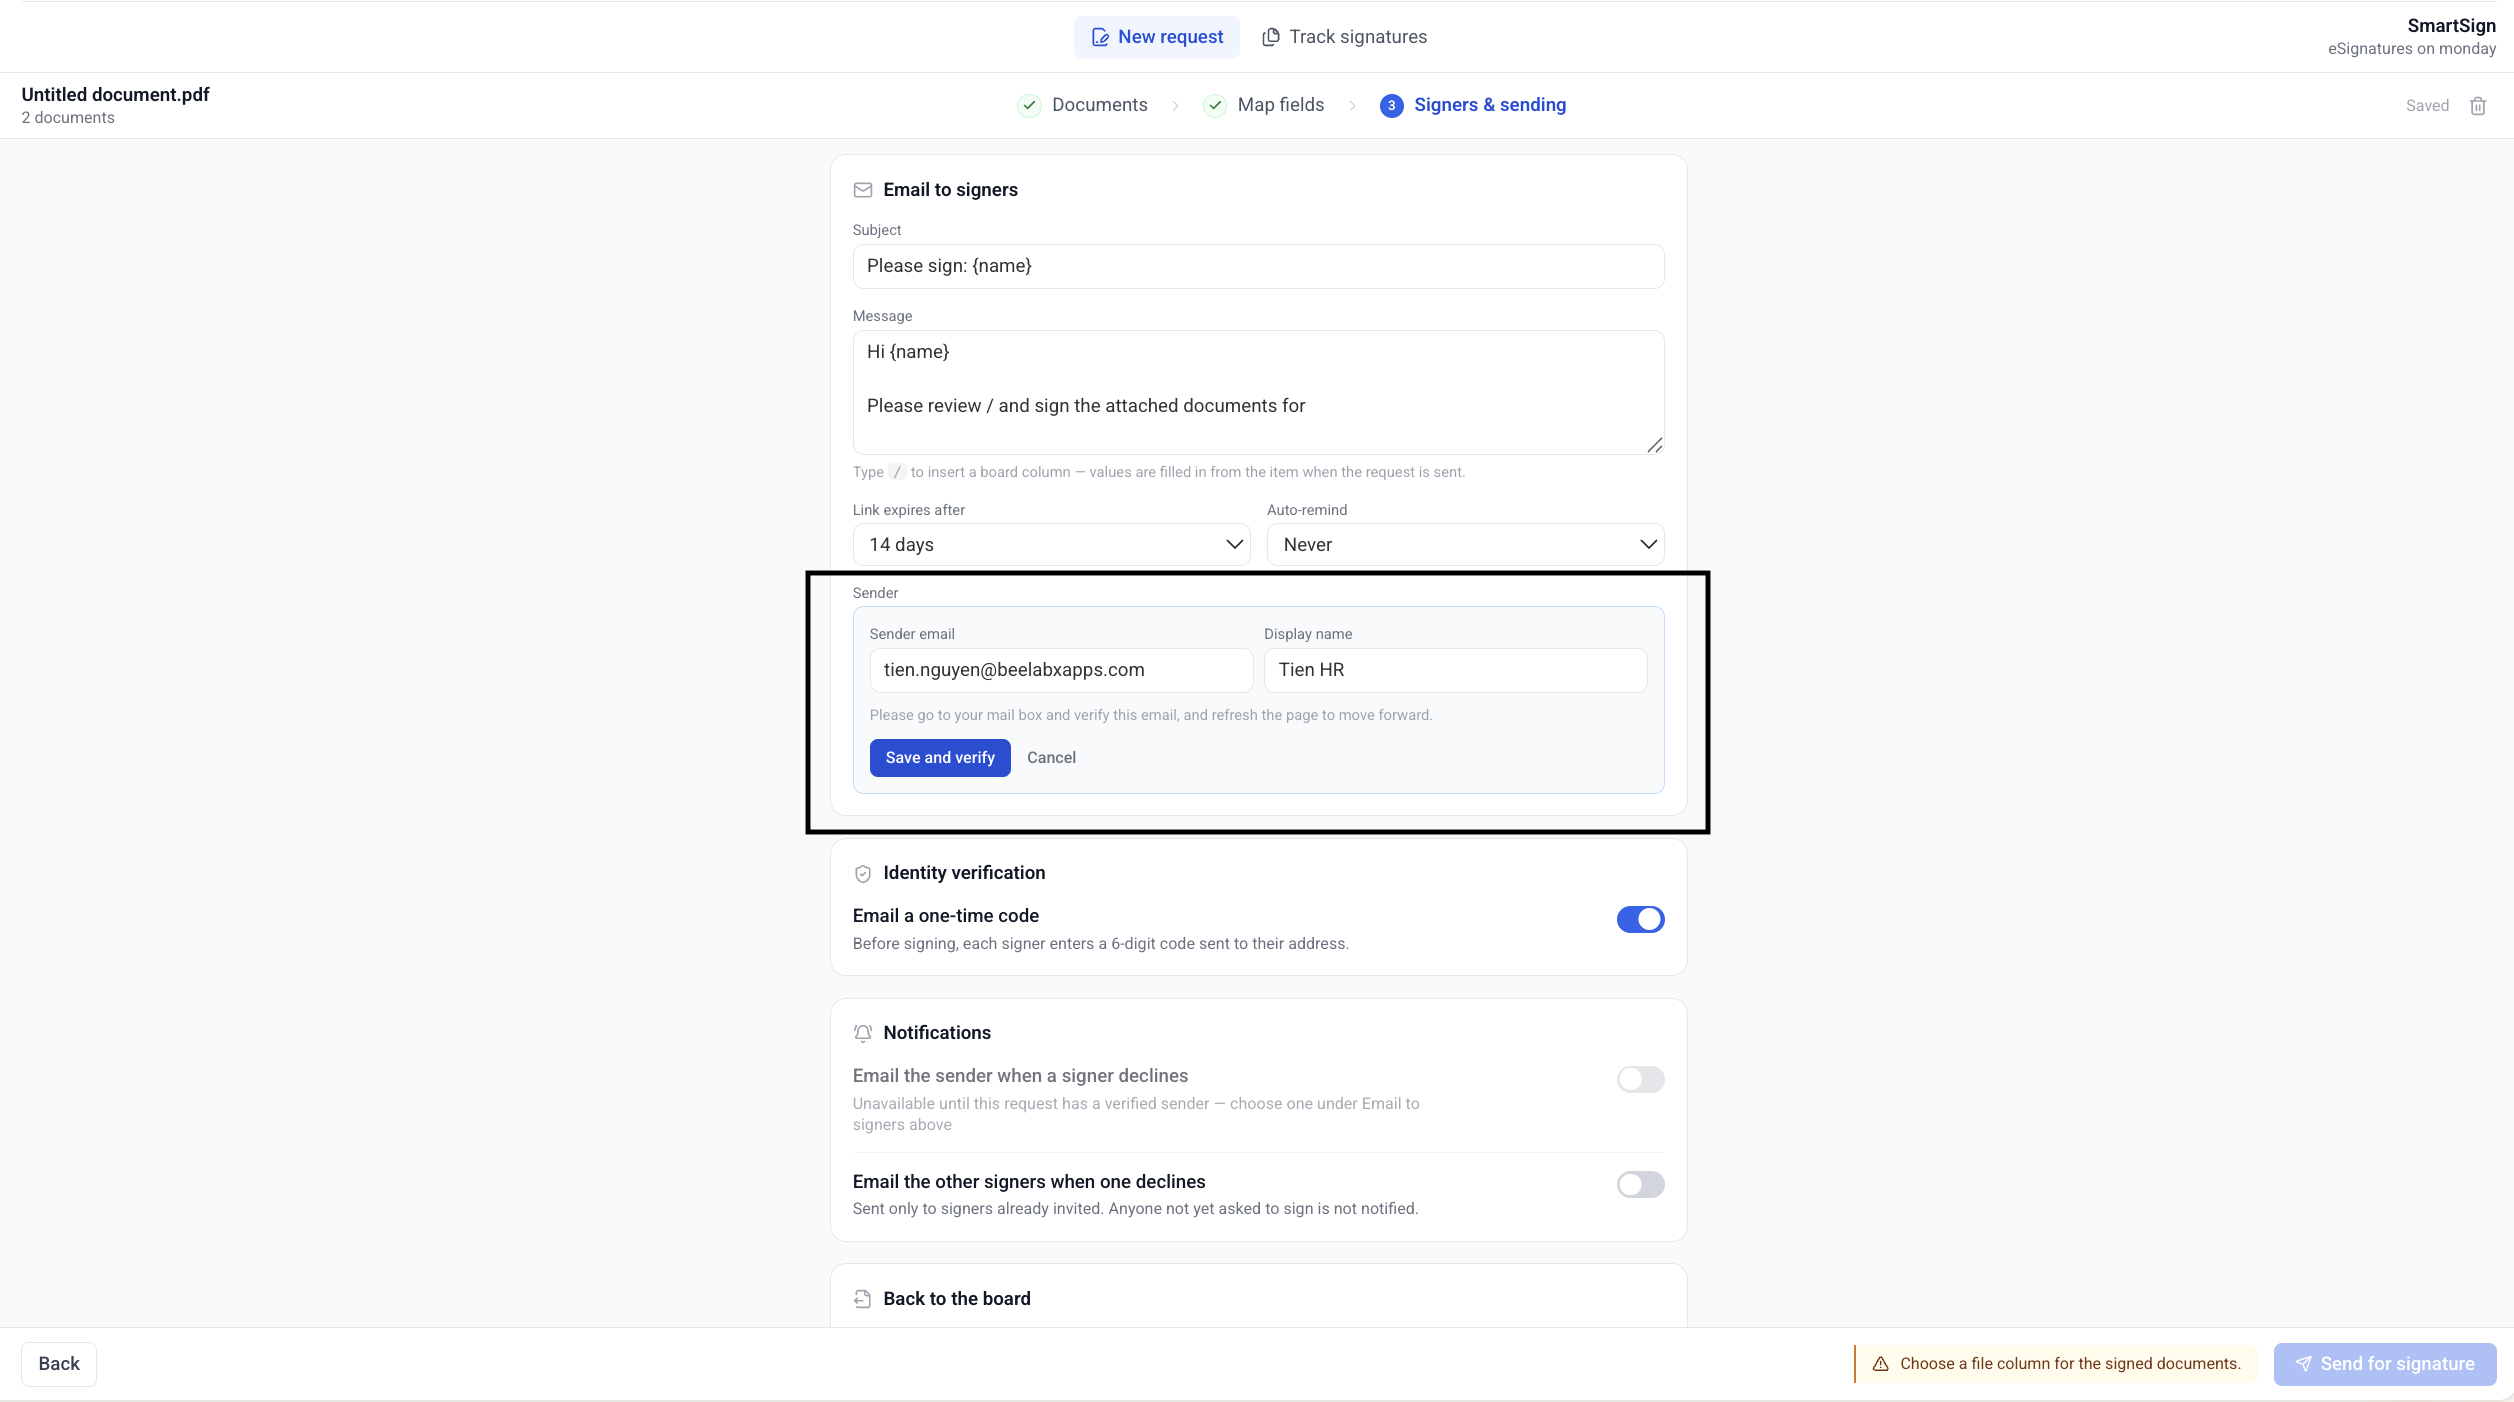
Add an Address
Click Add an address, enter your Sender email and an optional Display name (e.g. Acme Sales), then click Save and verify.
Check Your Inbox
SmartSign emails you Confirm your SmartSign sender address. Click Verify this address in it.
Refresh and Select
Come back to SmartSign, refresh, and pick the now-Verified address. Emails go out as Acme Sales (via SmartSign) with replies going to your address.
| Badge | Meaning |
|---|---|
| Verified (green) | Confirmed — selectable as the sender |
| Pending (amber) | The verification link has not been clicked yet. Shown, but not selectable. Use Resend for a fresh email |
Verification links are valid for 24 hours and work once. If yours has lapsed, open SmartSign and send a fresh one with Resend.
Sender addresses are private to the person who verified them — your colleagues see their own list, not yours. The address is pinned onto a request when you send it, so reminders days later still come from the same identity.
Identity Verification
| Setting | Description |
|---|---|
| Email a one-time code | On by default. Before signing, each signer enters a 6-digit code sent to their address |
Turning this off means access is by signing link only. The Certificate of Completion records that difference honestly — “Access was by signing link only, so the audit trail records these signatures as link-verified rather than email-verified.”
Notifications
| Setting | Default | Description |
|---|---|---|
| Email the sender when a signer declines | On | Needs a verified sender — that is the address it goes to |
| Email the other signers when one declines | Off | Only signers already invited are told. Anyone not yet asked to sign is not notified |
Back to the Board
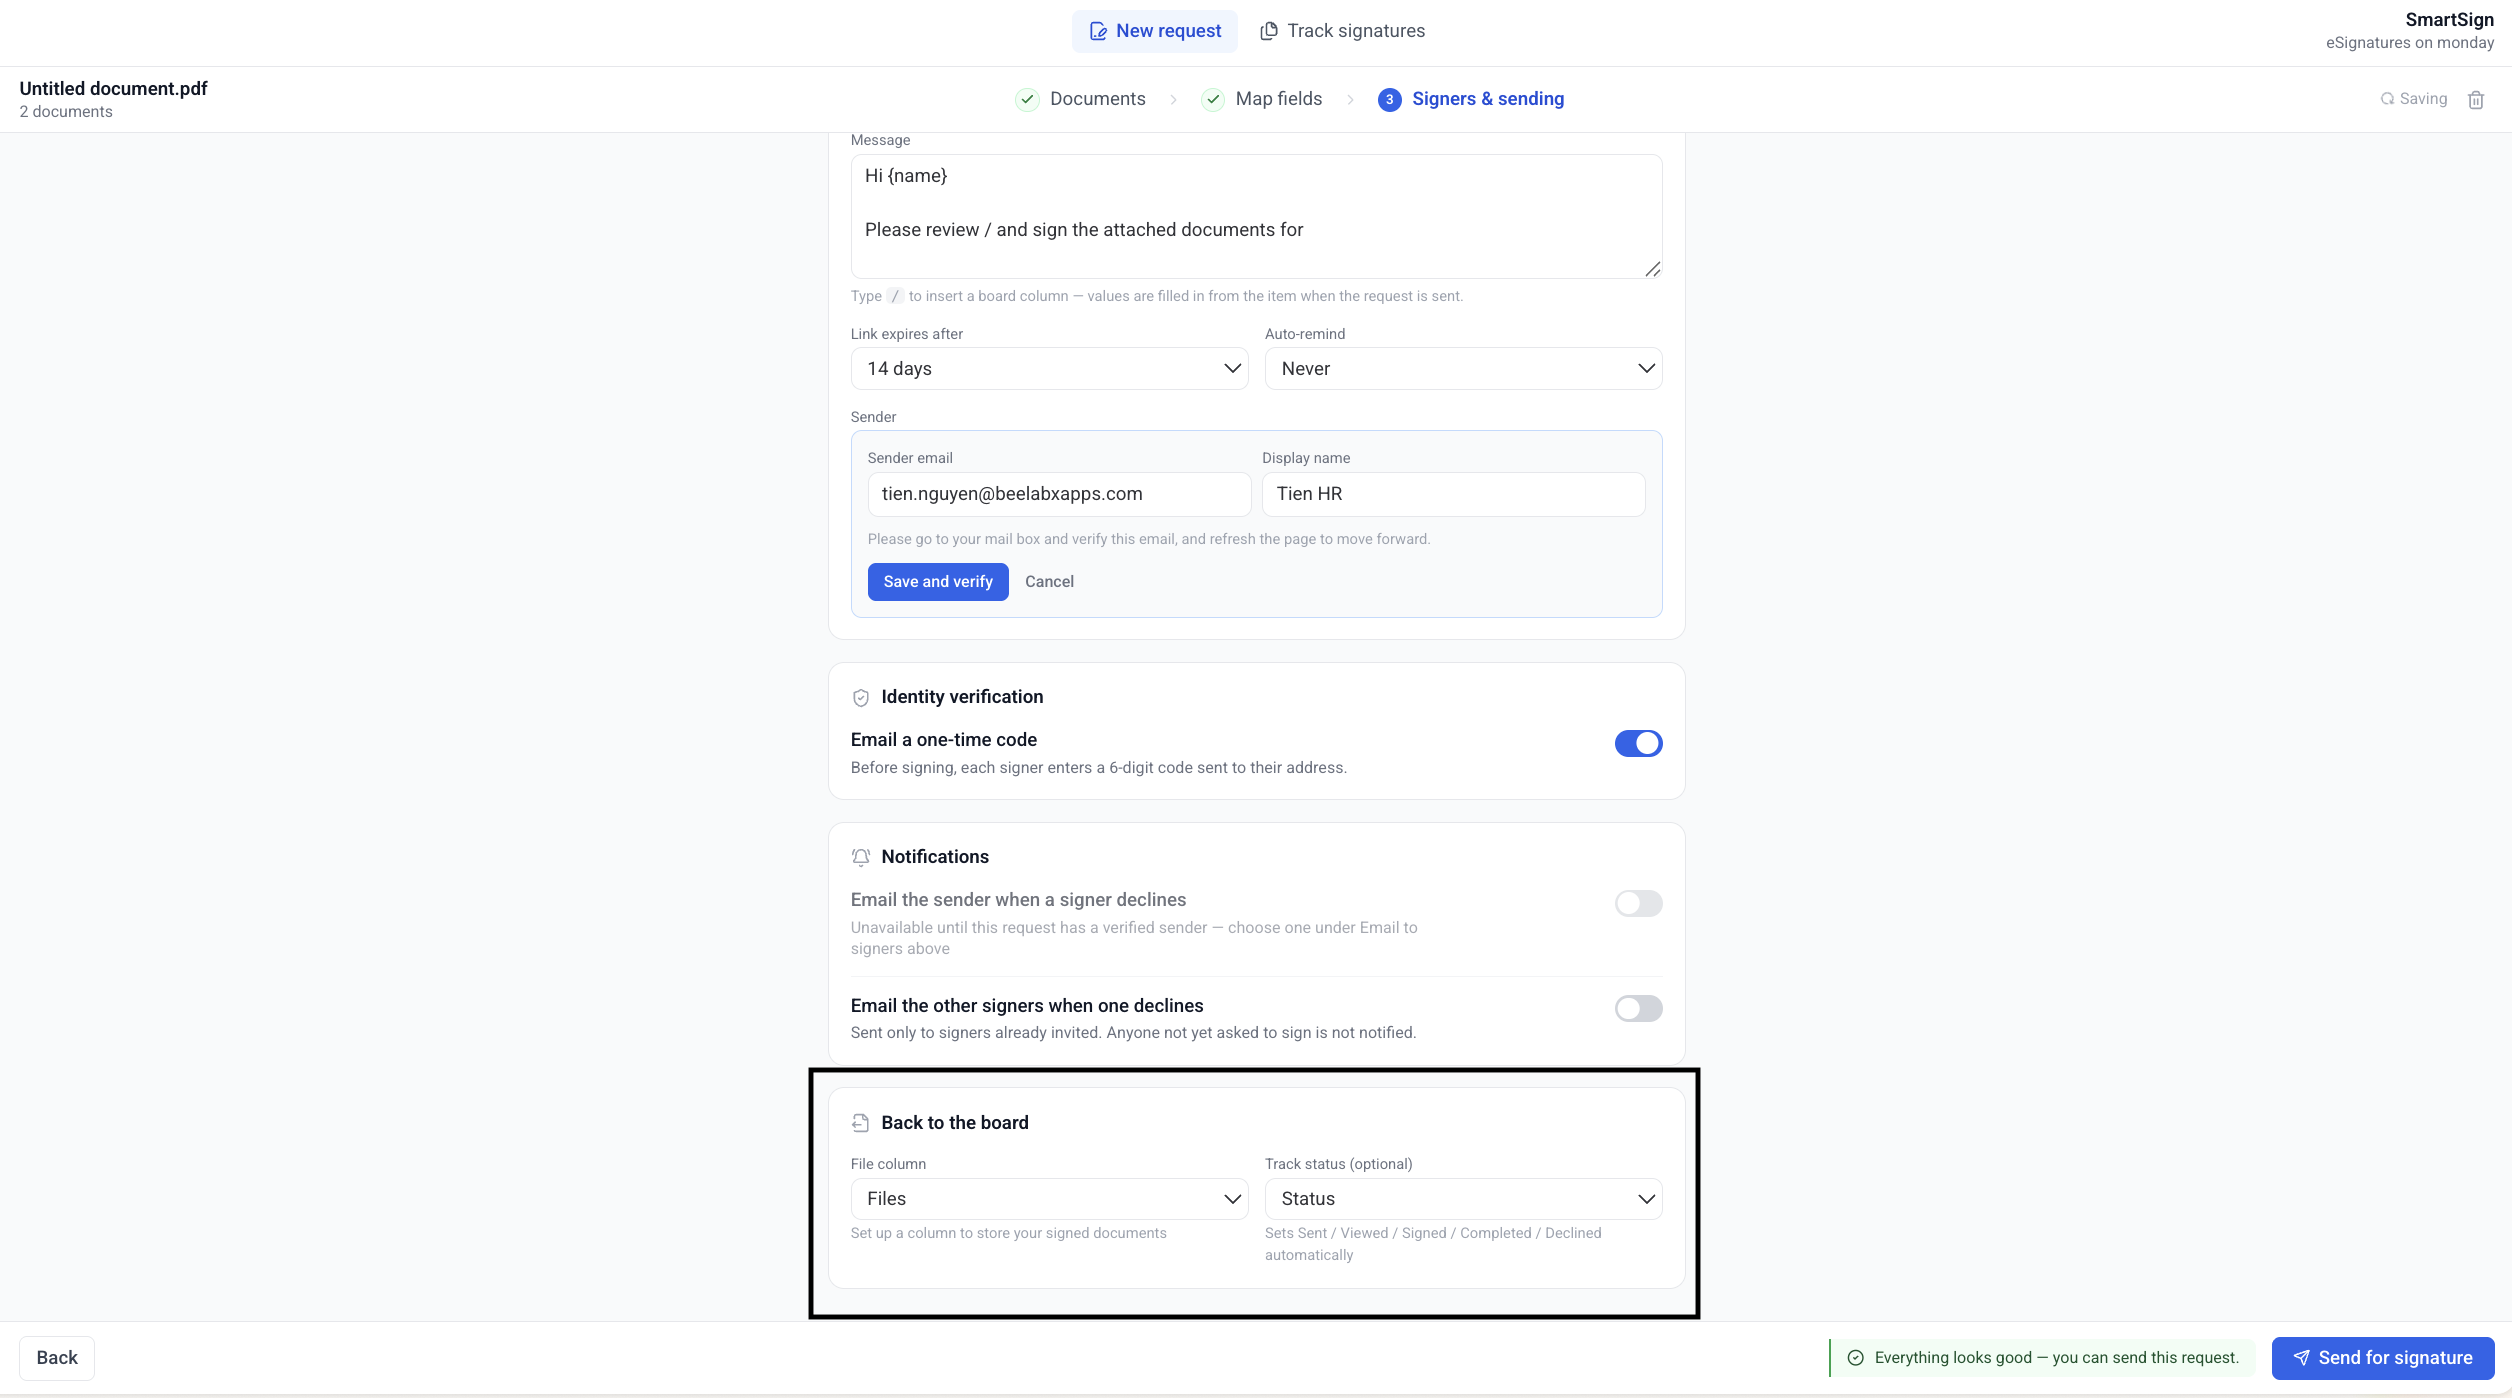
| Setting | Required | Description |
|---|---|---|
| File column | Yes | Where the signed PDFs are delivered. Each document arrives as its own file |
| Track status (optional) | No | Sets Sent / Viewed / Signed / Completed / Declined on the item automatically |
The file column you used last on this board is pre-filled for you next time.
Sending
When everything checks out the hint turns green — “Everything looks good — you can send this request.” — and Send for signature lights up. Send, and SmartSign switches you to Track signatures.
What Has to Be True Before You Can Send
| Requirement | Step |
|---|---|
| At least one document | 1 |
| Every signer has at least one signature field | 2 |
| No fields left on a removed document, no fields pointing at a deleted board column | 2 |
| At least one signer, each with a valid email address | 3 |
| A File column chosen for the signed documents | 3 |
Templates
If you send the same paperwork often, save it once. A template holds the documents, every field placement and the signer roles — but no people, no wording and no destination. Those belong to the request.
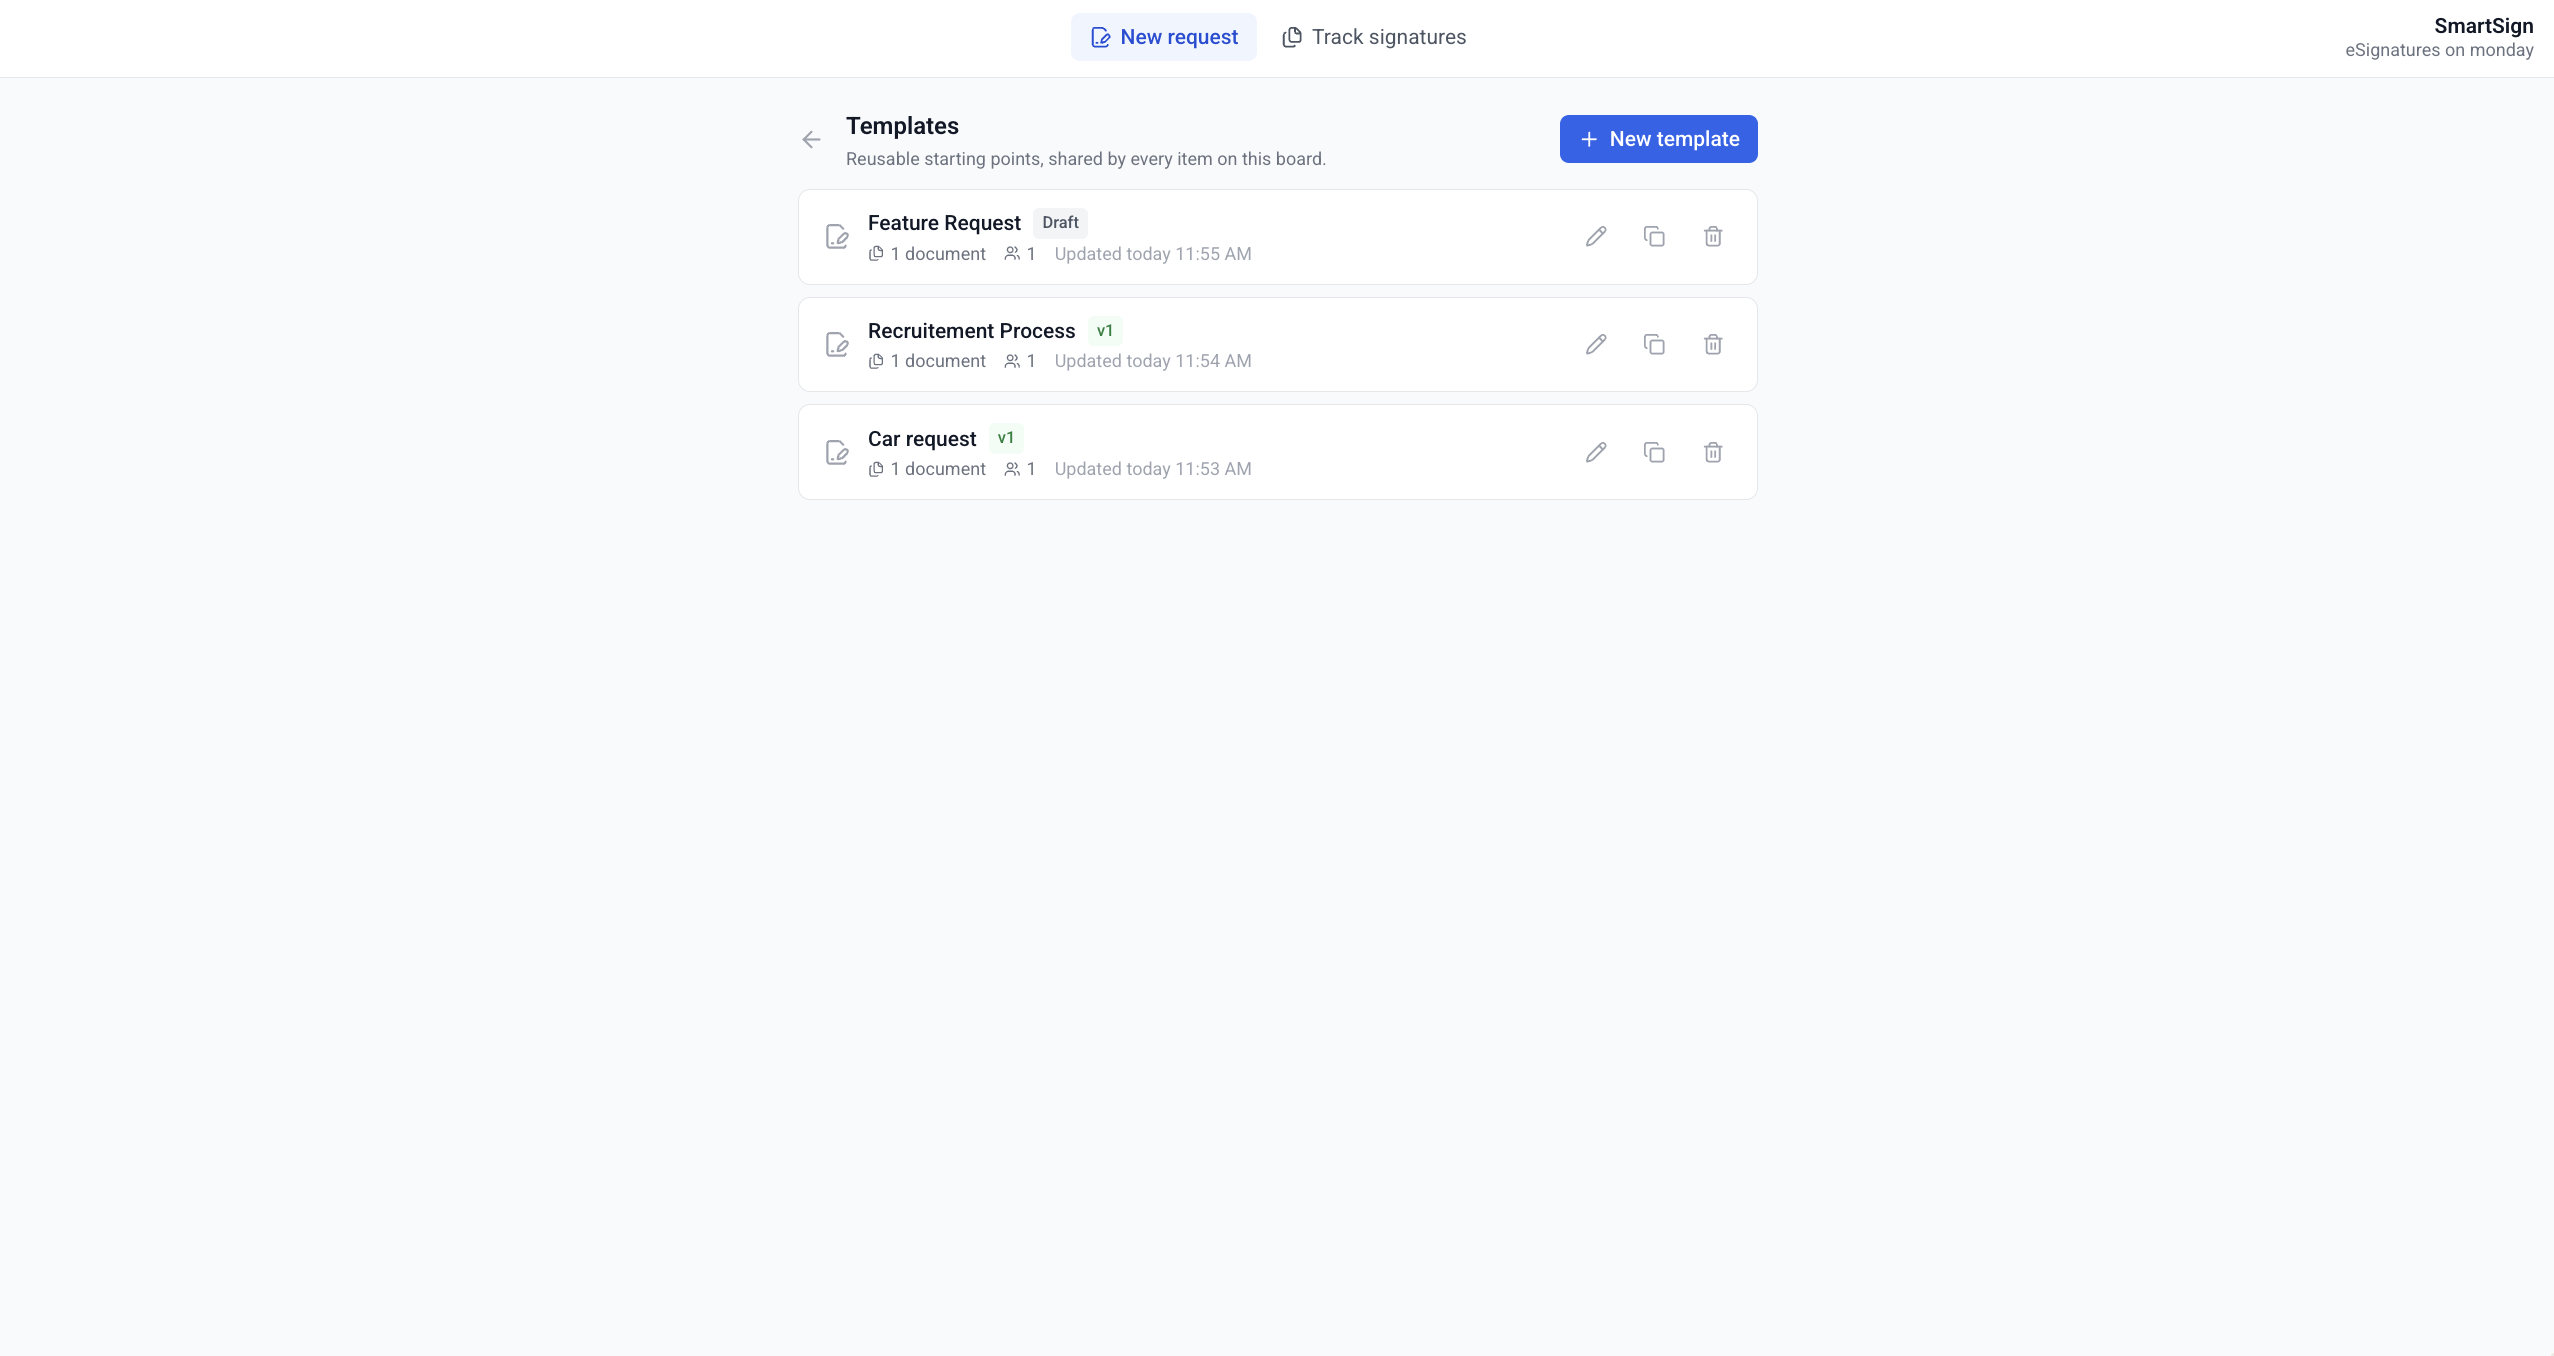
Open the Template List
On step 1 of a request, click Manage templates beside Or start from a template.
Build It
New template opens a two-step editor — Documents and Map fields. It is the same builder, minus the sending settings.
Publish It
Click Publish. Only published templates can be used by a request; a draft cannot.
Use It
Back on step 1 of a request, pick the template from the starter cards or from Add document → From a template.
| Chip | Meaning |
|---|---|
v2 (green) | Published — requests can start from this version |
Draft (grey) | Never published — not usable by a request yet |
A request takes a copy of the template’s published version. Editing the template later never changes a request that already used it, and never touches anything already sent.
Publishing again is Update this template. The button stays disabled while the published version already matches what you see — “The published version matches what you see — make a change to update.”
Track Signatures
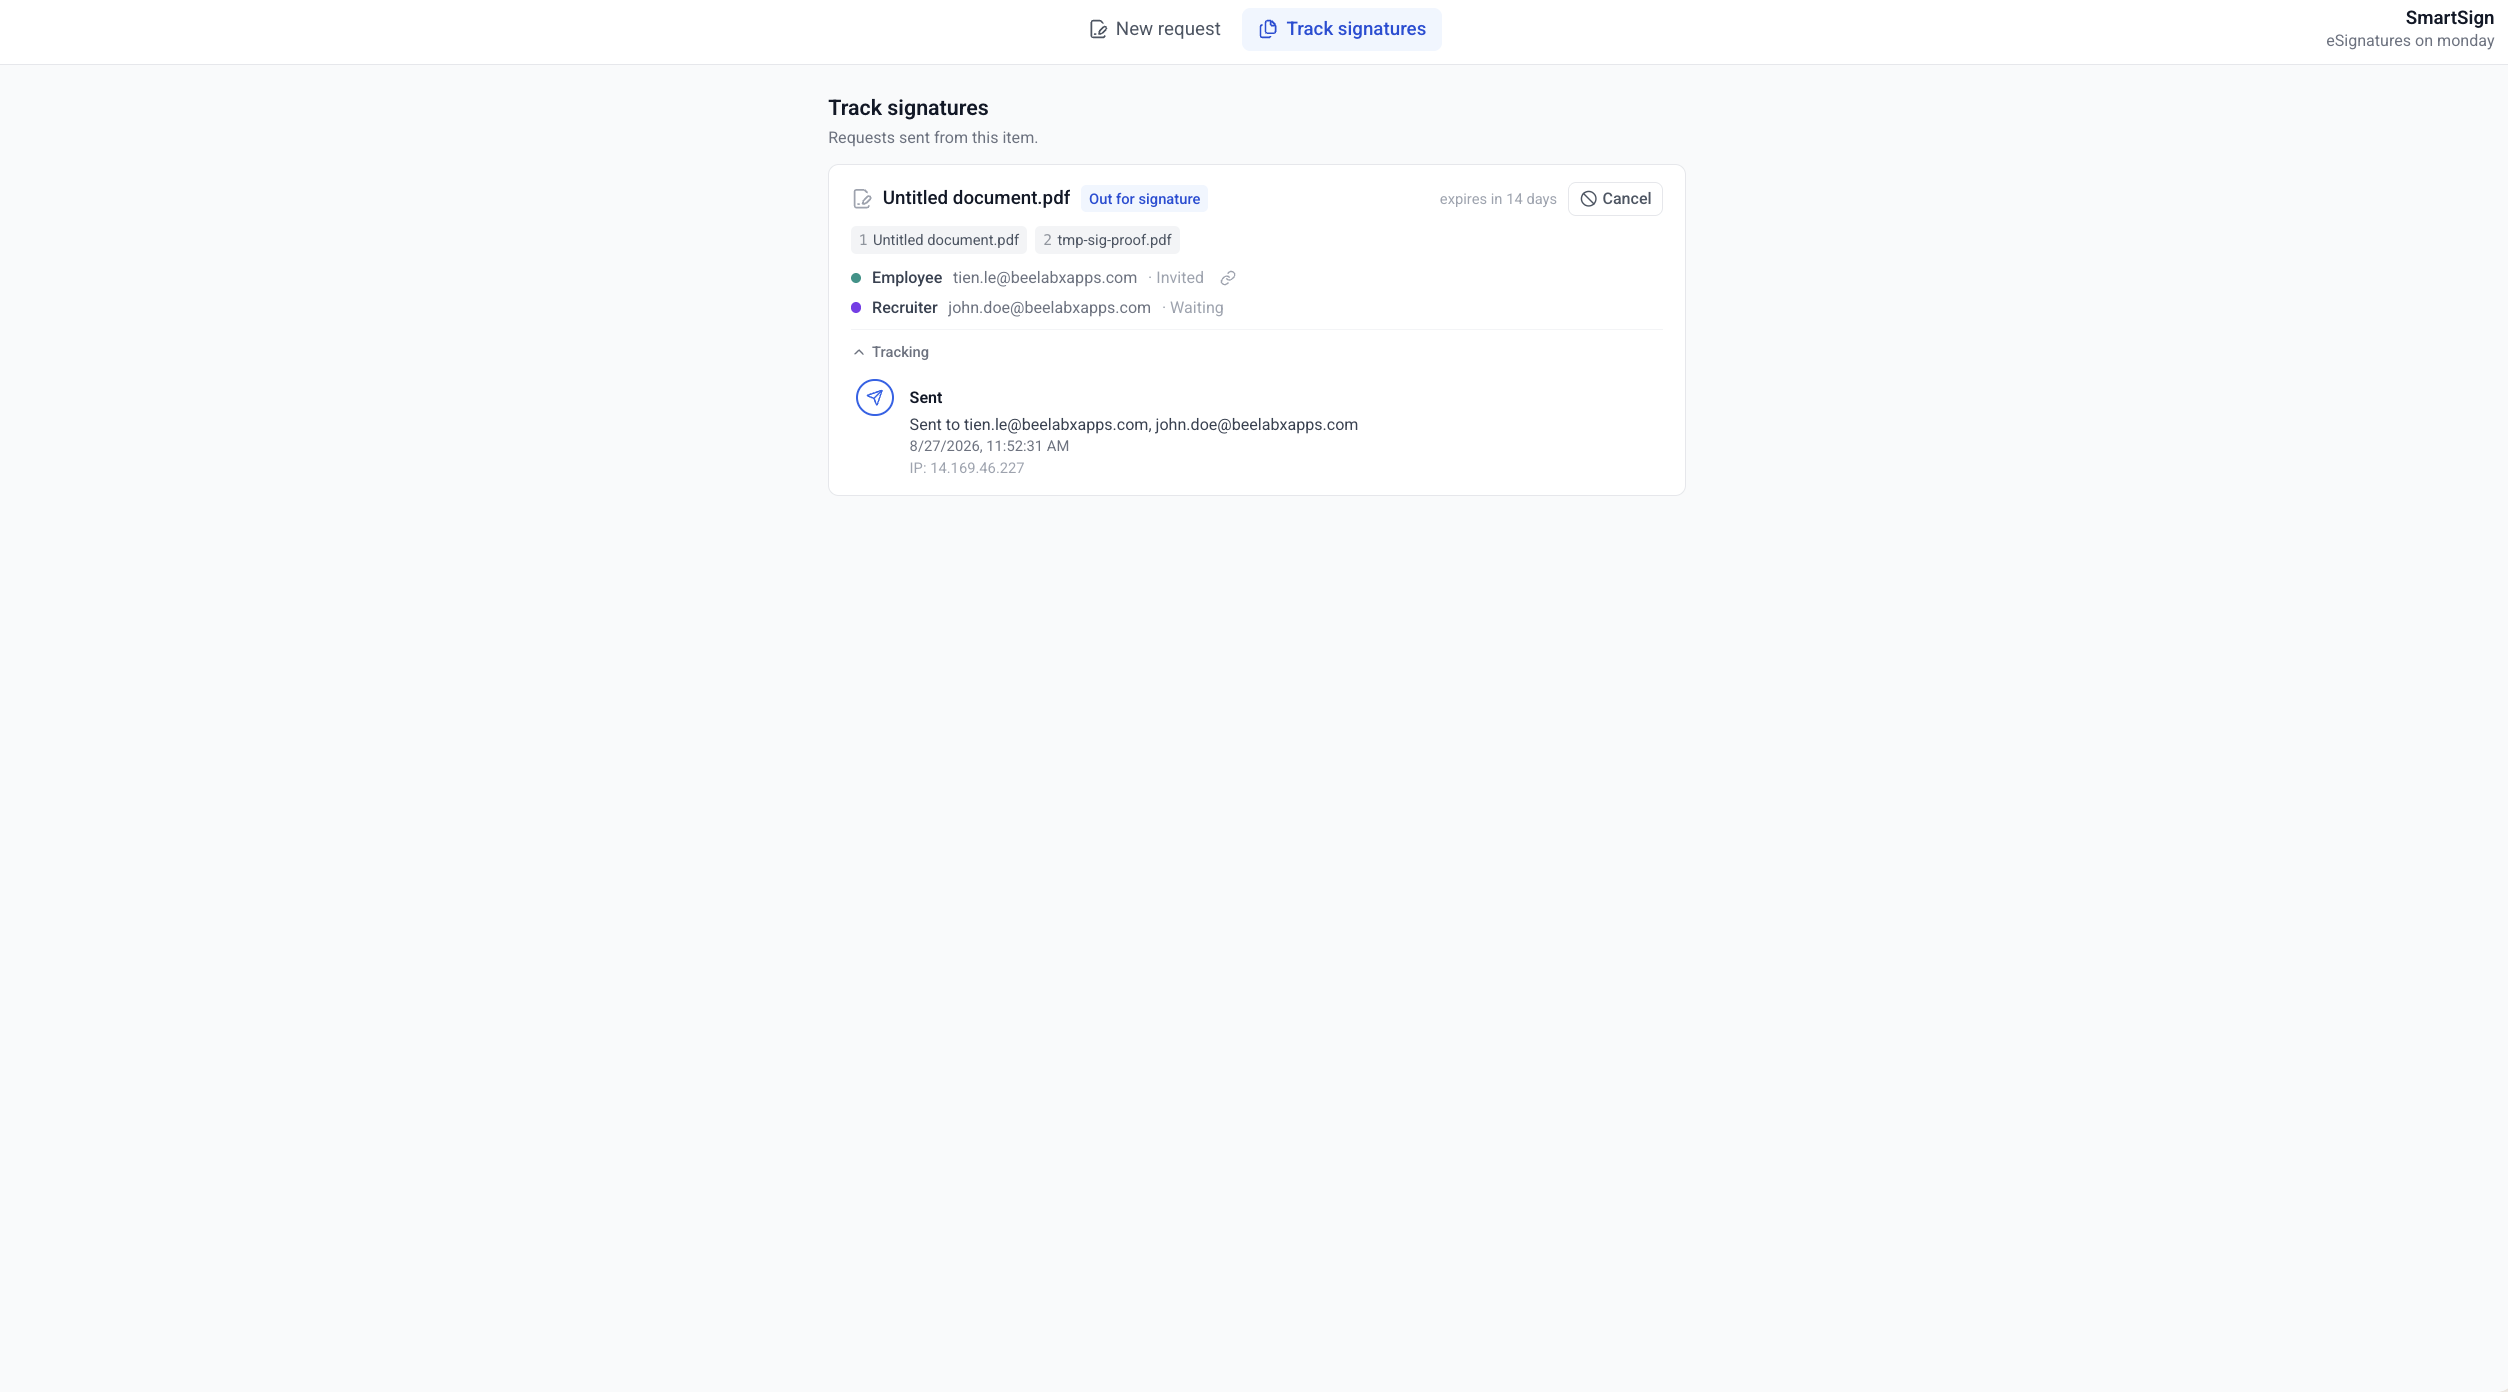
Request Status
| Badge | Meaning |
|---|---|
| Pending | Being sent |
| Out for signature | Live — signers can sign |
| Completed | Everyone has signed |
| Declined | A signer declined; the request is closed |
| Expired | The link passed its expiry date |
| Cancelled | You withdrew it |
Signer Status
| Badge | Meaning |
|---|---|
| Waiting | Not their turn yet, or their invite has not gone out |
| Invited | Their invitation was delivered |
| Viewed | They opened the document |
| Signed | They signed everything assigned to them |
| Declined | They refused |
The Tracking timeline is the human-readable view of the audit trail — who was sent what, who viewed it, who signed, when, and from which IP address. It is append-only and kept for 10 years.
The Signed Document
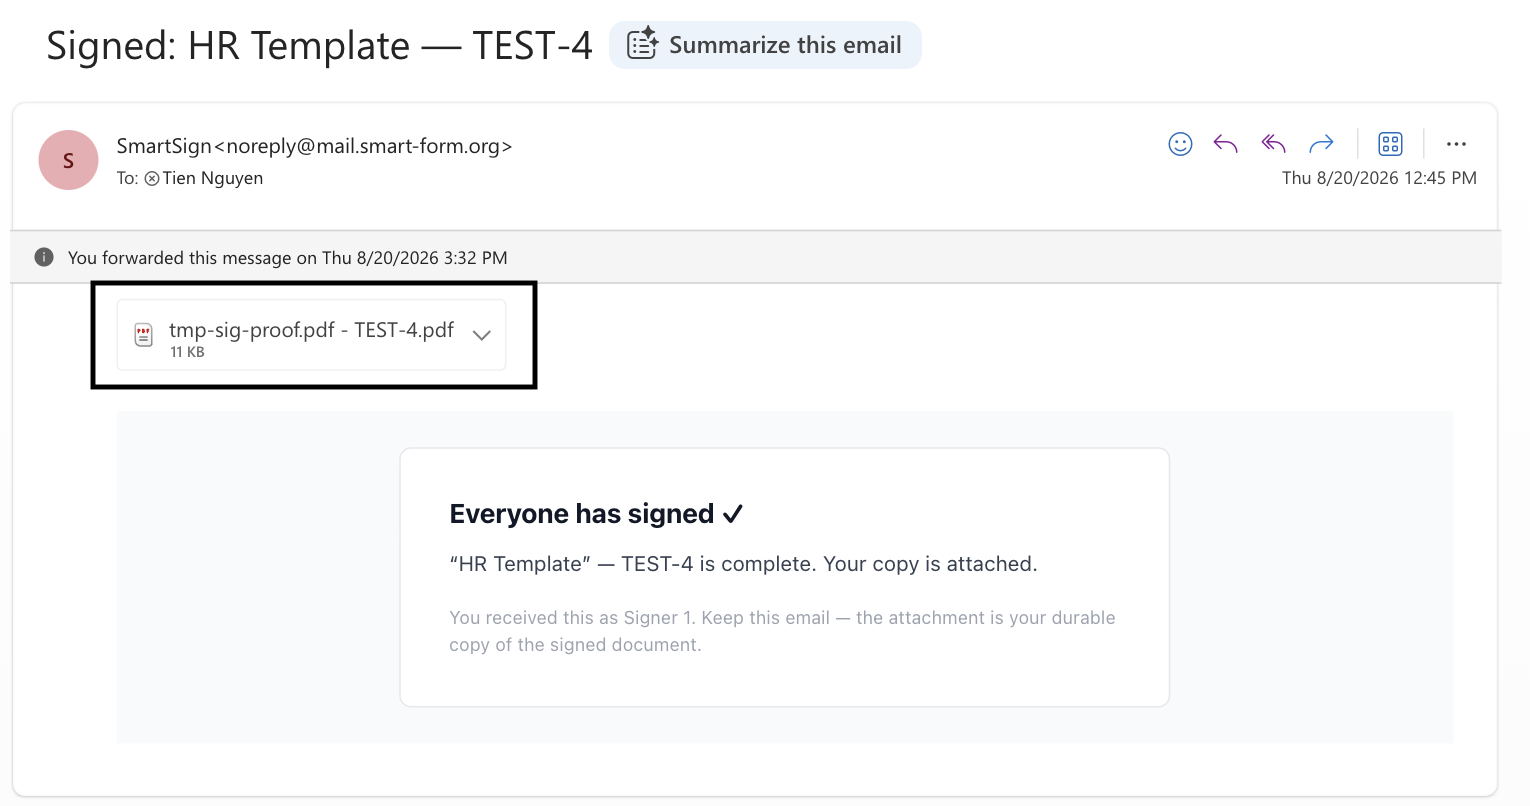
When the last signer finishes, SmartSign builds the finished PDFs and delivers them.
| What happens | |
|---|---|
| The file column | One signed PDF per document, named Document name - Item name.pdf |
| The status column | Set to Completed, if you mapped one |
| Every signer’s inbox | A Signed: … email with all the signed PDFs attached |
Several documents produce several files, never one merged PDF — each document keeps its own identity on the board.
The Certificate of Completion
Every signed PDF has a certificate page appended, containing:
| Section | Contents |
|---|---|
| Document details | Request and document names and IDs, pages signed, the Monday item, signing order, when it was created and sent, how identity was verified, and the SHA-256 of the document as sent |
| Participants | Each signatory, their address, how they were verified, when they signed, and their IP address |
| Signing events | The full audit trail for this document — created, sent, identity verified, consent accepted, viewed, signed, completed, delivered |
Times on the certificate are UTC, and it is generated from an append-only audit trail kept separately from the document itself.
Good to Know
| Topic | Detail |
|---|---|
| Documents | Up to 10 per request, 10 MB each, PDF only. Password-protected PDFs are not supported |
| Signers | Up to 5 per request |
| Autosave | Everything saves as you type. Leaving the builder is safe |
| One at a time | An item holds one live request. Complete or cancel it before starting another |
| Drafts | Never expire. Discard one from the builder header when you no longer want it |
| Field values | Item data is stamped in when you send; signer fields are filled at signing |
| Text fields | Up to 500 characters |
| Reminders | The original invitation, re-sent — only to signers who have been invited and have not yet acted |
| Where the signed file lives | Your file column and the signers’ email attachments are the durable copies |
| Download window | SmartSign keeps its own copy of a completed request for 90 days, then deletes it. The board file and the emailed attachments are unaffected |
| Audit trail | Kept for 10 years, and outlives the document files it describes |
SmartSign documents are signed, not cryptographically sealed. The certificate records identity, consent and timing from the audit trail — it is not an independent cryptographic attestation.
Contact Support
Need help with SmartSign or other SmartForm features?
Need Assistance?
Our dedicated support team is ready to help you get the most out of SmartForm. Whether you have questions about setup, configuration, or advanced features, we’re here to assist.
Contact Support Team →