Standard Form PDF Generation
Every submission becomes a PDF, saved straight to your Monday.com item — as a clean built-in layout, printed onto your own PDF, or merged into your Word template.
What This Does
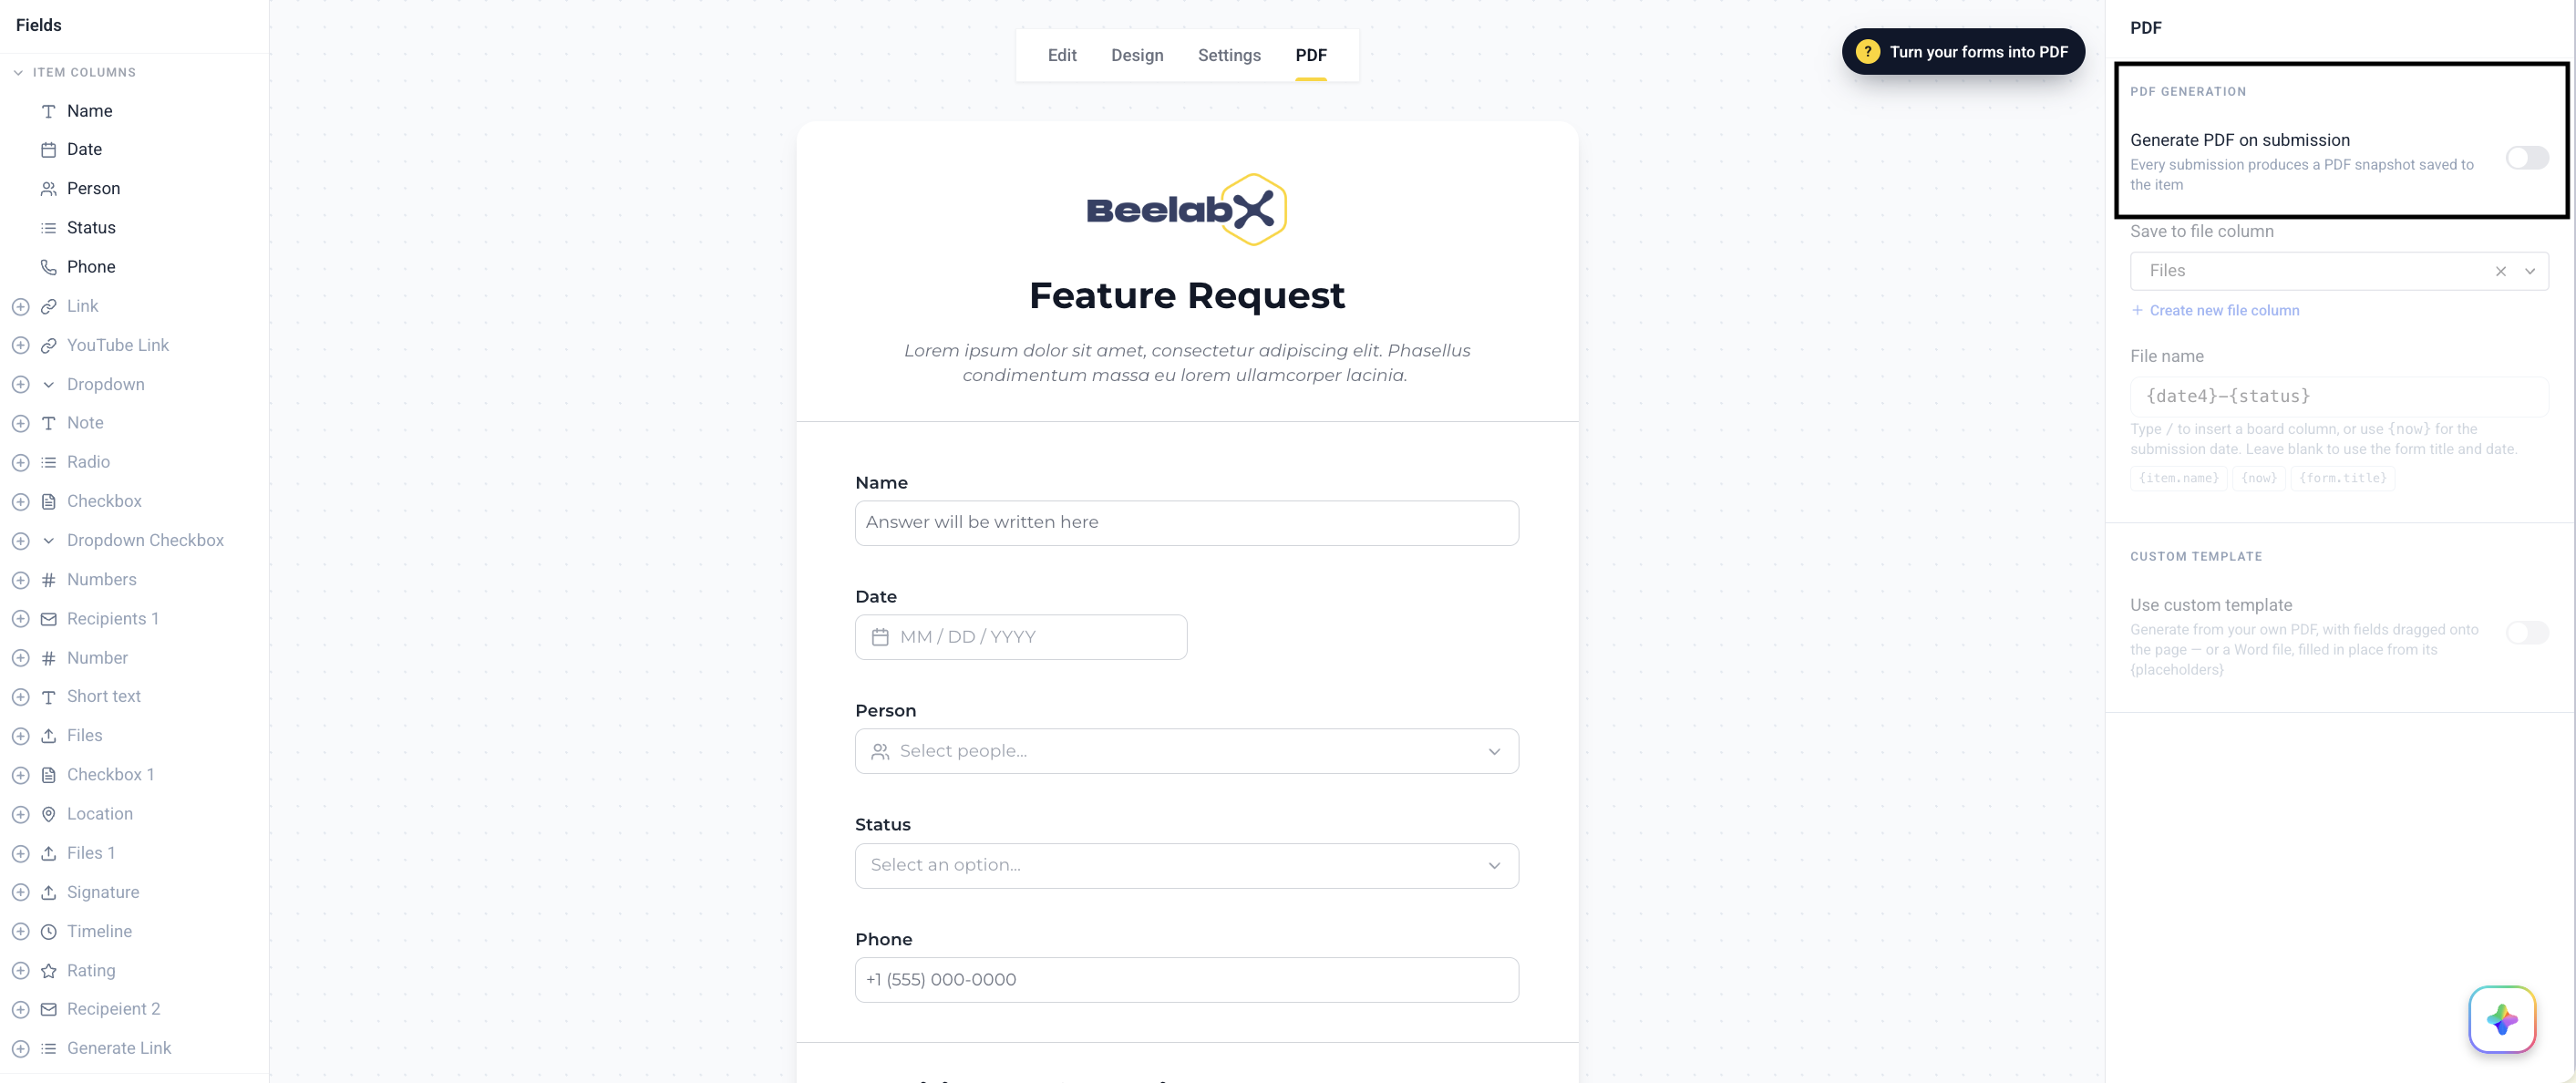
Turn on one toggle and every time somebody submits your Standard Form, SmartForm builds a PDF of their answers and attaches it to that item’s file column.
PDF is available on Item Forms and Subitem Forms. Action Forms and Survey Forms don’t have a PDF tab.
Three Ways to Build Your PDF
These are alternatives, not steps — most people should stop at the first one and be finished.
| You provide | Best for | |
|---|---|---|
| Built-in layout | Nothing — just a toggle | A tidy record of questions and answers |
| Your own PDF | A PDF you already use | Contracts, applications, forms that must look exactly like the original |
| Word template | A .docx with {placeholders} | Your company fonts, headers and page layout |
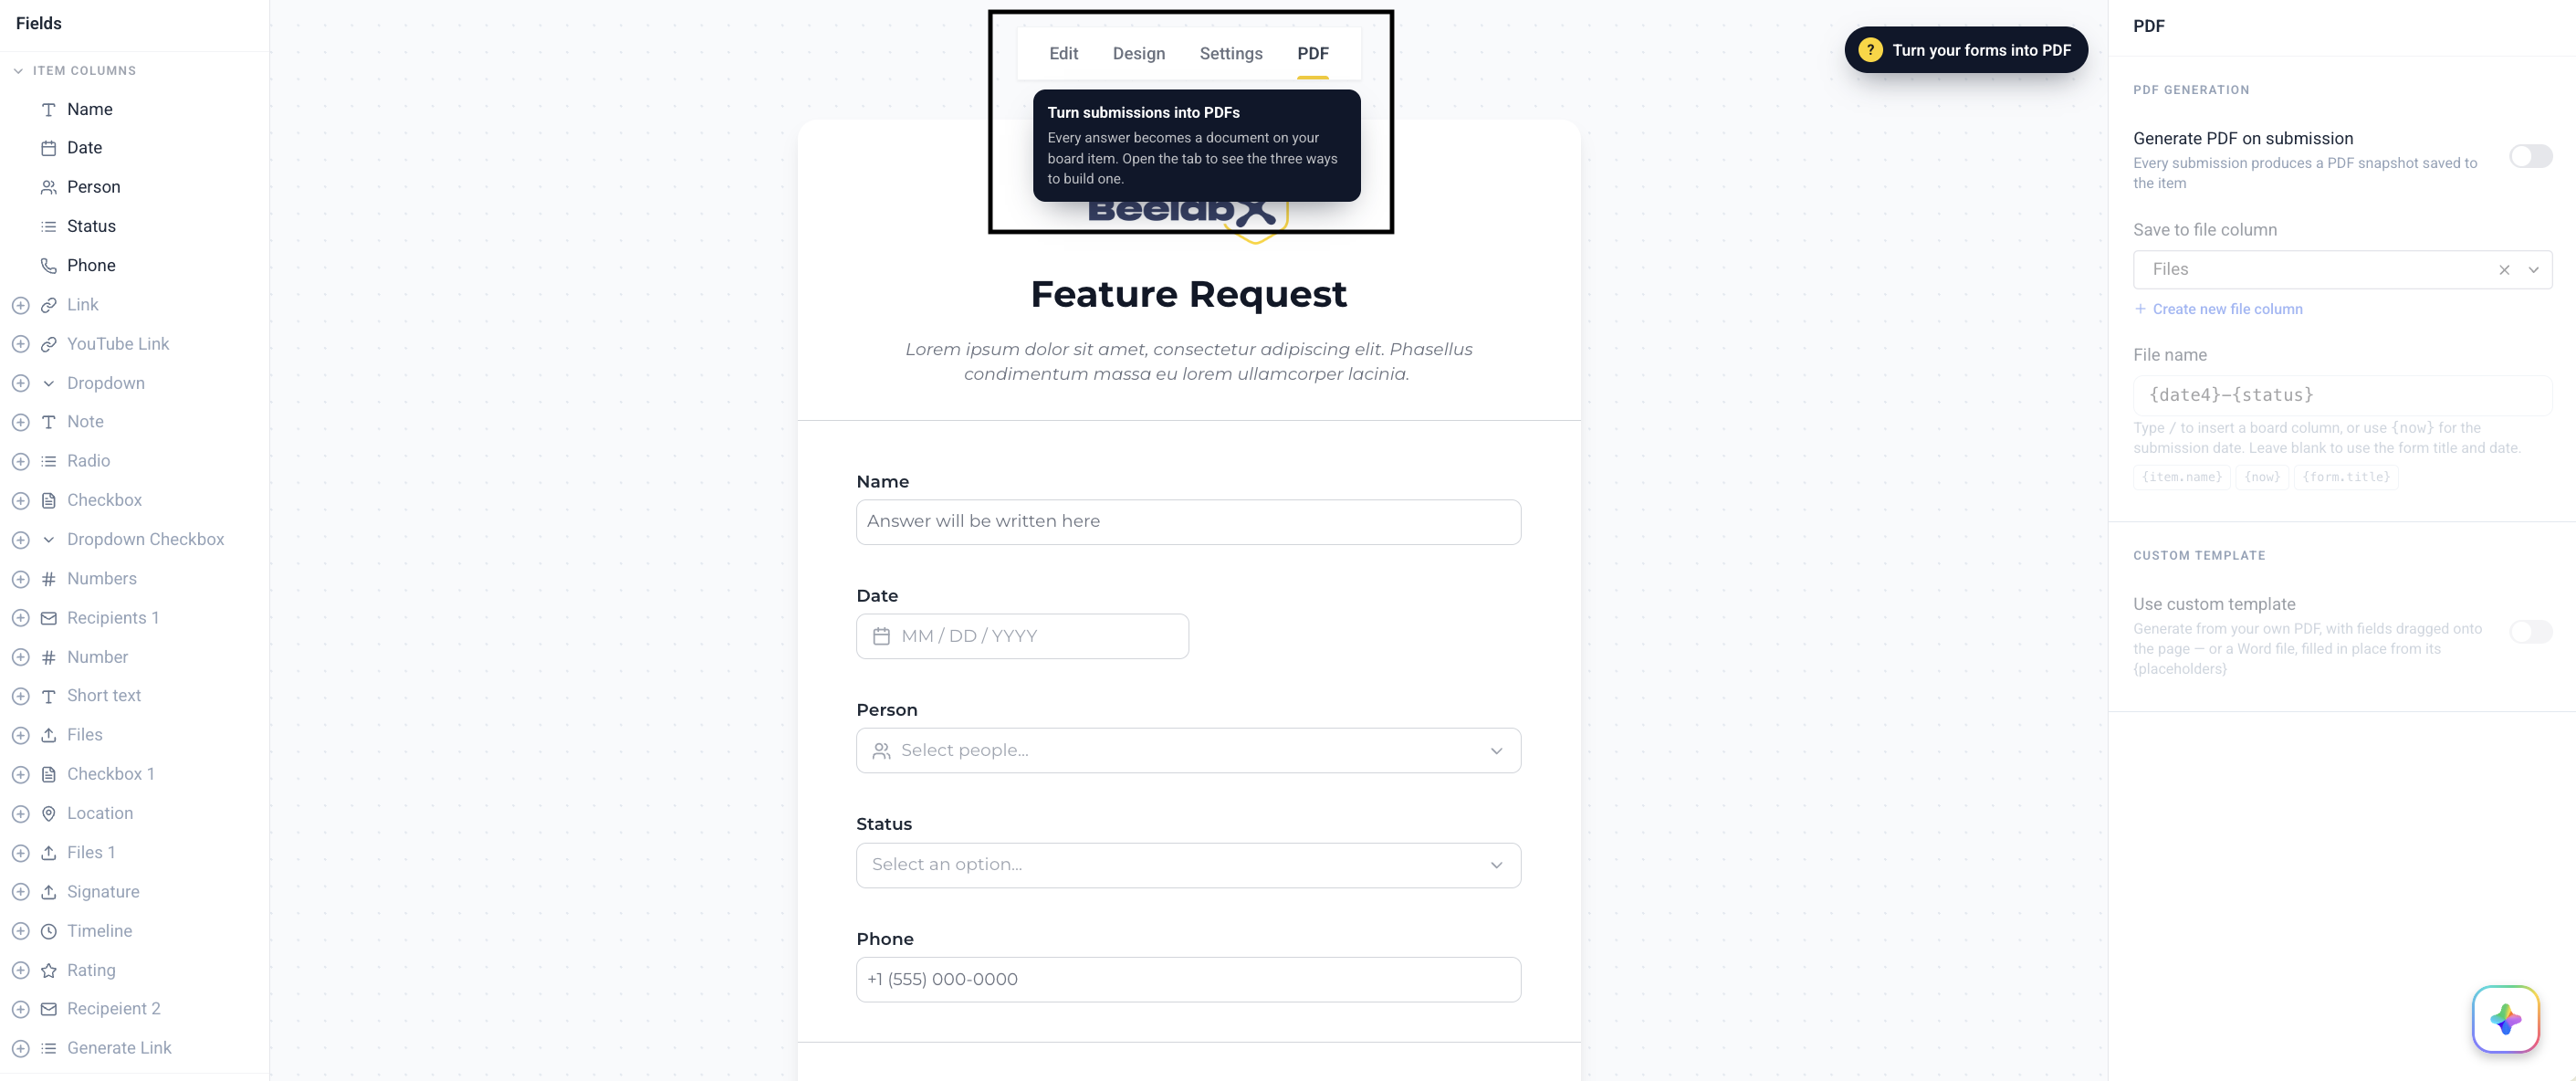
Inside the app, click the Turn your forms into PDF button at the top-right of the canvas to open the How PDF works panel. It shows the same three options with a picture of the finished document. The two custom-template options each launch a guided tour; the built-in layout just has a Turn it on button.
Getting Started
Open the PDF Tab
Open your form in the editor. The tab switcher at the top of the canvas has a fourth tab — PDF — after Edit, Design and Settings.
Turn On Generation
Switch on Generate PDF on submission. Everything below stays dimmed until you do.
Choose Where It Lands
Under Save to file column, pick the file column on your board that should receive the PDF. No file column yet? Click Create new file column and SmartForm creates one and selects it for you.
Done
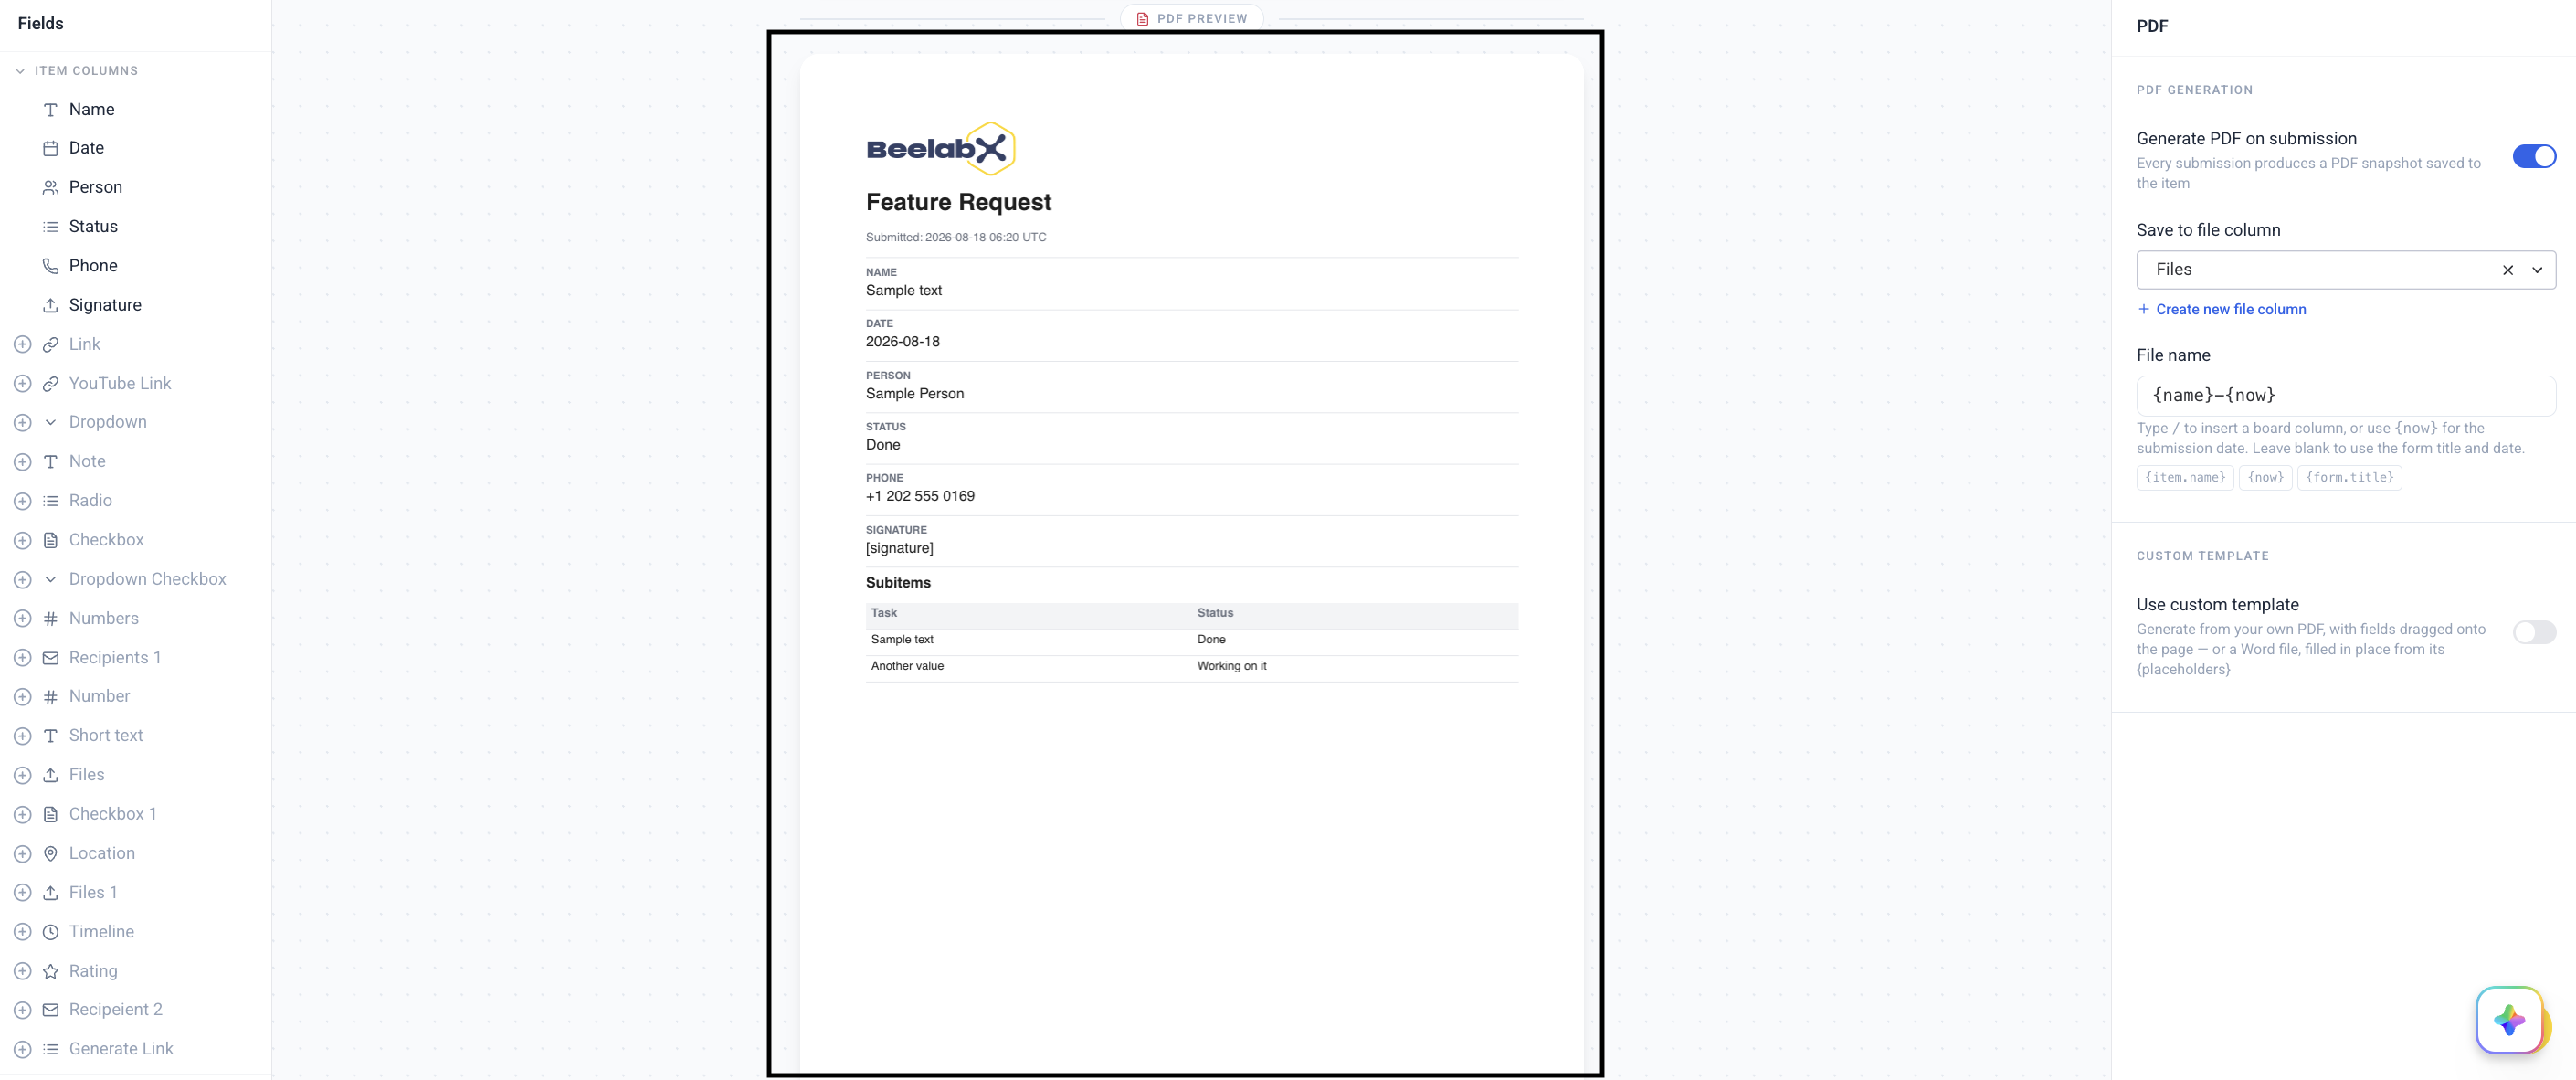
A live PDF preview now appears below the form canvas, showing the layout a submission will produce, filled with sample answers.
Without a file column selected, nothing is saved when a form is submitted. The panel warns you: “Pick a column — without one, nothing is saved when a form is submitted.”
PDF Generation Settings
The PDF Generation group in the right panel holds the three settings every PDF form needs.
| Setting | Description |
|---|---|
| Generate PDF on submission | The master switch. Every submission produces a PDF snapshot saved to the item |
| Save to file column | The board file column the PDF is uploaded to. Each submission adds a new file — nothing is overwritten |
| File name | The naming pattern for the generated file |
Naming Your File
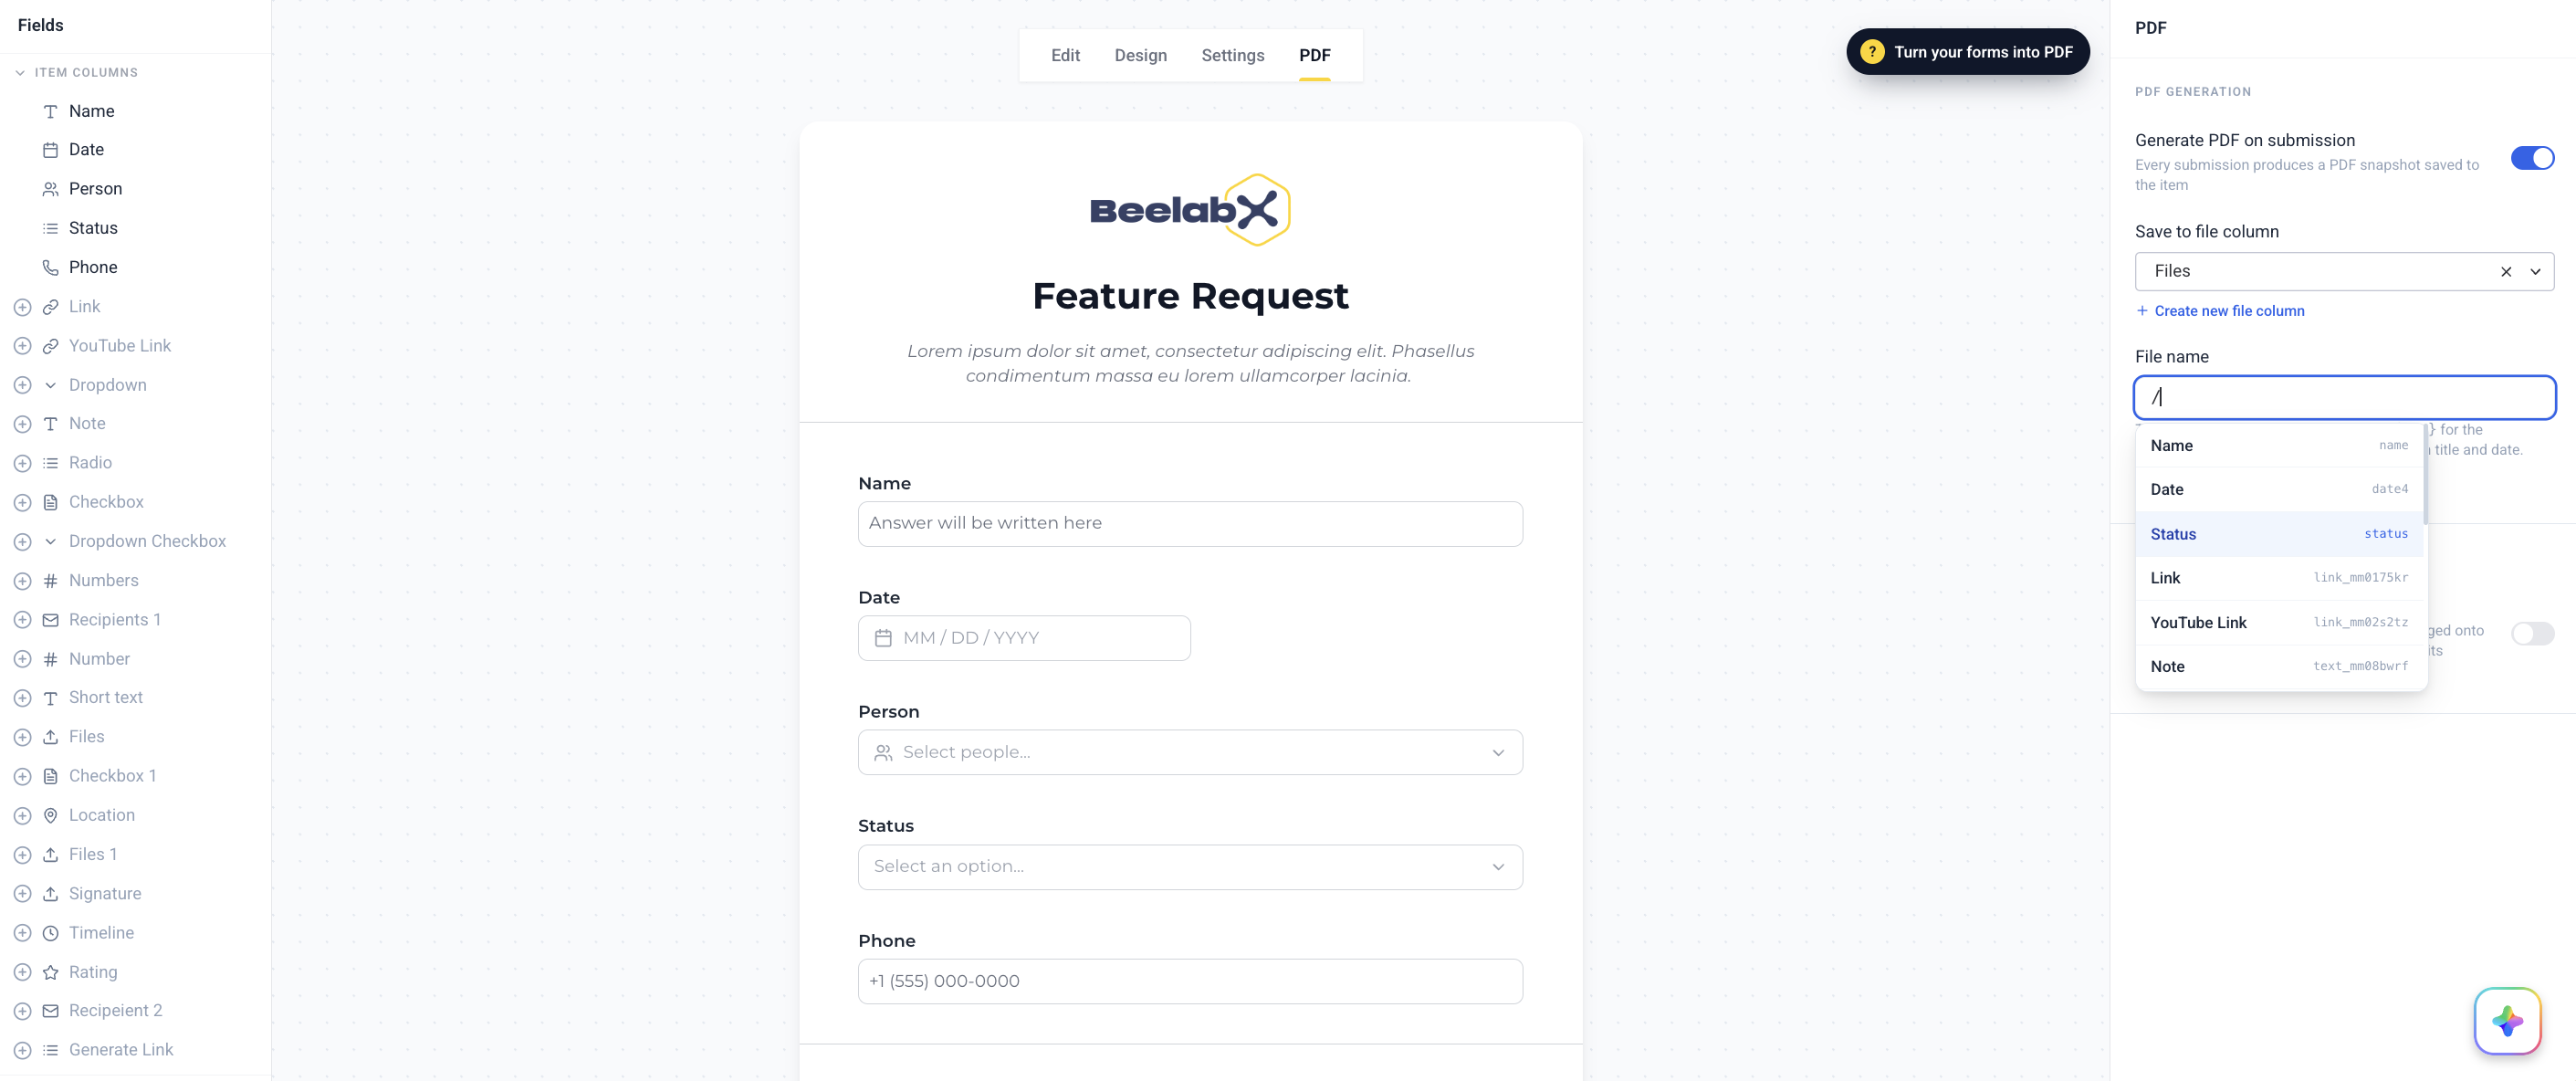
In the File name box, type / to insert any board column, or click one of the quick chips:
| Placeholder | Resolves to |
|---|---|
{item.name} | The name of the Monday.com item |
{now} | The submission date (YYYY-MM-DD) |
{form.title} | The title of your form |
For example, Intake-{item.name} produces Intake-Acme Corp.pdf. Leave it blank and SmartForm uses the form title and date.
Characters that filenames can’t contain (\ / : * ? " < > |) are stripped automatically, and .pdf is always added for you.
Level 0 — The Built-in Layout
With Use custom template left off, SmartForm builds the document for you. There is nothing to design and nothing to upload.
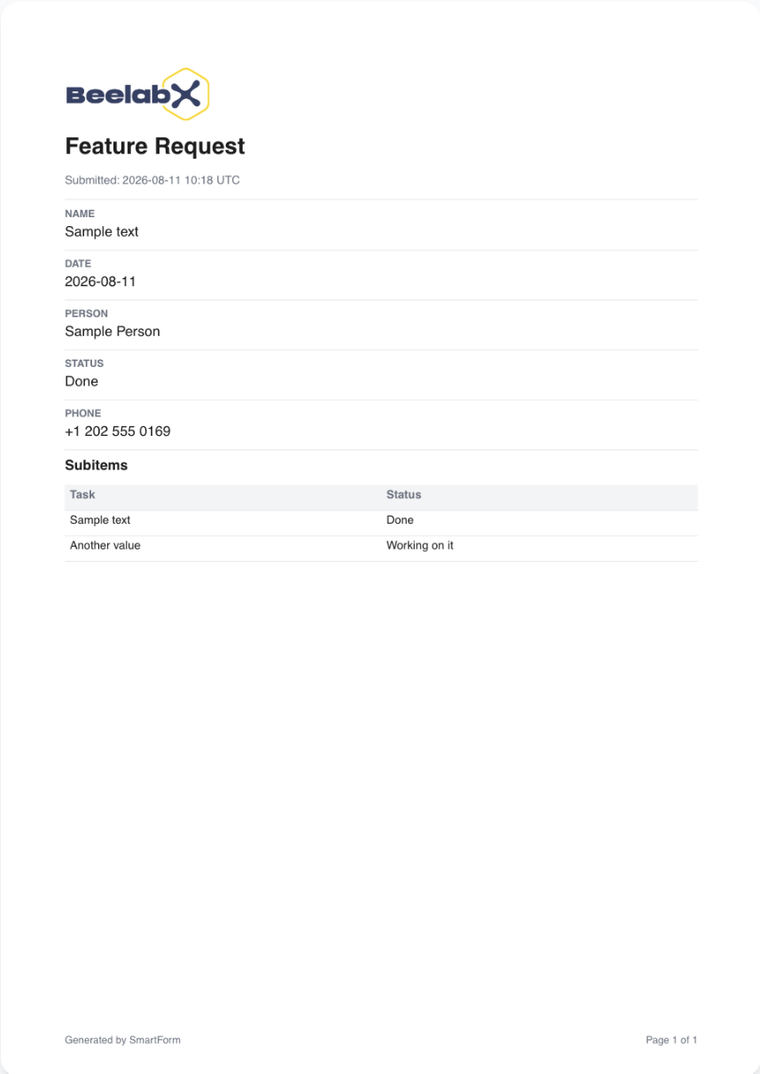
| Element | Description |
|---|---|
| Header | Your form logo and title |
| Submitted | The date and time of the submission |
| Questions & answers | One block per visible field, in your form order |
| Signatures | Drawn signatures printed inline |
| Files | Uploaded files listed by name |
| Subitems | A table of the item’s subitems, if your form collects them |
| Footer | Generated by SmartForm and Page X of Y |
Empty answers print as an em dash (—) so a blank is clearly a blank rather than a missing line.
Level 1 — Your Own PDF
Upload a document you already use and place each answer exactly where it should print.
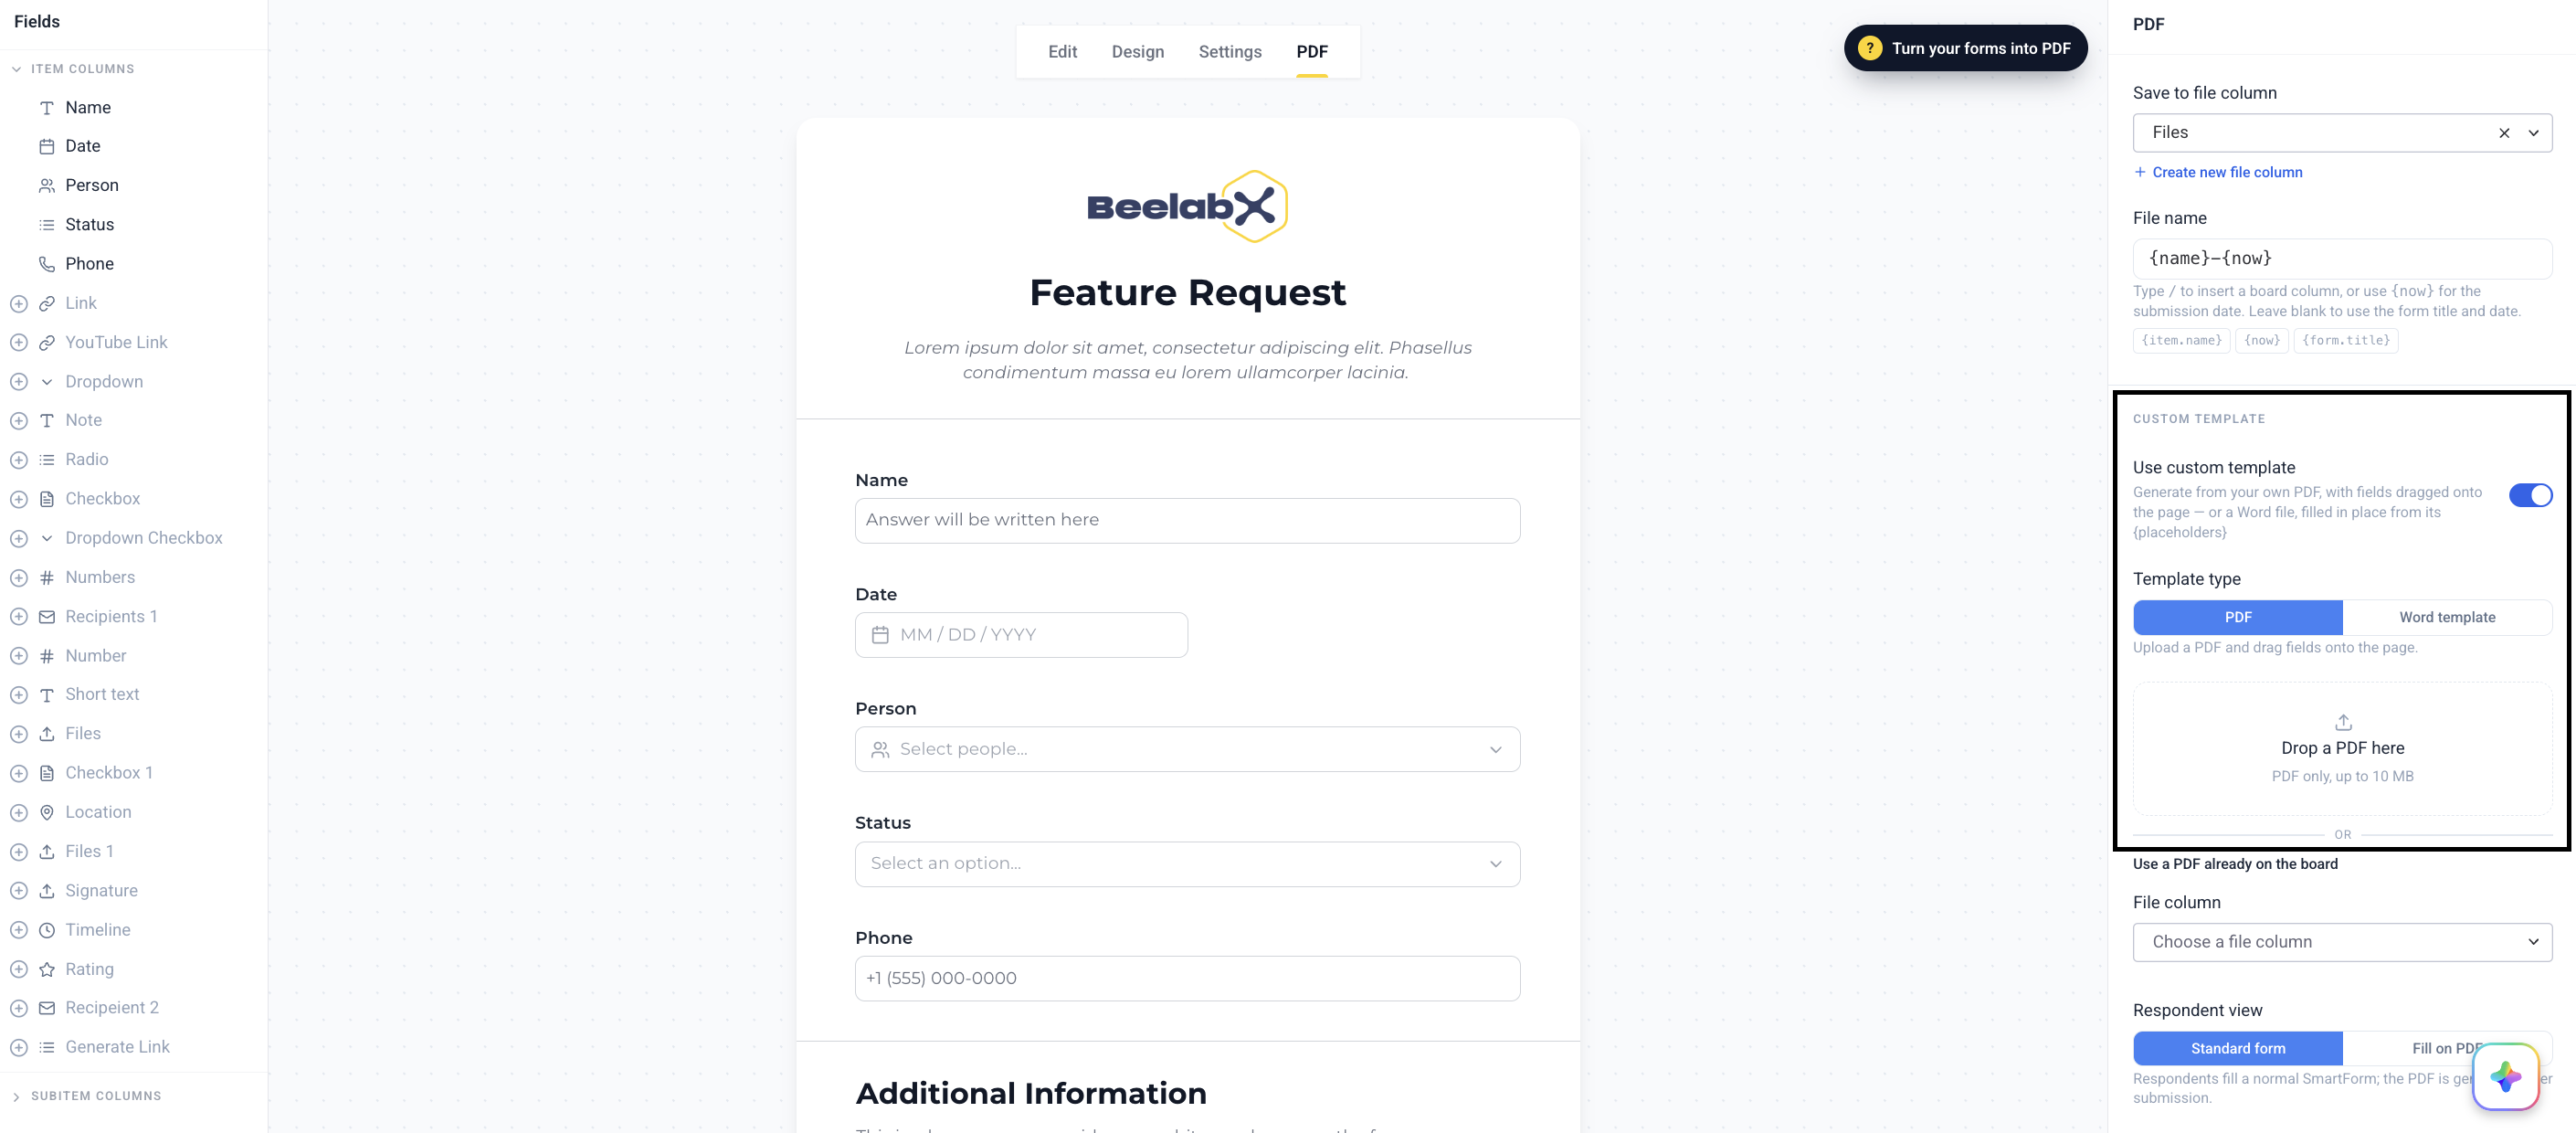
Turn On Custom Template
Switch on Use custom template in the right panel.
Keep Template Type on PDF
Under Template type, leave the segmented control on PDF.
Add Your Document
Drop a PDF onto the dropzone (or click it to browse). Alternatively, use Use a PDF already on the board to pull a PDF out of one of your board’s file columns.
Place Your Fields
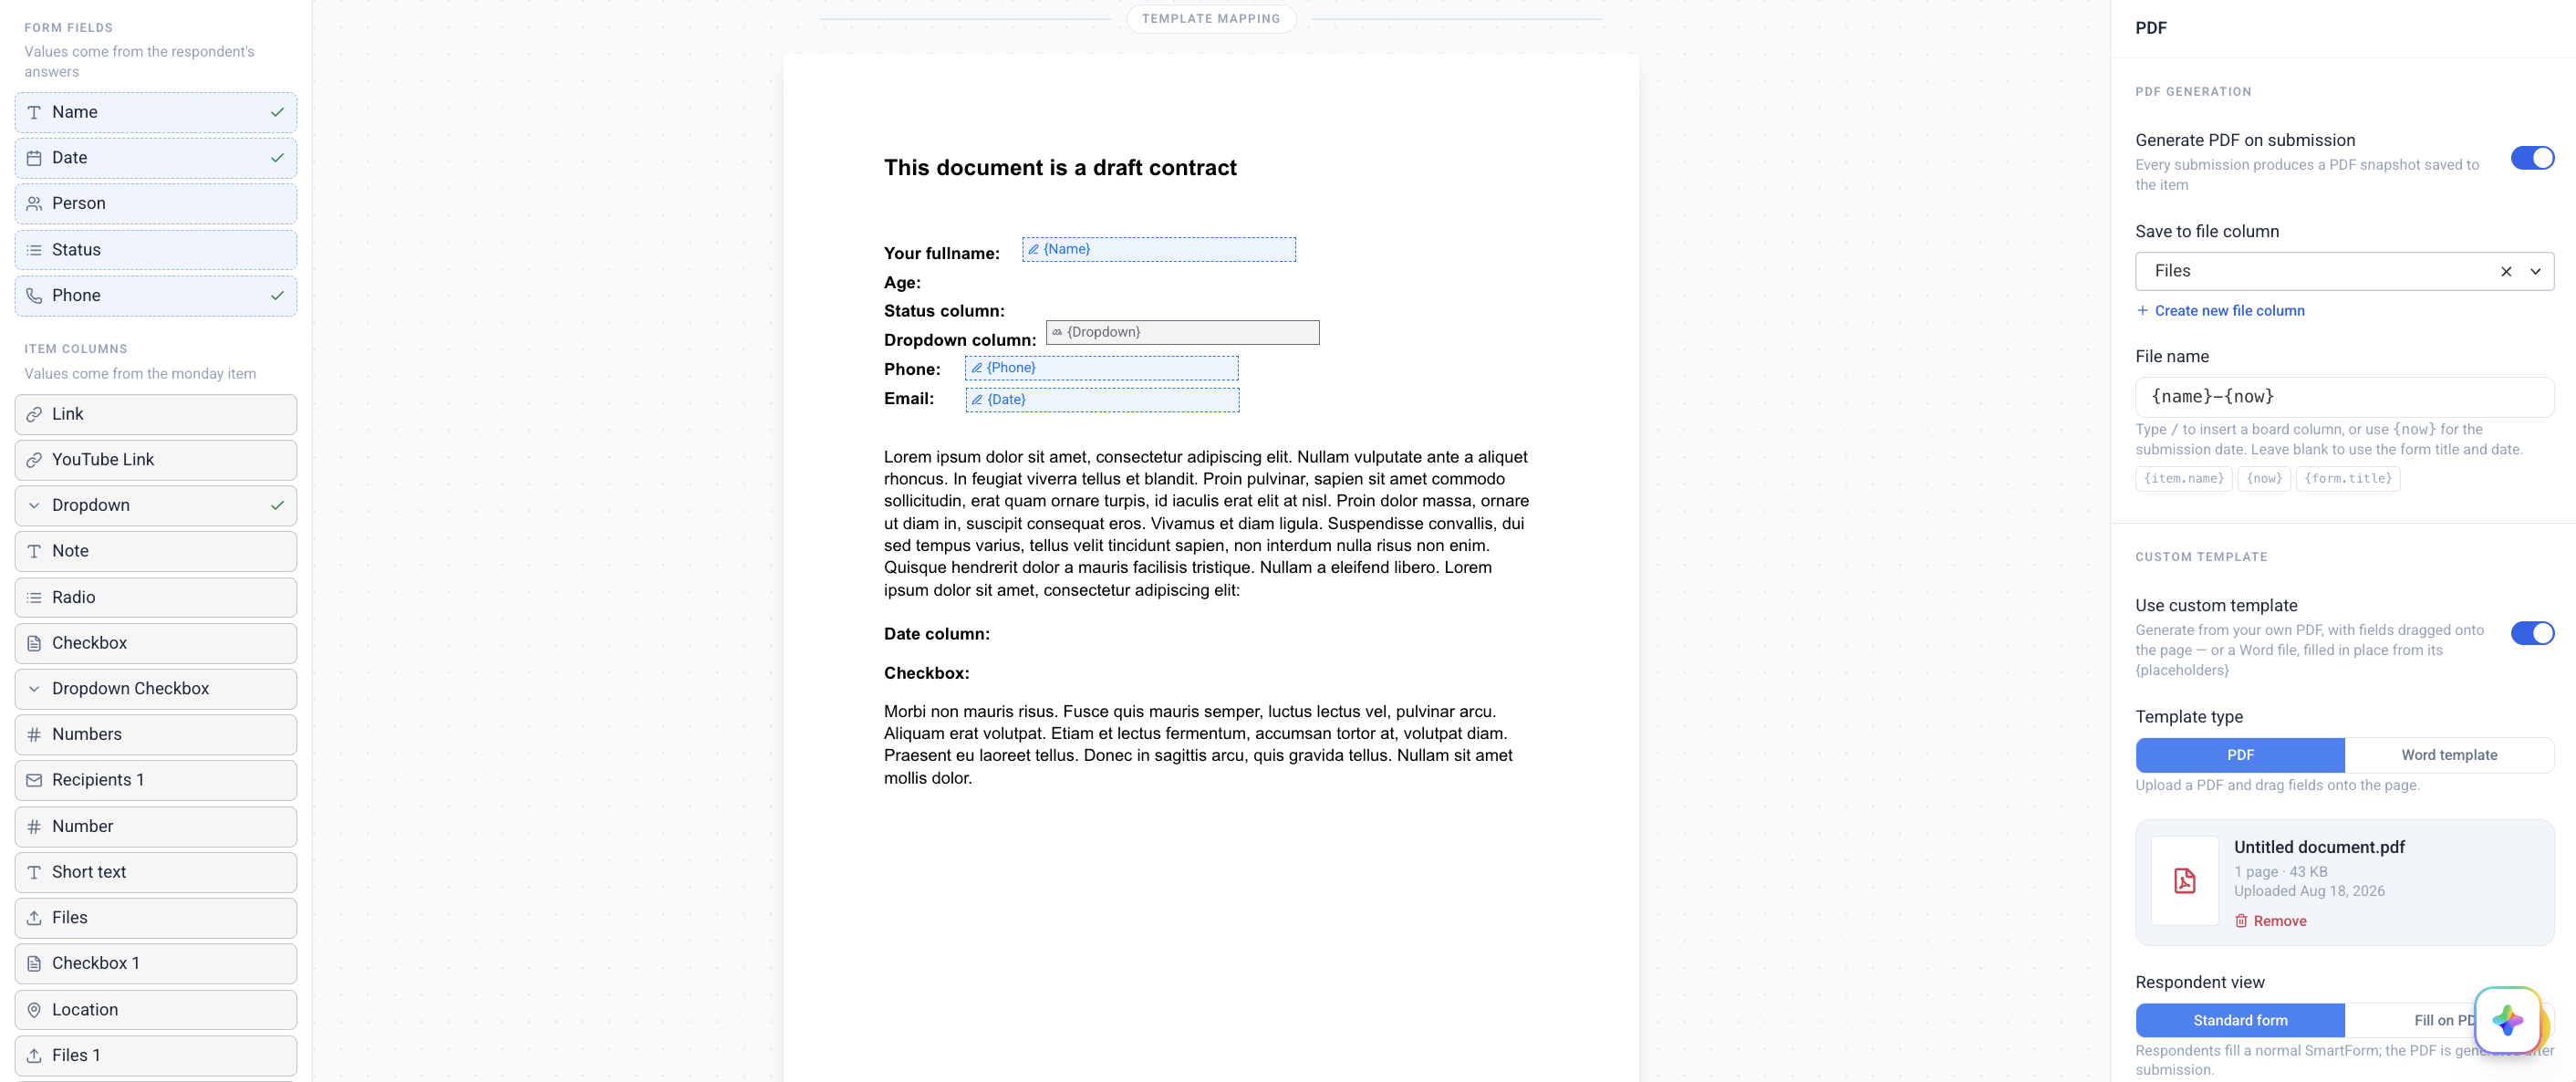
The left sidebar becomes a palette of fields. Drag a field onto the page — or click the field, then click the spot on the page.
Nudge It Onto the Line
Drag the box to move it, or drag the small square handle at its bottom-right corner to resize. Fine-tune the exact size in the right panel.
Repeat and Preview
A green tick appears next to every field that has been placed. Use the Page X of Y control at the bottom to move between pages.
Where the Value Comes From
The palette has two sections, and the section you drag from decides where the value comes from — permanently.
| Section | Value source | Look on the page |
|---|---|---|
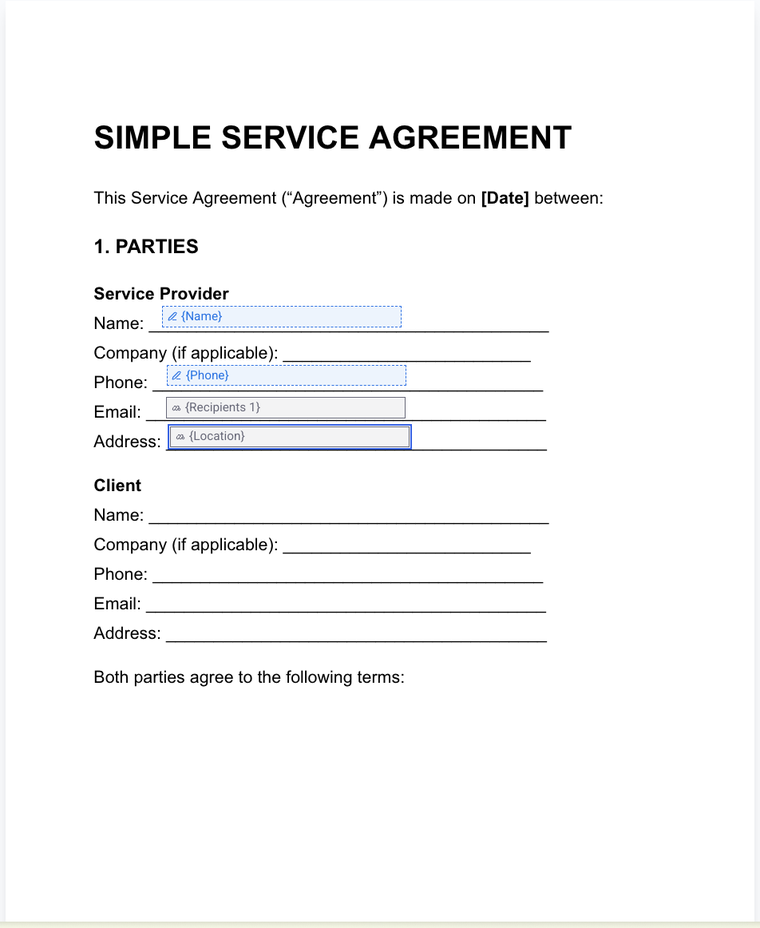
| Form fields | The respondent’s answer | Blue, dashed border |
| Item columns | The item’s current value on the board | Grey, solid border |
Columns Monday.com calculates — Mirror, Formula and Board Relation — always appear under Item columns, because a respondent can never fill them in.
To change where a box’s value comes from, remove the placement and drag the field again from the other section.
Box Settings
Click any placed box to open its settings on the right.
| Setting | Description |
|---|---|
| Value source | Read-only — decided by the palette section you dragged from |
| Width / Height | The box size in points. The hint tells you how many lines it fits, e.g. Fits 3 lines at 10pt |
| Font size | Between 4 and 72 pt |
| Alignment | Left, Center or Right |
| If the value is too long | Shrink to fit (reduce the font, down to 4 pt, to keep as much as possible — anything still too long is cut with an ellipsis) or Truncate (keep the size, cut with an ellipsis) |
| Remove this placement | Deletes the box |
Text always wraps — the height of the box decides how many lines it can use. The overflow setting only decides what happens once those lines are full.
Managing the Template
| Action | What it does |
|---|---|
| Remove | Deletes the template. The dropzone comes back so you can upload a new one |
| Re-sync | Only for templates imported from a board column — reads the PDF from that column again as a new version |
There is no Replace button. Swapping a document is remove, then drop the new one — one clear route instead of two that behave differently.
If you remove a field on the Edit tab after placing it, its box is flagged in red: “This field is no longer on the form, so nothing will be filled in here.” Remove the placement, or add the field back.
Respondent View — Standard Form or Fill on PDF
With a PDF template in place, a Respondent view control appears. It decides what the person filling in your form actually sees.
| Option | What respondents see |
|---|---|
| Standard form | A normal SmartForm. The PDF is generated after they submit |
| Fill on PDF | Your actual document, with typing boxes sitting exactly where you placed them |
What Fill on PDF Looks Like
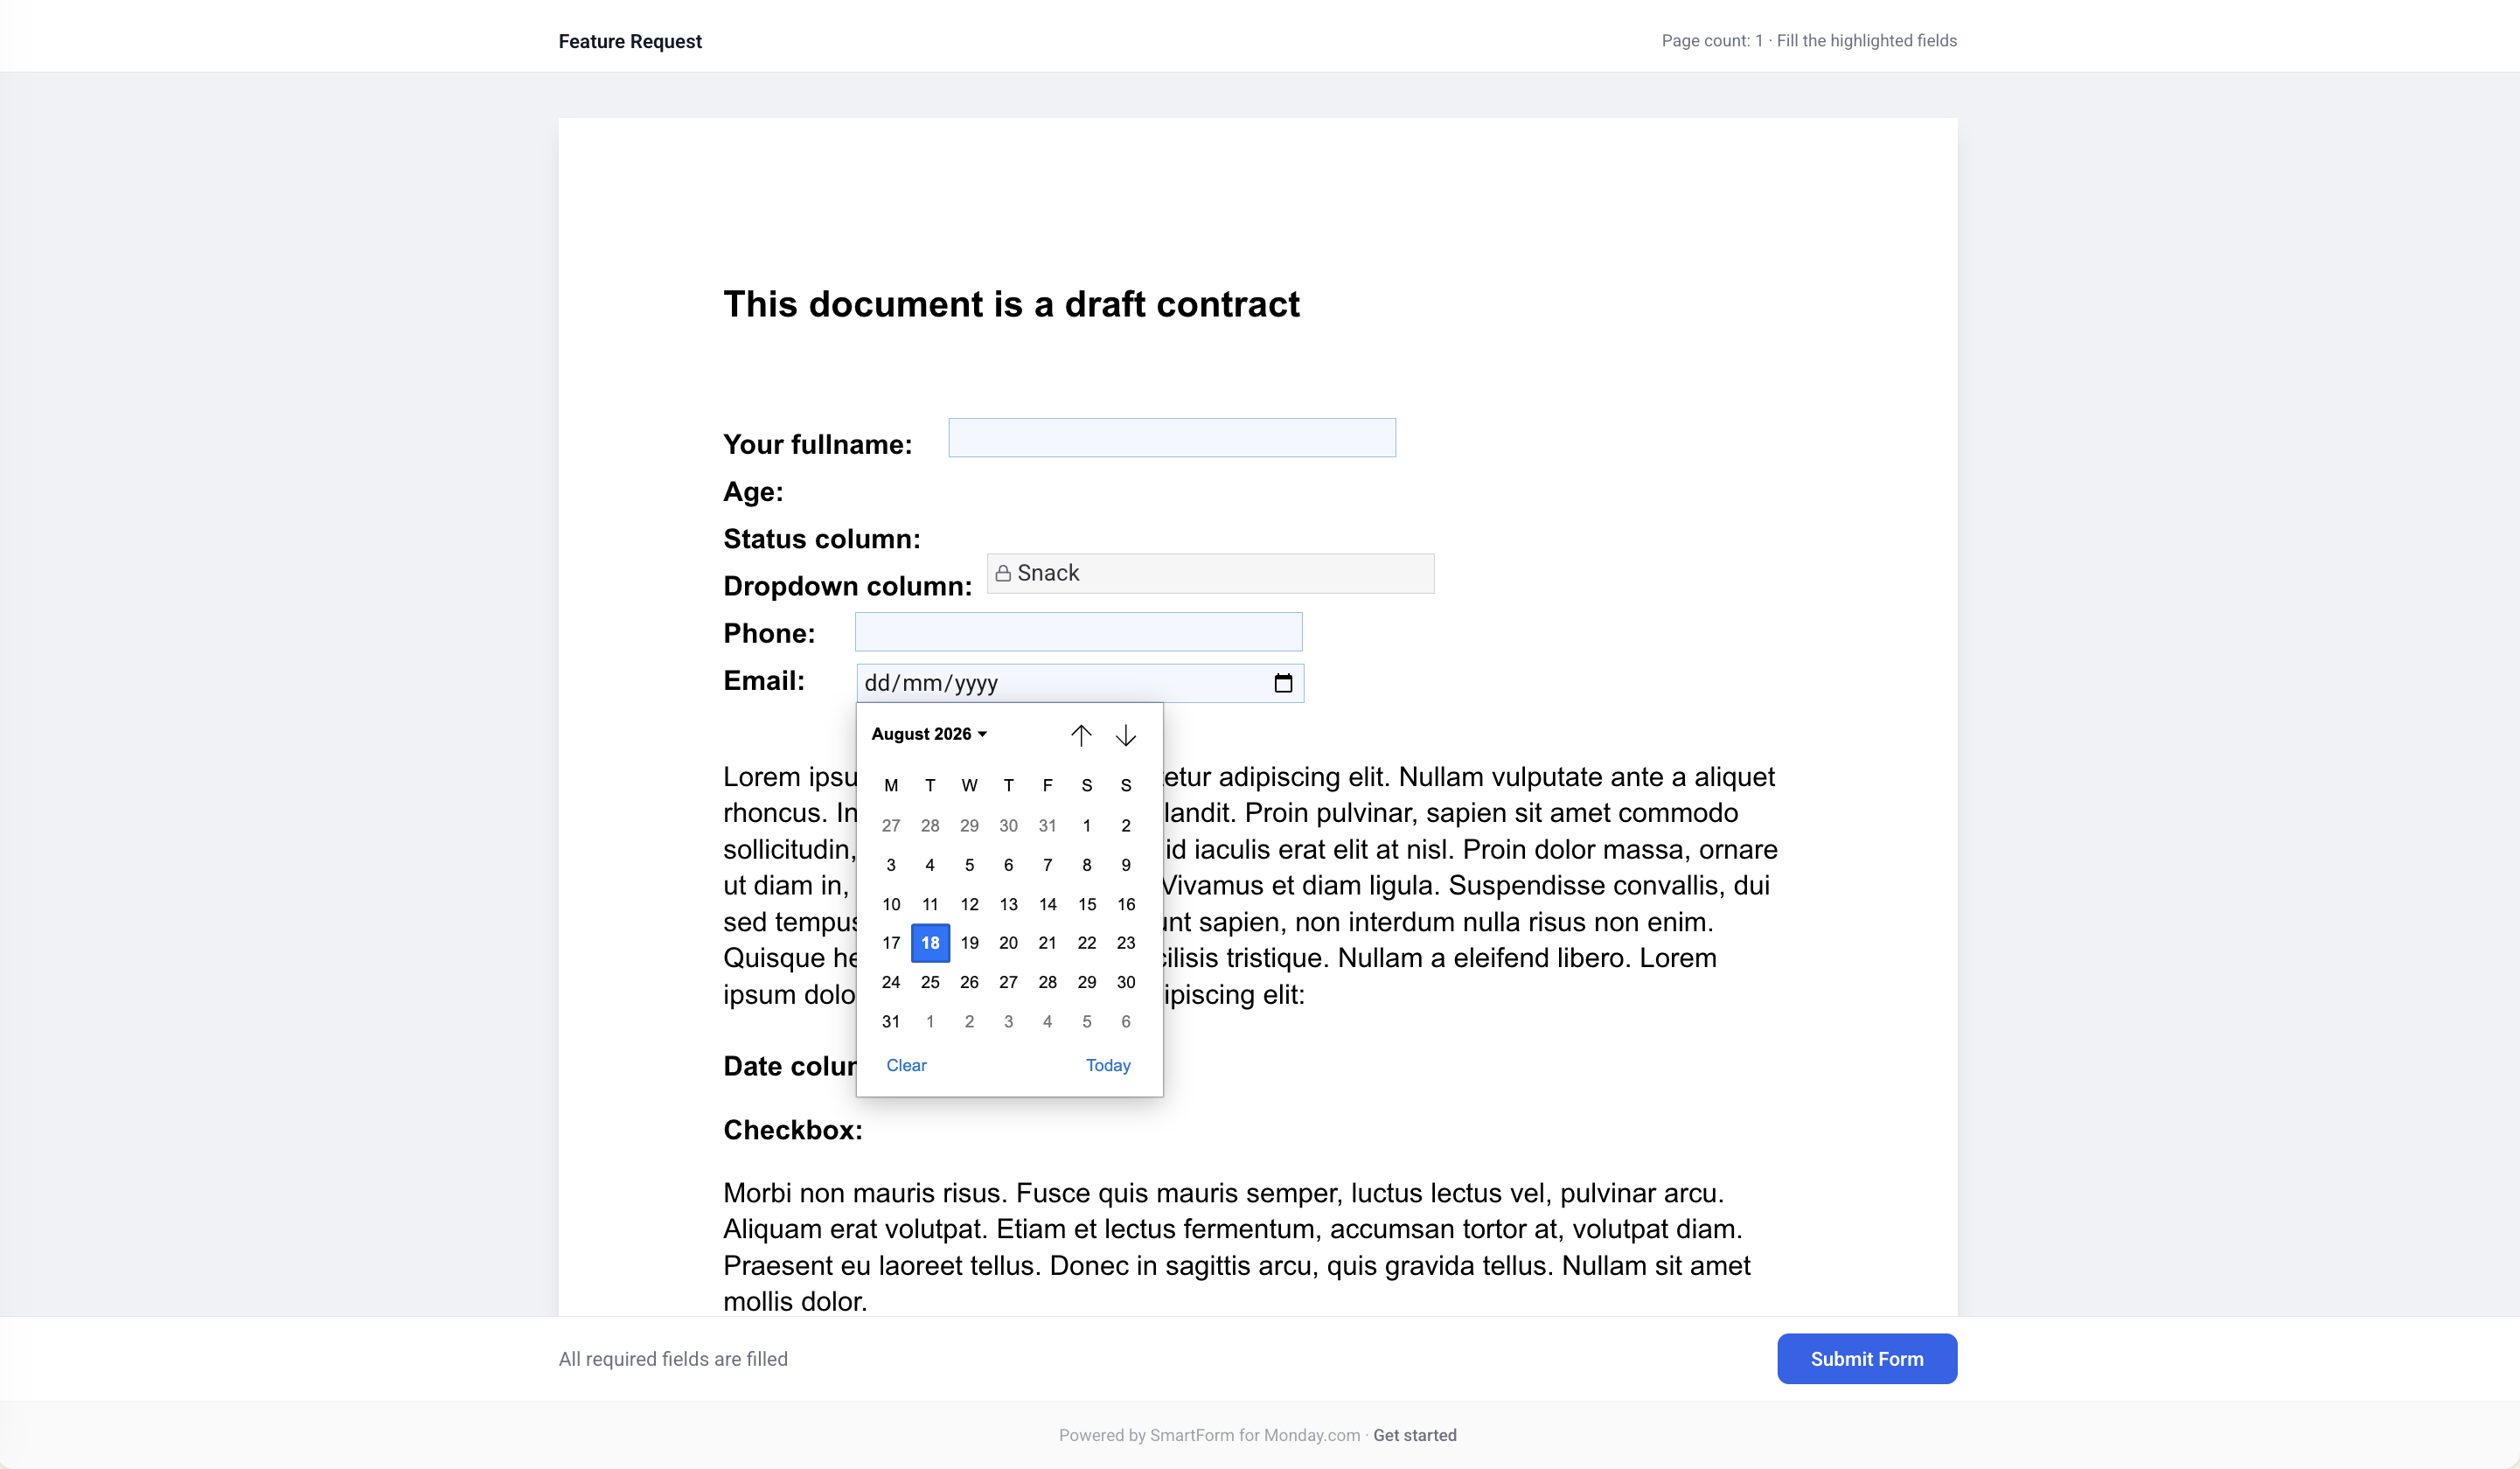
- The document is shown page by page, with input boxes on the lines you chose.
- Fields sourced from Item columns appear filled in and locked — Filled from the monday item.
- Signature boxes show a Sign here button that opens the signature pad.
- A bar at the bottom tracks progress: “2 required fields left” with a Jump to next link, changing to “All required fields are filled”.
Fill on PDF is desktop only. On a window narrower than 1024px — phones and small tablets — respondents automatically get the standard form instead, so nobody is ever locked out.
Fill on PDF is not available while your form uses conditional logic. A hidden field would leave an unexplained blank box on a fixed page.
Fields That Can’t Be Filled on a PDF
Almost every column type works. Two never will:
| Field | Why | What to do |
|---|---|---|
| File upload | A PDF page has nowhere to put an upload widget | Turn on Signature capture on the Edit tab if you wanted a signature, otherwise use Standard form |
| Mirror, Formula, Board Relation | Monday.com calculates these | Place them from Item columns instead |
The panel warns you about both situations while you’re setting up, and unfillable fields are dimmed with a “no entry” icon in the palette.
Level 2 — Word Template
Upload a .docx with {placeholders} where values belong. Your fonts, headers and page layout stay exactly as you built them, and SmartForm converts the finished document to PDF.
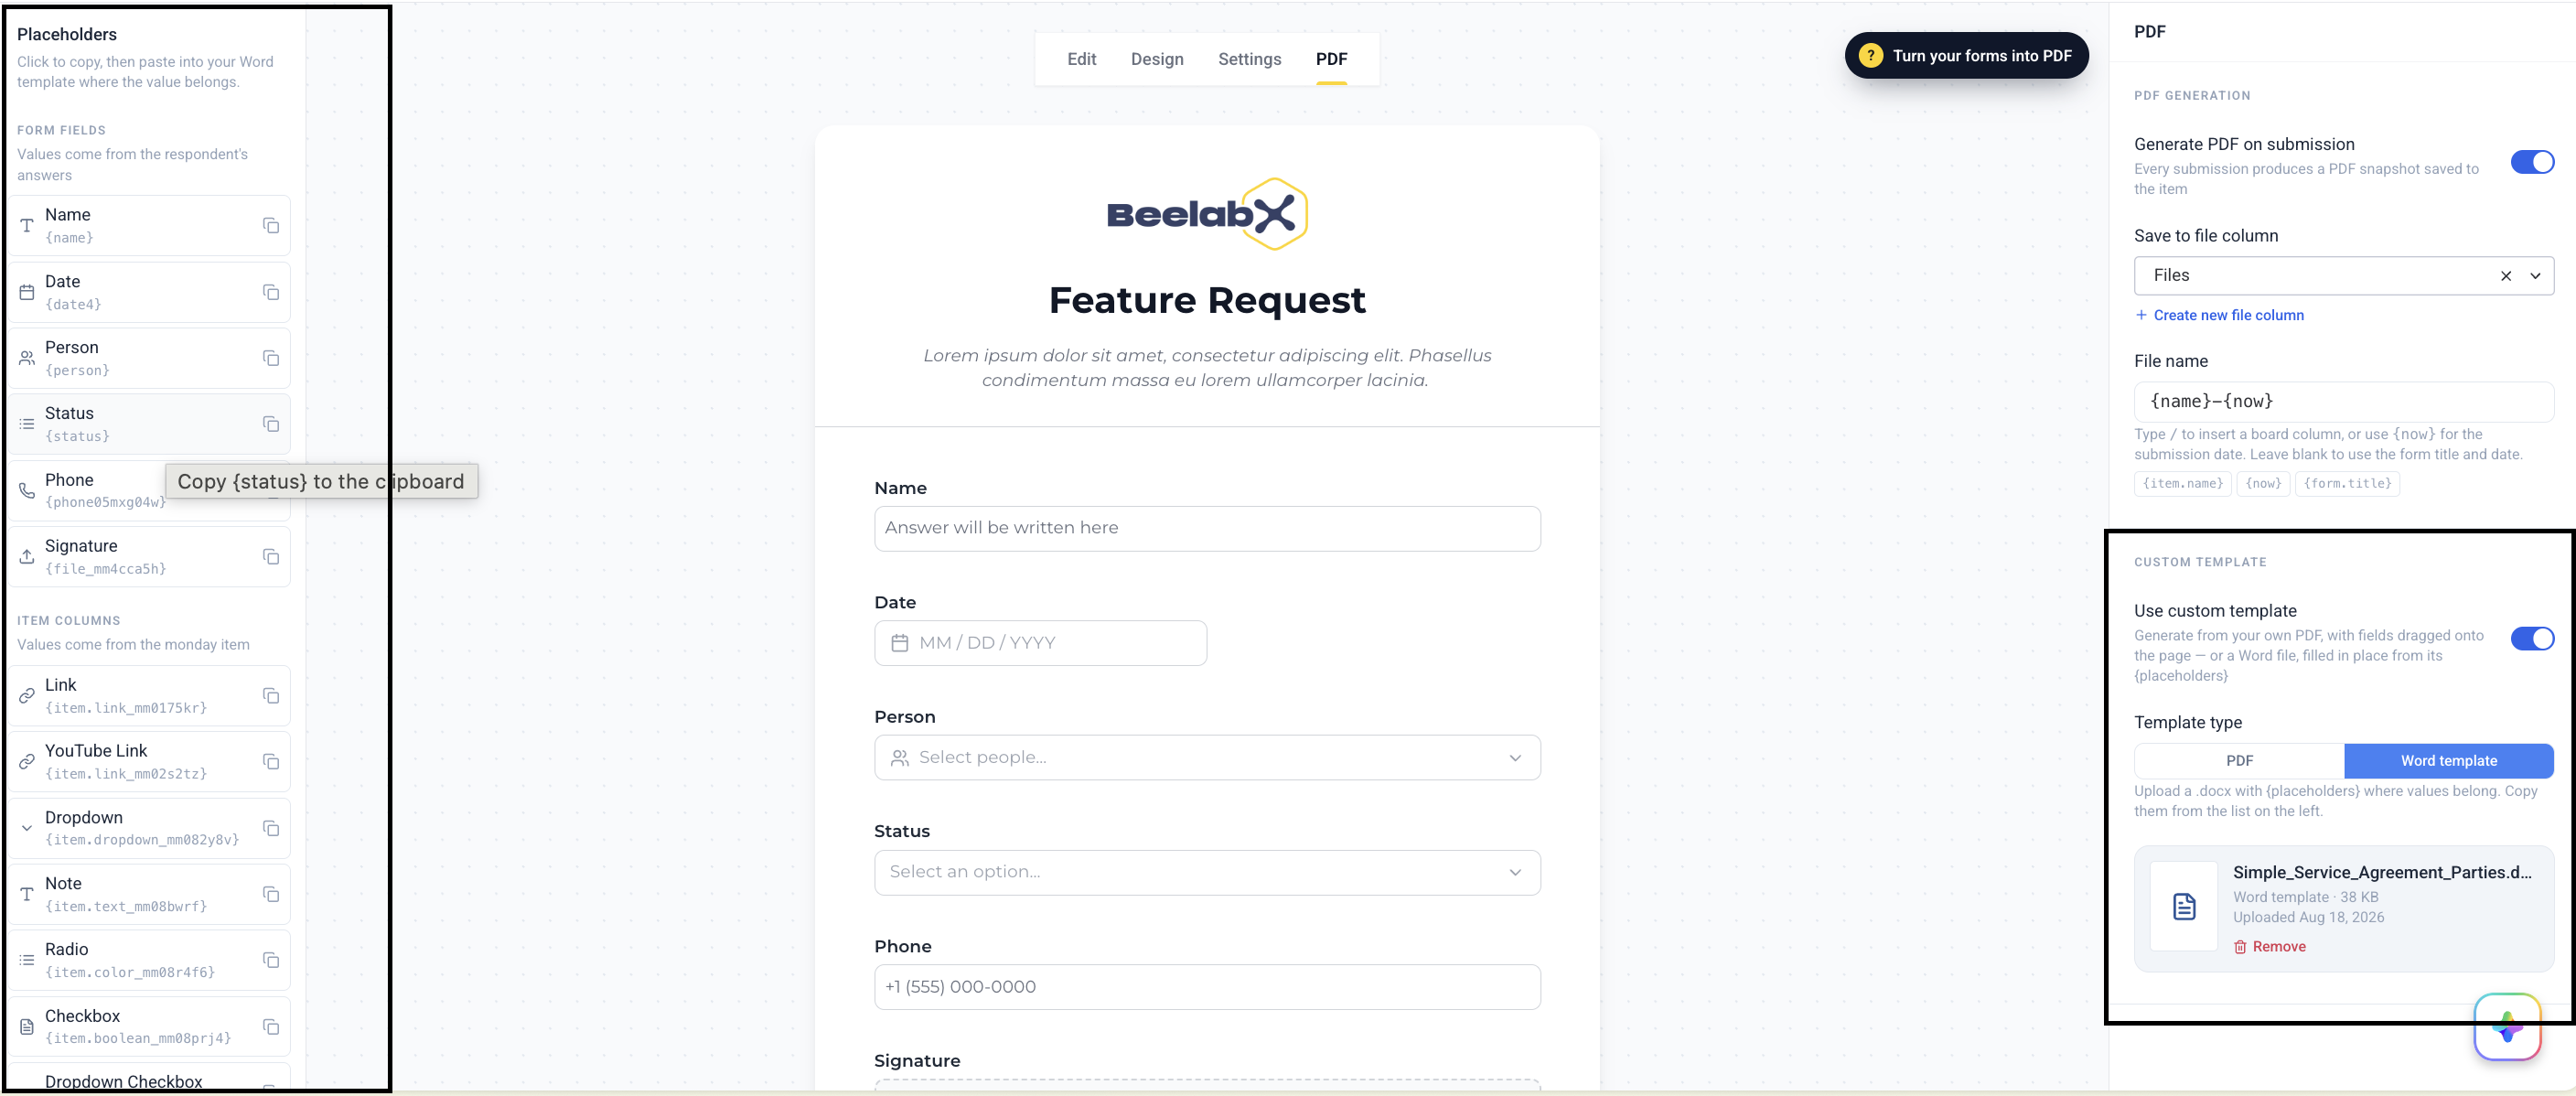
Switch the Template Type
Turn on Use custom template, then set Template type to Word template.
Copy the Column IDs You Need
The left sidebar becomes a Placeholders list. Click any row to copy its column ID to your clipboard.
Paste Them Into Word
Open your document in Word and paste each column ID where that value should appear. Save it as .docx.
Upload and Test
Drop the .docx onto the dropzone, then send a test submission to check the result.
The Placeholder Column IDs
| Section | Column ID | Value |
|---|---|---|
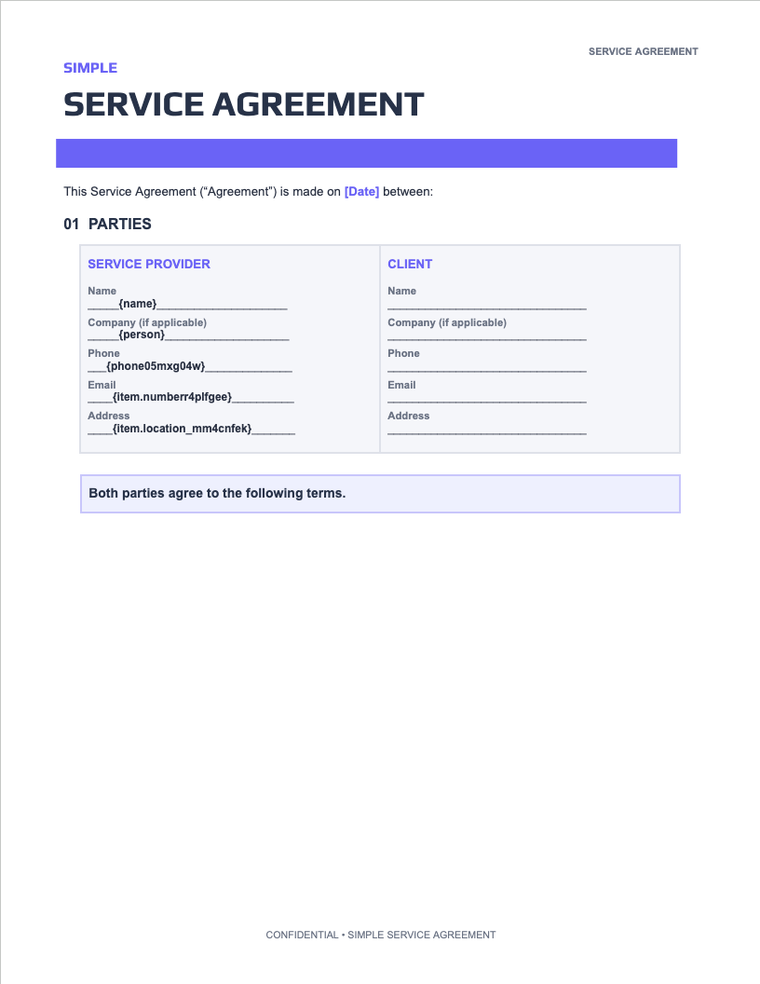
| Form fields | {column_id} | The respondent’s answer |
| Item columns | {item.column_id} | The item’s current value on the board |
| Built in | {item.name} | Item name |
| Built in | {form.title} | Form title |
| Built in | {now} | Submission date |
Signatures in Word
A drawn signature is an image, not text, so it works differently from every other column ID.
Insert a Placeholder Image
In Word, insert any image where the signature should appear, and size it to fit.
Copy the Marker
In the Signatures section of the sidebar, click the signature field to copy its marker — for example signature:file_mm3bsdwt.
Paste It Into the Alt Text
Right-click the image → Edit Alt Text, and paste the marker there.
The signature field’s ordinary {column_id} still works, but it prints the text Signed electronically — 2026-08-17, not the drawing. Use the Alt Text marker for the image itself.
With a Word template, respondents always fill the normal web form — a Word file cannot be filled in a browser, so the Respondent view control is hidden.
A placeholder that matches no field is left blank in the finished document — it is never printed as raw text. Check a test submission before sending your form out.
How Answers Are Printed
| Column type | Printed as |
|---|---|
| Status / Color | The label text, e.g. Done |
| Dropdown | Selected labels, comma-separated, e.g. Option A, Option B |
| Checkbox | Yes or No |
| Rating | 4 / 5 |
| Date | YYYY-MM-DD |
| Timeline | 2026-01-05 -> 2026-02-14 |
| People | Member names, comma-separated |
| Files | The file names — a PDF can’t contain the attachments themselves |
| Signature | The drawn signature, as an image. In a Word template this only happens via the Alt Text marker — the plain column ID prints Signed electronically — date |
| Empty | An em dash (—) in the built-in layout; blank in a custom template |
Good to Know
| Topic | Detail |
|---|---|
| Template size | Up to 10 MB, for both PDF and .docx |
| File types | .pdf for the PDF method, .docx for the Word method. Password-protected PDFs are not supported |
| Timing | Generation runs in the background. The respondent gets their success screen immediately; the PDF appears on the item a few seconds later |
| Every submission | Adds a new file to the column. Previous PDFs are kept |
| Board import | Use a PDF already on the board takes a one-time copy, not a live link. Use Re-sync to pull it again |
| Subitems | Included as a table in the built-in layout. They cannot be placed on a custom PDF template |
The Finished PDF, Side by Side
The same three answers, produced three different ways — so you can see what each level actually gets you before you spend any effort on it.
Level 0 — Built-in Layout
Your logo and form title, the submission date, then every question with its answer in form order, a subitems table, and a page footer. Nothing to design.
Level 1 — Your Own PDF
Your original document, untouched, with a box on each line where the answer will print — dashed blue for answers from the form, solid grey for values read off the item.
Level 2 — Word Template
Your fonts, headers and page layout exactly as built in Word, with a {column_id} on every line. On submission each column ID becomes a real answer and the file is converted to PDF.
Not sure which to pick? Start at Level 0 — most forms never need more. You can switch to a custom template at any time without losing anything.
Contact Support
Need help with PDF generation or other SmartForm features?
Need Assistance?
Our dedicated support team is ready to help you get the most out of SmartForm. Whether you have questions about setup, configuration, or advanced features, we’re here to assist.
Contact Support Team →